What's new
Pinball info

Register a free account today to become a member! Once signed in, you'll be able to participate on this site by adding your own topics and posts, as well as connect with other members through your own private inbox!

Revenge from Mars LCD fit and how to make sync adapter

newdos

Site Supporter
Joined
Jan 14, 2013
Messages
3,129
Location
Hartlepool
Alias
Newdos
Hi all,
I have spent hours looking everywhere for the diagrams to make a sync adapter for my RFM so I can fit an LCD screen. I have finally done it and got it working, so thought I would share it here.

I bought a cheap cga to vga converter off ebay first - shown in the pic. You will then need a vga monitor cable and a 74ls02 chip to convert the H&V sync to a combined sync. I used a Dell 19" LCD computer monitor I had lying around.

First job cut off one end of the VGA cable and strip back the wires. You will need to find the red, green, blue, horizontal sync wire(usually grey) and the vertical sync wire(usually white). All the ground wires can be twisted together. sleeve each of the wires with heatshrink.

Next solder the red, green, blue and ground wires to the respective pins on connector P3 on the board.

Now for the 74ls02 chip. You only need pins 1,2,3,7 and 14. Solder the Horiz sync wire(grey) to pin 2 the vert sync wire(white) to pin 3. Pin 1 is the combined sync ouput and a wire from pin 1 goes to the pin marked 'S' on connector P3. Add a wire to pin 7 for ground and a wire to pin 14 for +5v. This power can be got from within the p2k PC case. Don't forget the board also needs +5v power so just tee together the power leads then off to the pc case for your supply

That's it!!! plug in your new lead to the p2k PC monitor socket and put another lead between the vga socket on the adapter (P4) and your monitor and off you go. Mine worked first time so good luck!!!


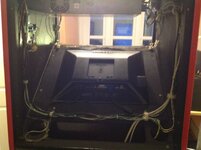
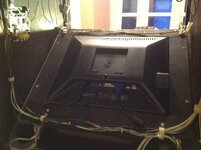
Will add more to this when I actually fit it into the RFM.

Feel free to ask any questions.

Kev
IMG_0914.JPG IMG_0915.JPG
 
I always like it when someone says "thats it" at the end of a quite in-depth description. It reminds me of the "Meaning of Life" sketch in the classroom with the description of where the boys need to put their coats. ;)

Great work. I want to own a RFM at some point and this was one of those tasks I wasn't sure if I could tackle.
Can you give us another shot of the 74ls02 chip, I assume it is in a socket?
Also can you give a link to the CGA to VGA converter that you used?
:)
 
Watch this space Kevlar and over the xmas hols I may be fully fitting the LCD to the RFM which I will document. Do you think there would be much demand for the wells gardener monitor if I sold it on ?

Cheers Kev
 
newdos,

Cant wait to see how you mount it in the cab..... That's always the bit that has eluded me.....
 
Watch this space Kevlar and over the xmas hols I may be fully fitting the LCD to the RFM which I will document. Do you think there would be much demand for the wells gardener monitor if I sold it on ?

Cheers Kev
I'm not sure but maybe more demand from arcade cab owners if not pin2k owners.
 
Well I said I would do it and I have finally got around to fitting a LCD monitor to my RFM, ably aided by my son Matt !!

I fitted a 19" dell monitor which has a supply range of 100-240volt, which is handy as the main supply in the RFM after the transformer is 110volts everywhere.
The pics have all uploaded in a weird order so I have put text next to each pic.

Feel free to ask any questions. I can tell you this looks amazing compared to the old CRT that has some convergence issues !!! I have 2 videos of the old crt and the new LCD - there is no comparison!!! I don't seem to be able to upload them to here so if any wants to see them let me know and I could stick them on you tube.

Cheers Kev (and Matt!!)


This pic below shows the cable mounts screwed back in place with all the cables nice and tidy, the CGA converter screwed to side of cab and the 110v power supply(the old green, white and black lead that powered the old CRT) spliced to the monitor power lead. This means the monitor power works through the main switch under the table as well as everything else.

IMG_0102.JPG


Pic here shows a quick rough test of everything to make sure all is working before final fix in place(note monitor was upside down at this point!!)

IMG_0100.JPG

The image below shows how much space is left when finished, without the old CRT in there. As shown by my son Matt round the back of the RFM !!! Only thing left to do now is get a couple of brackets made to mount the fluorescent to light the translate now.

IMG_0104.JPG


This image shows a pickup of a 5v supply for the cga to vga converter
IMG_0099.JPG


This shows the monitor fitted in the hole where the old wells gardner monitor came out off. the monitor fitted perfectly and sat in the recess that was already there. You can see I made a wood surrounds and sprayed it black (well my son did!!) before I screwed it into the case. This actually held the monitor in place very tight. We had to remove one of the wood pieces to turn the monitor through 180 degrees (as the image was upside down at first) as it was that tight we couldn't get it out!!

IMG_0098.JPG
 

Attachments

  • IMG_0103.JPG
    IMG_0103.JPG
    106.9 KB · Views: 20
  • IMG_0102.JPG
    IMG_0102.JPG
    119 KB · Views: 18
Also forgot to say I have the old monitor if anyone interested but you will have to collect.
 
Really interesting - Will have to take another look at converting mine. Would be interesting to see before/after pics of the screen.

I suspect that one of the major differences will be because the CRT expects 4v instead of the 1v VGA output that is sent out of the Pc. I did the Ultimarc upgrade as mentioned in the Pin2K guide and the picture was 100% better....

Increasing Monitor Contrast (Getting a Better Picture.)
(Thanks to Mickey Johnson for this info.) For the best combining effect in Pinball 2000
games, you need the monitor to have a very brilliant monitor display, but not
overbright (in that it has poor black level). What it amounts to, you need the graphics
extremely high contrast.
On many games, the original Ducksan or Wells Gardner monitor had decent color, good
focus, no screen burn, but did not have high contrast. To get the colors to look bright
enough, the constrast needs to be turned up on the monitor. Unfortunately the
downside is the blacks would look grey. The problem is, this really kills the effect on a
RFM, as the black needs to be black, and not bleed through to gray. When the
graphics appear, you want them to kill what is behind the image. You want the virtual
targets to be vibrant and clear so you can see all the detail. And the inverse is true
also, when the target disappears, you want the area to be completely black so that
you don't see the monitor reflection. You want to see the playfield.
The Monitor Amplifier which can be used in Pinball 2000 games.
Now you can do a cap kit, replace the monitor, or have the tube rejuved, but this
most likely will not fix the problem. The problem actually is in the computer. I learned
this from years of doing Mame videogame projects where I would be interfacing
computers to arcade monitors. The problem stems from the fact that the video output
of the computer is too low for the arcade monitor (the two devices were actually
never meant to be used together). It would be like having way too low of a pre-amp
audio output and when amplified you end up with a poor quality sound. There is an
easy fix to this problem, using a Monitor Amplifier (scroll down this page a bit). This is
a standalone video amplifier converts the 1 Volt output from a VGA card into 4 Volts
required by most arcade monitors. The amplifer contains four channels,
Red,Green,Blue and Sync. The Sync is a buffer rather than an analog amplifier, and
this is to avoid the "fold-over" at the top of the picture on some monitors that are
sensisive to DC input levels.
To implement the monitor amplifier, the original cable will need to be modified using a
short jumper that goes from the amplifier to your monitor input. This will have a
drastic improvement on the contrast. I went from a washed out picture to a vibrant
one. I could see detail that I never saw before. Also the explosion graphics really get
punched up by this mod (since they are mostly white/yellow). I was also able to lower
the brightness and contrast (that were previously maxxed) on the monitor controls
and had a wide range to adjust from.
Note there are two different models of the amplifer. The new version is powered by
VGA output, and the old version requires connecting to the amplifier's 5 volts to the
power supply drive connector of the pin2k computer. The problem is that not all VGA
card outputs have that 5 volt line. My RFM did, and my SWEP1 did not. Now, if you
have the new style amplifier and don't have the 5 volts on the VGA output, you will
not get a picture (because the amplifier is not being powered). There is a easy fix to
this, you have to solder a wire to the new amplifier pcb (its documented at the
amplifiers website), and run it to the 5 volt power supply drive connector (which is
what I did for my SWEP1). Note this entire issue is documented at
http://www.ultimarc.com
Now as far as the results of adding the amplifier to the SWEP1. Wow, what a
difference. I thought the picture was good before, but now I see so many small
details in the picture that I never saw before. My machine now has a very good black
background (I have always been picky about black levels on TVs), and the graphics
just pop up bright and vibrant. Even the stars in the background are bright as can be,
lit against the deep black background.

By changing to a monitor, the 1v that is being supplied on the VGA line will be expected at 1V on the monitor..... Therefore no issues and a bright picture :)
 
Paul,
Difference is stunning I have had to turn the default contrast and brilliance down and it still looks miles better send me a pm ane I will email you the vids

Cheers Kev
 
Ok here goes the CRT video first then the LCD one


Let me know if they look ok and you can see the difference!!

Cheers Kev
 
Paul - I can see why the vids look different directly on you tube - go there and take another look - especially at the free play wording
 
I can kinda see, however it just looks like Focus (which is a pot onthe rear). However you are the one stood in front of it, and can obviously see the difference, so thats great news :)
 
I can kinda see, however it just looks like Focus (which is a pot onthe rear). However you are the one stood in front of it, and can obviously see the difference, so thats great news :)
Hi Paul,
No its not focus, it's convergence - ie. if you put the rfm convergence test up on the screen - where you should get a white dot or line, you get red green and blue lines and dots. Adjusting that is a major pain, and apart from that I just don't like crts - heavy, dirty and lots of high voltage knocking about!!!!

Kev
 
That looks great mate much better than before, how much do you want for the old CRT I might be up in Carlisle shortly so could easily pop over
 
Good work. Might I suggest for future installations, you get a short IEC extension and pick up the 110v from the auxiliary output of the computer power supply. Saves splicing a cable in.
 
Good work. Might I suggest for future installations, you get a short IEC extension and pick up the 110v from the auxiliary output of the computer power supply. Saves splicing a cable in.
Thanks Andy I would of done that but my atx supply doesn't have one on so no choice!!

Cheers Kev
 
Can you keep it for 2 weeks ? Will order 2 scoops and post you one up or can bring with me if you wish

Thanks

David
Hi David,
That's fine no probs at all, just bring the plastic with you and we can do a straight swap. PM me nearer the time and I will give you my address.

Cheers Kev
 
IMG_0972.JPG Job now fininshed guys. Finally got some brackets made to support the fluorescent as can be seen in the pics below. The last shot shows the finished job!!!!

IMG_0971.JPG
 
Do you find that the graphics, especially the martians, are quite blocky on the LCD?
 
Back
Top Bottom