What's new
Pinball info

Register a free account today to become a member! Once signed in, you'll be able to participate on this site by adding your own topics and posts, as well as connect with other members through your own private inbox!

Playfield swap. How do YOU do it?

Alan Syson

Site Supporter
Joined
Jul 21, 2011
Messages
445
FT cab sorted, time to move onto the playfield.
Been swotting up, threads here & pinside plus vids.
Uncertain how to approach this task, whether to strip everything off the old PF, taking loads of pics, cleaning up/replacing bits then transferring over.
Did notice on one of @Pick Holder threads having both PFs side by side and transferring parts over as you take them off.
TBH I find this approach very appealing.
Any hint/tips/guidance gratefully received,
Alan
Hi Alan,

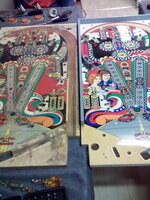
I have the playfields side-by-side. I'm photographing the playfield, removing a bit, cleaning it up, putting it in a labelled bag if it can't go straight back on, and putting it onto the other playfield if I can. I'm too afraid to do it any other way for fear of ending up with a random jigsaw puzzle of thousands of bits I can't put back together.
 
I would 100% recommend having both playfields side by side, also use clear sticky back plastic, mark out screw holes and transfer them across to the new one.
Also handy to have an iPad or something with a larger screen than a phone to refer back to pictures as your going.
Painters tape to mark up any wires you unsolder, the harness does hold its position but better to be sure.

I found the pop bumpers the hardest part, there's a lot of stuff to fit into a small area, and with exposed earth braids easy to get short, I would buy new earth braid and bulb holders so you can keep the old ones in place to use as a map.
 
How ever many pics you take - TAKE MORE. From every conceivable angle, for each and every part you remove. Even take videos so you can see where the bits are. You will never regret taking too many pics, but...
It's not as if it's a chore nowadays to take pics.

Split the playfield in to sections, and all the pieces you remove from one section, put in a separate tub/bag - that way you're not searching through every screw or bolt you've taken off for the specific part you need - also less likely to forget to fit a piece.

Slow and steady wins the day.
 
FT cab sorted, time to move onto the playfield.
Been swotting up, threads here & pinside plus vids.
Uncertain how to approach this task, whether to strip everything off the old PF, taking loads of pics, cleaning up/replacing bits then transferring over.
Did notice on one of @Pick Holder threads having both PFs side by side and transferring parts over as you take them off.
TBH I find this approach very appealing.
Any hint/tips/guidance gratefully received,
Alan

Get the right tools first would be my advice.

If you want to see a playfield swap done right I would recommend following @Ant-H 's Addams Family thread for a recent example. Have a read through for tips and advice.

You can find it here:


You'll need the following:

A lot of space:

Ideally an area where you can work unhindered and free of children/animals! :D

Ultrasonic bath:
This will be used for the plastics and Initial cleaning of parts. Also the harness if you're feeling brave.

Tumbler:
Used to bring back the shine on your metals (posts, mechs, flaps, wire gates etc.

Autosol/Metal Polish:
Used in conjuction with the Tumbler

Pinball Rotissorie/Tipper:
I've done 5 playfield swaps now with saw benches but its a royal pain in the ass. Its very difficult to install large mechs with a saw bench as there isn't normally enough clearance. Invest in the rottissorie, either build one or buy one.

Buy stock of parts:
Get a stock of star posts, metal posts, T-nuts, screws and Rubbers sorted. There's nothing worse than realising something has snapped or is missing and then buying stock and awaiting its arrival stopping you midflow.

Drill bits:
Get some imperial bits if you can, metric is OK but its never going to be exact and you'll often find with playfield swaps, holes either are missing entirely or aren't big enough to host posts. I've had this with every brand of playfield (Mirco, CPR, IPB).

Prep the playfield first:

My advice would be to burr out the clear around your post holes, pop bumper bolts and topside T-NUTs prior to any assembly, this will reduce the risk of cracking the clear. Some playfields come with some of the clear removed but often its just not enough and you could up cracking the clear on installing wire forms, bolts or posts.

Document everything:

Take multiple pictures, top down, side on etc. You've removed a layer? Take a picture. You've removed a post, take a picture of the type of post it is.
Bag everything, you can do this by sections on the playfield or by specific parts/mechs whatever level of detail you think is adaquate.
Take a video also you can run this back for any pictures you'll miss (you'll miss some, trust me).

Don't cheap out:

Replace ramps if they look scruffy, replace pop bumpers yokes and assemblies (they often are weak from decades of abuse), replace targets. If you're doing a swap, look to replace every perishable part. These should be scrutinised for there look and condition.
Replace star posts and pop bumper bodies/caps.

Elements you'll find the most stressful:

Installing wire guides, without a doubt this is the most stressful for me. Doing these without chipping the artwork or clear especially when they are flush is an artform.
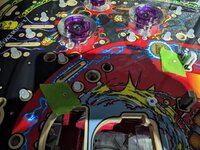
My advice would be to use Green Duct tape over area's you are going to burr out with a bit to avoid slipping and damaging the surrounding area.
Keep the tape in place when installing the wire forms for the same reasons.
PXL_20230221_204615063.jpg.


PXL_20230221_221351545.jpg

PXL_20230221_221346205.jpg


Final bit of advice, don't underestimate the task, its going to take a lot of time, especially your first.

I could go on here but maybe I'll make a guide post instead..
 
Last edited:
If it's a straight swap then I rarely take pictures (takes too long), if there's a delay (eg not he same weekend or things have to be put away) then pictures are a must.

IMG_20181104_175610.jpg
 
I have done 2 playfield swaps on old ballys (space invaders and centaur),one thing I did was draw a pencil line where the earth braid wen't around the playfield,this was a tip I had recommended to me by someone on pinside and it made life a lot easier when reassembly commenced
 
⬆️ you used the same earth braid(?)!😳
Don’t overthink it. Just crack on , if it’s not identical to what it was, and it all works………. Job done ✅ don’t get the playfield next to each other idea. We have one at the workshop and one at my mum’s house 😆(like what else….) just jesting… this was me during my first p/f swap, lost count of how many now….. don’t rush it. Enjoy it👊🏼Keef……97548105-68DE-41E2-B847-771C4036BE73.gif
 
I call it earth braid,but I actually meant just the thin stuff that runs to the lamp sockets,not the chunky stuff that goes up to the backbox ect,my bad
 
Get the right tools first would be my advice.

If you want to see a playfield swap done right I would recommend following @Ant-H 's Addams Family thread for a recent example. Have a read through for tips and advice.

I have 95% of the tools required, need a stapler and a few other bits and pieces.
It’s a job I’ve always put off, I’ve always liked FT but the cab and PF let it down.
Took the plunge after telling myself I’ve done everything associated with a swap, removed/replaced mechs/plastics etc, just not all at once. Only thing I hadn’t done is a cab refurb and that went OK (apart from the coin door incident).
I am an @Ant-H disciple
 
Ive done several now..... my $0.02

1. Loads of pics... Every Mech, multiple times. every connector. We are in the days of digital cameras - Pics are free.
2. See #1 above
3. See @s000m 's entry above... that about covers it.
4. Dont forget to clean the loom. Cilit Bang foam spray in a bath works, and then a swill with the shower.. and leave for a good few days very minimum to dry

you NEED the manual... or a copy of at some point, so make sure you start with it.

Last point - and people i'm sure will disagree - You dont need to bag everything, then number everything. as long as you have taken lots of pics.
 
Hi Alan,

I have the playfields side-by-side. I'm photographing the playfield, removing a bit, cleaning it up, putting it in a labelled bag if it can't go straight back on, and putting it onto the other playfield if I can. I'm too afraid to do it any other way for fear of ending up with a random jigsaw puzzle of thousands of bits I can't put back together.
This is exactly how I do it when restoring my classic car, so satisfying finding a bag with a label of exactly what nut blot washer it is for 😃
 
I find when it comes to playfield swaps, there are a load of different ways you can approach it. Id say do what your are comfortable with.

But as many have already said above, photo, photos, and more photos would be my advice.

If you swap over the parts directly from one playfield to the other then most parts/fittings will transfer straight across.
However if you plan on cleaning, restoring or replacing any parts in between and that will be off both PF’s for a while, I’d label stuff up so you know exactly what’s what.

There’s nothing worse than removing something for a few days to restore for example and then coming back to see a pile of bolts and screws and thinking, oh ****, what goes with that 🤔.

What ever method you choose to go with, just take your time and enjoy the whole process 👍🏻
 
Last edited:
4. Dont forget to clean the loom. Cilit Bang foam spray in a bath works, and then a swill with the shower.. and leave for a good few days very minimum to dry

Was thinking of swerving this bit Paul but on reflection...
Don't the labels, I was going to do all the connectors etc, come off/become illegible when washed?
 
My advice would be to burr out the clear around your post holes, pop bumper bolts and topside T-NUTs prior to any assembly, this will reduce the risk of cracking the clear.

Been thinking about this. I have a Dremmel but I'm worried it might be a bit cumbersome for such a delicate task, my hands don't work too well as they're riddled with arthritis. What do you use?
 
Been thinking about this. I have a Dremmel but I'm worried it might be a bit cumbersome for such a delicate task, my hands don't work too well as they're riddled with arthritis. What do you use?
Dremel is fine on slow RPM with Diamond burr bits:

I used a normal drill bit before on my first machine swap and got lucky, normal bits will bite into the wood and you'll be lucky if you don't rip off the artwork with it.

I use the egg shaped bit for best results in getting the clear down safely.

You can go one stop more and buy the Kruzman clear kit.
 
Was thinking of swerving this bit Paul but on reflection...
Don't the labels, I was going to do all the connectors etc, come off/become illegible when washed?
Use a label maker. They have a plastic film. Pretty resistant. You can go old school and use wipes to clean up the loom but your hands will come out blacker than a chimney sweep.
 
Also I forgot to say the worst thing is when holes are missing on the top side and you need to align things. I had to do this with Fish Tales. I was missing the post holes that go above the in/out lanes. I told Mirco that he's missed them. Got no response....

Best thing to do there is get tracing paper and mark out area's like other nearby holes for triangulation. Then make a divet with a small punch tool for the area. Burr out the clear, then drill out a hole first with a small bit (pilot hole) and widen gradually. Re-burr when neccessary to avoid chipping. Sodding nightmare. Before anyone says, I had worse with CPR. Had a total of 7 missing holes on the top side to drill out.
 
DIshwasher at low temp is your friend for cleaning the bigger stuff, careful with plastics, they may bend if getting too hot. Zinced stuff may react with the detergent, test.
I strip the top in the machine, put the new playfield on sawhorses, old on top, unscrew everything, pull the old one out and stuff is roughly in the right location for screwing down. Back in the machine and assemble top.
It gets difficult if the playfield has to go away for refurb and everything sits in a box in a corner. Did anyone say take lots of photos?
 
I was 70 when I did my one and only swap. I found a bottle of drink eased the pain somewhat. I had vodka and I also made promises to God I knew I couldn’t keep. Never again 🤦🏻‍♂️
 
What ever method you choose to go with, just take your time and enjoy the whole process 👍🏻

This is great advice, don't treat it like a chore, radio on, plenty of Tea, if its starting to annoy you walk away and come back tomorrow.

Once you start on the topside and see an old 90s game starting to look factory fresh its really exciting.
 
Last edited:
Back
Top Bottom