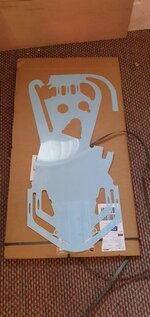
What's new

In Progress HERE COMES THE RUSH - Diner

I figured we'd do a thread for Claire's holy grail DINER

Mainly to get advice and feedback as well as track progress.

Until now all my pins have arrived working and just needed cleaning, or parts replacing or tweaking here and there so they play to my high standards šŸ¤£

Diner arrived DEAD. We knew it had a board issue but this is Claires grail and we knew it could be either fixed or replaced.
The board had battery damage at some point but has had nvram installed.
My eyes couldn't see anything wrong but it's definitely borked so the board has been sent to Jim @myPinballs to work his magic.

In the meantime I'm trying to assess what needs doing on the areas I'm more comfortable with, the playfield and mechs.

The playfield has had the mylar removed and in general is in good condition.
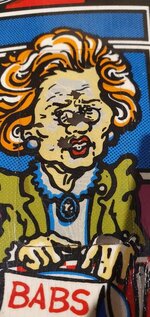
The main issues are a few of the customers had art missing from their faces and clothing.
20220307_170441.jpg
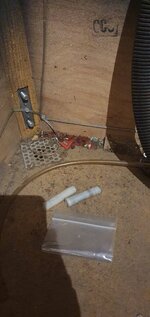
In the cabinet was a collection of decals/overlays. I considered using them but noticed the scale was slightly off.
So I thought I'd cut out the bits needed thinking the scale might not be as noticable in smaller sections.

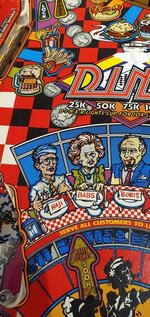
So Haji's & Babs' heads were cut out from the decal and I thought F it lets try It.
I thought this might be a huge mistake as if I screw it up or it looks bad I can't remove them without removing even more art.
20220308_135217.jpg
I'm quite pleased with the result. It's hardly noticeable except Babs' double chin? I suppose that could be touched up to be less obvious?

Maybe it was a mistake? Let me know... But it's too late.

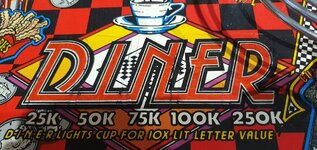
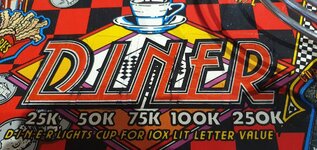
The other more obvious insert damage is DINER
20220308_135538.jpg

Can anyone explain the smudgy black bits?
I'm not sure whether to leave that or try address it. I looked at the decal and it is slightly smaller like the rest plus the purple isn't a match. So if I did try use it I'd have to try cut it to pieces and try to keep the outlined DINER letters.
Is it worth it? Or just accept typical damage from this era? Or could their be better quality decals available?
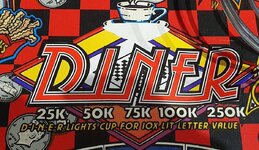
20220308_135251.jpg


Advice was to clearcoat the stickers, however we were also advised to go with a PF overlay which Claire got me to buy (she'll be invoiced).

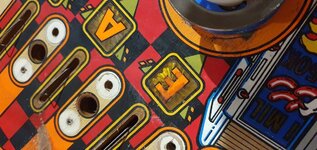
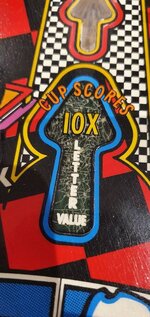
The next noticable playfield issue is raised inserts. This is my first experience of raised inserts... I assumed they'd sit up squarely but this one is like a smooth hill! If it wasn't irritating it would be satisfying.
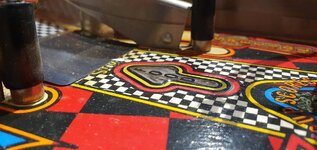
20220308_135314.jpg

Our fellow Diner owner @Spandangler has many uses and apparently one suited for us is his deep throat clamp. Hopefully we can borrow this in the coming weeks and squish the inserts down.
Another pro to a playfield protector I suppose?

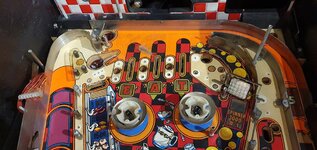
A quick inspection found an interesting fix for the diverter mech and a broken stand up target.
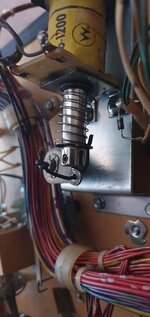
20220308_104135.jpg


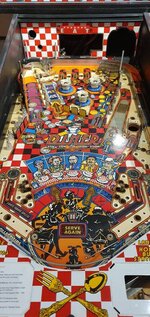
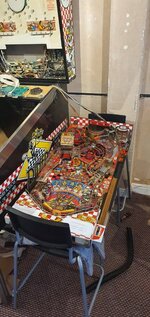
Here's an overall photo of the state of DINER
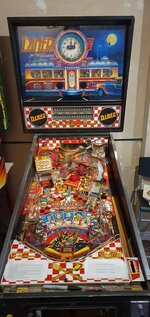
20220308_130500.jpg

There was a lot of muck at the back of the cabinet and out of curiosity I thought I'd take the of out as I'd read the wire harness is long enough.
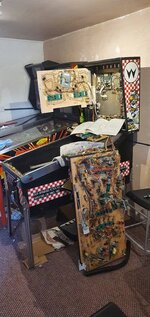
20220308_101147.jpg
20220308_101826.jpg
20220308_000035.jpg

We're wondering whether to strip it and clean up, apply some more decals if needed and get to work on replacing broken old parts or wait for the board to see if the game runs first.
The benefit of stripping may reveal broken parts we can then order.

I've ordered my first foam cleaner and Claire's ordered some new rubbers and a playfield protector.

All feedback and help appreciated šŸ‘
 
Last edited:
Itā€™s nearly impossible to order everything you need in one go. I just accept that Iā€™m gonna spend loads on ā€œpostage and packingā€ when refurbing a machine. šŸ˜€. Iā€™ve tried waiting until the last possible moment with an ever growing list, but then you find that you canā€™t get it all from one supplier so still end up with multiple packages.

Your board will be repairable, and if not, you will get a new or refurbished one, so no point in waiting, crack on with the rest of the jobs whist you wait for it.

Already I've found parts I can't get at Pinball Mania but can get at Pinball Heaven and vise versa.
Some aren't even available at all except Marco.

I've started to strip it down hoping to find more bits to replace.
It's becoming apparent a full plastics set will be worth the investment
That's just the artwork around the edge of the insert cracked and damaged isn't it ?

I wonder if those decals came from Classic Arcades - they are historically notorious for being wrong size, wrong font, wrong colours .....just wrong usually šŸ˜„
They look old that's for sure.
The character ones seem to match the colours well , just not the size.
The food inserts are off with regards to colour so I won't bother with them.
Can't tell if it's bad decals of the pf has lost its vibrancy.
 
The broken spring in the diverter linkage was/is notorious. The worst offender was the twin diverter on Rollergames. To the extent that an update eliminated the spring altogether.

And I seem to recall a service bulletin advising a coil change on the cup diverter, to a weaker 26-1500. In fact, it was a correction to entries in the manual, which list a 26-1200.

PS any of the four types of System 11 Cpu board will suit; Diner, as a 'C' game, simply doesn't have audio processor, Ram, Rom's (or more than a link to the audio board, in fact)
 
Last edited:
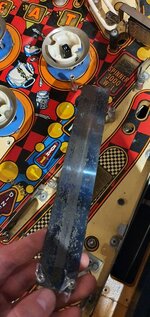
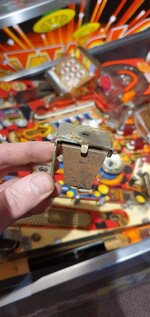
The state of it all.
Regretting revealing all the dirt and rust.

What options do I have to clean up these two items?

20220308_163503.jpg20220308_165308.jpg
 
Evaporust is THE Best to get shot of rust and crap - soak overnight - it seems expensive but reusable - so very cost effective. lasts for a long time.

Then you're into tumbling and polishing and if you fancy it - nickel plating or send off for zinc plating. Ive got a nickel plating kit to try sometime but not got around to it yet.

I'm going to try wire wool and autosol first. I think evaporust and a tumbler is a little deep for me atm . Especially cost wise.
Want to get diner nice but not mint or I'll be here for years šŸ˜

Mate that ainā€™t dirty trust me.
More the rust thats scares mešŸ˜†
 
I'm going to try wire wool and autosol first. I think evaporust and a tumbler is a little deep for me atm . Especially cost wise.
Want to get diner nice but not mint or I'll be here for years šŸ˜


More the rust thats scares mešŸ˜†
If that's chrome plated, expect to see stainless steel underneath and some of the chrome flaking. If it's got rust the chrome is likely already gone in that area. You can only do as Alan says, or just tidy up until you spend a few pounds an a replacement. I use a Dremel with a wire brush attachment at low speed to remove rust, and some turtle wax metal polish and a woolen polishing attachment to finish up. Not perfect, nowhere near as good as evaporust, but it makes me feel like I've done something :)
 
Toss the smaller bits in a tumbler for few days, they will shine up real nice with zero effort :)
 
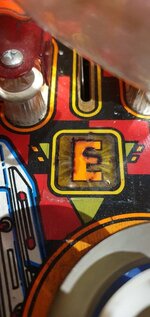
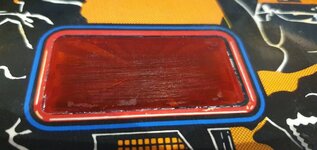
Any ideas on how to make this E better?

20220308_163533.jpg

Toss the smaller bits in a tumbler for few days, they will shine up real nice with zero effort :)
No tumbler here yet... Gonna try alternatives for now šŸ˜
 
(This might be stating the obvious.) You want to get some LEDs under those inserts as the incandescent bulbs' heat is most likely the cause of the damage.
 
Honestly - evaporust is a miracle - anything else is just hard work.

not a lot of people know this, but it also cleans up dirty plastic bits really well too.

With evaporust will the bits look ok after or require tumbling to be shiny?

Was hoping to avoid buying a tumbler for now.

(This might be stating the obvious.) You want to get some LEDs under those inserts as the incandescent bulbs' heat is most likely the cause of the damage.
Yes intend to led it just not for a while. We pushed our budget for this out of the blue Diner.
Got a bk2k coming and I intended to led thatšŸ˜³
 
Any ideas on how to make this E better?
Looks like an insert decal, I'd remove and replace, someone will sell a set. Could use inverted air duster or get some IPA in behind to soften the glue.

Raised inserts; when I reset a FH clock face I used a hairdryer to soften the glue and used a dift to tap them out from underneath, removed the glue from each parts and reset with fresh glue. Fashioned a nozzle from tinfoil to direct the airflow.

A set of decals and overlays were hidden in the cabinet so I've got some for EAT. Just wary about removing that one incase I cause more damage.

The diner inserts have the black smudges and there's no decal there
20220308_135538.jpg
 
Fully stripped except a few posts and guides.
Good ole clean!

20220309_164330.jpg

Got the mylar off the E, it seemed to be just that, a mylar square šŸ¤” I am guessing someone touched up the E and then covered it. It looks about the same without the mylar.
Not sure a decal will improve it as the smudging is still there
20220309_164338.jpg


Just have to wait for the playfield protector and a clamp to level the Inserts šŸ˜
 
As I've ordered a full set of insert decals to replace a few dodgy ones I figured I may as well remove some of the others.

20220314_144441.jpg
20220314_151031.jpg


I'm struggling to see which are decals and which are just aged inserts...

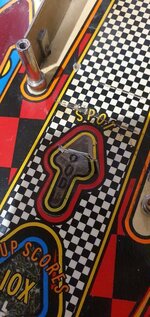
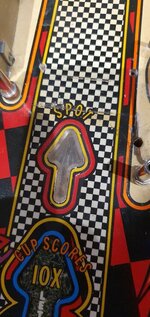
This one is crazed and I wonder if a decal, if I've got a full set coming should I just remove it?
20220314_151039.jpg


A few have scratches on, I can only assume it was a previous owner cleaning them to apply decals. Any tips on removing these scratches or should I not bother as they'll barely be noticable?
I've tried novus 2 and 3 but not sure if it's making any difference so I'm a little wary.
20220314_151428.jpg


Shocked ghost playfield protector arrived!
20220314_151024.jpg
 

Attachments

  • 20220314_151028.jpg
    20220314_151028.jpg
    99 KB · Views: 7
Any tips on removing these scratches or should I not bother as they'll barely be noticable?

I've tried novus 2 and 3 but not sure if it's making any difference so I'm a little wary.
View attachment 163615
Wet n Dry paper, slightly wet. I can't tell quite how bad it is but 800/1200 and 2000 should be as fine as you need go. Lightly sand (with a small piece of paper and a small block. Cut some 1" x 1" timber if you have it.) and a couple of drops of water. Then use medium & fine polish to buff from the matt back to gloss. IPA to clean, dry then the new decal / insert transfer. Seal ideally with a touch of lacquer.

Build up your confidence one at a time. Don't banzai and do the lot in one go if you're wary. :)

Sandpaper, Gyvazla 45 Pcs Wet and Dry Sandpaper, 80 To 3000 Assorted Grit Sandpaper for Automotive Sanding, Wood Furniture Finishing, Wood Turning Finishing, 9 x 3.6 Inches https://www.amazon.co.uk/dp/B0725PZ9HS/ref=cm_sw_r_apan_glt_i_06T19ZNABHNCPGAQZJHS

This suitable?
Be good to get something via Prime so I can have a go before decals arrive in the next few days šŸ˜

I do want to do as much as I can because once the pf protector is on it'll be a nightmare to do anything else and we're hoping to get it fired up by the end of the week
 
a playfield protector? I hate to say it but its about 100K plays too late :D


1. A new playfield and getting it swapped in is waaaay out of our budget.

2. The pf is in pretty good condition for its age, it's had the mylar removed so no bubbling just a bit of wear in areas you barely see. The protector will keep it from wearing more and protect the decals rather than clearcoat the entire thing which would probably be more pointless.

1. Pretty much every Sys 11 era game will show some wear. Not everything NEEDS to have a new playfield , yours looks pretty good. Thats very much a recent thing anyway as not long ago very few new decks were even available.

2. You have the protector now so fair enough but tbh in home use chances of more wear is minimal - especially as you'll be keeping it clean, good condition balls etc.
 
you've taken most of the stuff off the playfield so putting a new one in is pretty straightforward now!


but for the love of god put mylar down on the areas you want to protect but don't put that protector on it- it will make it play terrible.
 
Sandpaper, Gyvazla 45 Pcs Wet and Dry Sandpaper, 80 To 3000 Assorted Grit Sandpaper for Automotive Sanding, Wood Furniture Finishing, Wood Turning Finishing, 9 x 3.6 Inches https://www.amazon.co.uk/dp/B0725PZ9HS/ref=cm_sw_r_apan_glt_i_06T19ZNABHNCPGAQZJHS

This suitable?
Be good to get something via Prime so I can have a go before decals arrive in the next few days šŸ˜
I don't know the brand but give it a go. There's a good selection of grades there. I use Indasa / Mika myself. I've just checked my Wet & Dry Sheets and those are Kingspur and Matador.
Basically the more expensive automotive brands stay sharper longer. Use a dab of washing up liquid too. Let us know how you get on.
 
you've taken most of the stuff off the playfield so putting a new one in is pretty straightforward now!


but for the love of god put mylar down on the areas you want to protect but don't put that protector on it- it will make it play terrible.

Taking everything off the bottom of a pf is an entirely different ballgame. Then the wiring harness. It's a whole other level to taking some ramps and posts off.

I did research into playfield protectors and most say the games don't play any different.
How would it be much different to a full pf mylar?

The only real difference I could find was you don't feel the ball rolling as much as without.
 
Back
Top Bottom