Ok...where we we......
ah yes g.i. Or the lack of it!.....so time to add an led bar at the back of the playfield we will remove one of the gi lamp holders and solder in a cut to size 6v white led bar like this....plan is to light up the right ramp and the rear of the playfield...

The other stumbling point I have with roadshow is the "radio" toy..it's so dull! Love what
@Monkeyboypaul did to his two, why has he two? Maybe ones for sell as that solid red lump of plastic is soooo terrible. Any way got to thinking, what can be done to brighten it up a bit without any artist skills. (Which as we already know I have none of!) so the easiest option to cheer it up is light. Had two ideas add extra illumination to the radio tied in with the pop bumper flasher or the yellow lamp on the radio itself.
Decided on the top lamp.so fitted this to the inside chassis of the radio........will see how it interacts when the game is back together..may change it to the pop flasher...we will see......at present when the lamp on top of the radio lights the whole radio illuminates.....got to cheer up the toy a bit!.....

Next is the audio.....roadshow has a great soundtrack but a lot of the mid range audio is lost with the stock speakers so time to install one of our budget speaker upgrade kits...consisting of one direct fit 5.25" full range two way coaxial speaker for backbox left. One direct fit 3.5" super tweeter, for backbox right. Finally a 6.5" mod bass woofer with passive crossover for the cabinet , again direct fit....here it is....


Real easy to install. We can use all the existing fixings to do the job , the only extras we need are some spacers, and an old post rubber!?(all will be revealed!) so let's start on the tweeter, backbox right....

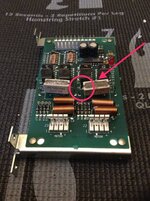
Remove the four screws holding the tweeter in place, and also remove the blue capacitor. (Acting as a cheap crossover). Keep the bolt that holds the capacitor in place, we will reuse that......

Fit the replacement super tweeter with one of the old screws using one of the existing holes, then reuse the bolt from the capacitor to hold the tweeter in place. Re-solder the cables , noting polarity, black/yellow positive, black negative. Like this...

Next back box left. Remove old speaker....and disconnect cables..place the four small spacers over the holes. (These come with the kit, it stops the existing fixings damaging the speaker plastic and lifts the speaker cone off the panel .

Then fit the new speaker using the four original screws, remember that the spacers fit between the panel and the speaker. Also be sure to reconnect the earth strap and cables, yellow black positive, black negative. Like this.....

Finally the woofer....remove the nuts from the four studs and lift off the old woofer, like this......

Keep all the original fixings as we will reuse these. Now this is where our old post rubber comes into play! If you cut it with a knife into four equal pieces like this....

You can reuse it as a spacer/insulator to lift the woofer cone off the cabinet and to stop that horrible resonance (vibrations you get with a more powerful woofer that has a wider, improved frequency range) place the four parts over the studs like this.....

Then place the new woofer over the top and refit with the original washers and nuts...like this....

Then reconnect by pushing the spades together like this again observing correct polarity...job done.....