But that’s chris on left Gary !!! ……. Chris by day..Christina by night!!!!


Definitely mateNever be perfect but miles better than bare wood
As long as it's not noticeable once the game is all back together then I'll be happy 
 !!
!!


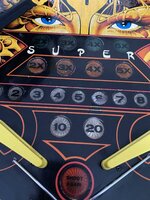
I went opposite way on barracora ditched the rubber tits that held on theyplastics found the vibrated loose too easy so went pvc nut route,but it’s looking good mate,what you clear coating with?Lots of tumbling still going on but I've also been progressing with the painting. First up was to make the drop targets a bit more presentable by touching up the white stars and then covering with mylar:
View attachment 171282
View attachment 171283
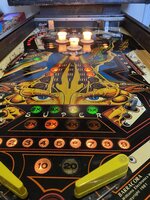
I've also been continuing with the playfield and got most of the black line work done along with masking stuff off in preparation for clear coating. I've still got the colour matching touch ups to do which I'll be looking at over the weekend and I also need to finish masking off the metal ball guides as well:
View attachment 171284
Had a parts order arrive as well and I'm hoping this is most of what I need in terms of new parts that I don't already have in stock. Along with the usual new rubbers and balls, I'm replacing the white plastic nuts with rubber ones as I prefer the look of them on older games (I did similar on my Lucky Strike EM). There's a flipper rebuild kit, some new spinner decals, a lamp holder for the pop bumper and a rebuild kit for the missing connector on the power supply board
View attachment 171287
I've still got all the plastic nuts (plus a load from other games in the parts bin) so worst case I'll have to swap them back but hopefully they'll hold upI went opposite way on barracora ditched the rubber tits that held on theyplastics found the vibrated loose too easy so went pvc nut route,but it’s looking good mate,what you clear coating with?
For clear coat I'm going to give the below a try. It's 2 pack so I've had to buy a respirator and will be spraying outdoors so I don't poison myself  Started by removing the coin door and then worked my way from front to back taking stuff out. I won't be completing dismantling the coin door but will give the front a clean and polish as well as the door surrounds.


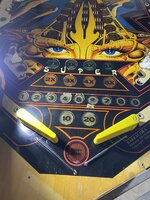
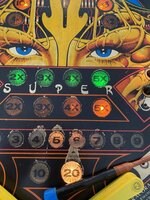
 I don't know how many different paints I've mixed, applied and then wiped off again but it's been a lot! I really struggled to get anywhere near this blue but had a bit of a breakthrough this evening and whilst it's still too dark I'm calling it done as I don't think I'm going to get much closer. The final mix contained 3 different blues, green, burnt umber, white and black
  If the proper artists on the forum have any advice, tips or techniques when it comes to colour matching then I'm all ears as this has been one of the harder ones to date. There's still a few minor tweaks to make but the below pic is where it's currently at:


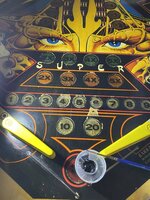
 The original foam pieces were disintegrating so I cut up some yellow post rubbers I had to replace them:


")


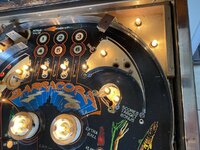
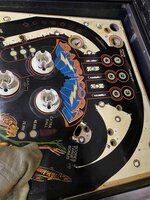
 There's still the light board brackets to remove along with all the gubbins for the backglass locking mechanism and them I need to sort out the transformer wiring and put it back how it should be so that it plugs in cleanly to the new board One day I might be able to start putting things back together rather than constantly removing stuff

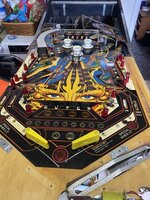
 It was never going to be perfect but compared to where it started out it's a massive improvement, which is what I was aiming for. Now it just needs to sit and cure for a bit while I carry on with the cabinet.


