So, I picked this Diner up from @Markjduk back in June. Mark said this came as part of an operator raid.
It was pretty tired and generally grubby, however it played well on collection with the exception of the clock that wasn’t turning properly.
My brother and I packed it down and took it home. Once home, the first thing we did was clean the cabinet as it was grubby. The legs that came with it were pretty poor, luckily I had a decent spare set of legs at home ready to put straight on.


The game was fully incandescent, and I’m one for changing these to sunlight (warm white) Comet LEDs. This was the next job I completed.


The next job was the faulty Dine Time clock in the back box. I wasn’t sure if it was the PCB or stepper motor (or both) that was at fault. I decided to replace the pair.
The initial replacement I purchased from Pinballshop.nl turned out to be faulty and @Homepin supplied a replacement directly.
Mike provided regular updates, shipped directly from Taiwan and without delay. Customer service at its finest. Thanks again Mike
 Next up was to swap out the cracked and rusty / scruffy coin door, with a nice raised coin door. Thanks again to @Alpha1 for selling me his spare

 My next bright idea
 quite literally, was to make more of a feature of the cup on the playfield.
Pinball Heaven sell a 15cm LED strip light mod. Turns out this fits perfectly to the underside of the recess in the backboard of the playfield above the cup! It’s a cool white instead of the warmer white GI, but I think it looks great.

I then made a list of parts needed to complete a topside tear down, comprising of clear star posts, Perfect Play silicone rubbers, jet bumper caps, and some miscellaneous nuts / screws.
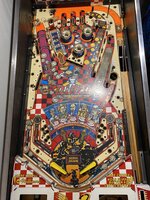
The playfield was dirty including every corner and in all the hard to reach places at the back of the playfield; under the cup, etc.
Rubbers were shot, I think some were original, especially the 3-1/2” one under right ramp. Star posts were filthy. It’s been long overdue a clean. I’m pretty sure most of the hard to reach area’s haven’t been cleaned in 30yrs. This is definitely the dirtiest game I’ve owned so far.
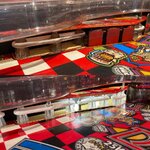
Once all the parts arrived, I started taking parts off the playfield ready to clean. As you can see it was filthy.


 I’m sure you will agree this game was pretty dirty.
I placed all the parts on the floor in some sort of logical order and began to clean the playfield with foam cleaner, then Novus 2 and waxed. The heavily worn ball trails and swirls along the back edge of the playfield (under the cup) I improved with a few passes using a magic eraser. Not something I would normally do, but felt needs must in this instance. I think the end result is totally acceptable.
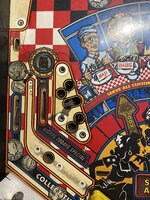
 There was heavy wear down to the wood to the centre rollover (where the ball drops out of the hole in the cup) as pictured. I made good this area and covered the repair with a cut to shape piece of Mylar to prevent further wear.
 Here are a selection of photos showing areas of dirt on the playfield after tear down.


Again, after cleaning the playfield, I then cleaned all the parts I had taken off. Here are some before and after pictures.


After spending a full day cleaning plastics / ramps, I started to fit the new star posts and white silicone rubbers on the playfield.

Starting to get the feel for how slick this is going to look when finished
I continued fitting the star posts and rubbers to the freshly waxed playfield. I had to wait a few extra days as the parts list in the manual was wrong and I was short on star posts and 3-1/2” rubber.
With the arrival of the last few parts needed, I continued to fit the remaining parts to the playfield and put it all back together. I decided to fit a pair of Cliffy’s to cover the damage to the inlane where the ball drops from the wire form.

It was pretty tired and generally grubby, however it played well on collection with the exception of the clock that wasn’t turning properly.
My brother and I packed it down and took it home.
Once home, the first thing we did was clean the cabinet as it was grubby. The legs that came with it were pretty poor, luckily I had a decent spare set of legs at home ready to put straight on.The game was fully incandescent, and I’m one for changing these to sunlight (warm white) Comet LEDs. This was the next job I completed.
The next job was the faulty Dine Time clock in the back box. I wasn’t sure if it was the PCB or stepper motor (or both) that was at fault. I decided to replace the pair.
The initial replacement I purchased from Pinballshop.nl turned out to be faulty and @Homepin supplied a replacement directly.
Mike provided regular updates, shipped directly from Taiwan and without delay. Customer service at its finest. Thanks again Mike
Next up was to swap out the cracked and rusty / scruffy coin door, with a nice raised coin door. Thanks again to @Alpha1 for selling me his spareMy next bright idea quite literally, was to make more of a feature of the cup on the playfield.Pinball Heaven sell a 15cm LED strip light mod. Turns out this fits perfectly to the underside of the recess in the backboard of the playfield above the cup! It’s a cool white instead of the warmer white GI, but I think it looks great.
I then made a list of parts needed to complete a topside tear down, comprising of clear star posts, Perfect Play silicone rubbers, jet bumper caps, and some miscellaneous nuts / screws.
The playfield was dirty including every corner and in all the hard to reach places at the back of the playfield; under the cup, etc.
Rubbers were shot, I think some were original, especially the 3-1/2” one under right ramp. Star posts were filthy. It’s been long overdue a clean. I’m pretty sure most of the hard to reach area’s haven’t been cleaned in 30yrs. This is definitely the dirtiest game I’ve owned so far.
Once all the parts arrived, I started taking parts off the playfield ready to clean. As you can see it was filthy.
I’m sure you will agree this game was pretty dirty.I placed all the parts on the floor in some sort of logical order and began to clean the playfield with foam cleaner, then Novus 2 and waxed. The heavily worn ball trails and swirls along the back edge of the playfield (under the cup) I improved with a few passes using a magic eraser. Not something I would normally do, but felt needs must in this instance. I think the end result is totally acceptable.
There was heavy wear down to the wood to the centre rollover (where the ball drops out of the hole in the cup) as pictured. I made good this area and covered the repair with a cut to shape piece of Mylar to prevent further wear.Here are a selection of photos showing areas of dirt on the playfield after tear down.Again, after cleaning the playfield, I then cleaned all the parts I had taken off. Here are some before and after pictures.
After spending a full day cleaning plastics / ramps, I started to fit the new star posts and white silicone rubbers on the playfield.
Starting to get the feel for how slick this is going to look when finished
I continued fitting the star posts and rubbers to the freshly waxed playfield. I had to wait a few extra days as the parts list in the manual was wrong and I was short on star posts and 3-1/2” rubber.
With the arrival of the last few parts needed, I continued to fit the remaining parts to the playfield and put it all back together. I decided to fit a pair of Cliffy’s to cover the damage to the inlane where the ball drops from the wire form.


 . Great Job

 ️
️
