Been waiting for the weather to warm up a bit before taking on this playfield swap, well, that’s what I have been telling myself, in all honesty I’m a bit intimidated. The playfield is a CPR I brought at the end of last year and its been waiting patiently in its box ever since.
First up, knocked up a couple of rudimentary playfield stands, as an utter newbie I’m trying to do everything possible to make the job easier, so having the ability to have the playfields side by side seemed like a good idea.

Next job was getting the old playfield out of the cab, the labels were still on all the back box connectors so that was just a case of unplugging and feeding through the hole, so with the help of a glamorous assistant, the playfield came out without too much drama.
First job on the new playfield was giving the underside a good coat of varnish, went for some Matt Rustoleum Polyurethane Finish, apparently its suitable for spraying directly onto wood, and that’s exactly what I did with it.

Next up were a couple of jobs I have been really dreading, installing the t-nuts and countersinking the pop bumper nails. In the end I went with the good old hitting them in with a hammer approach. A couple of thoughts here, most of the holes were very tight and needed redrilling, it’s also quite hard to see which are the 8-32 inch and which ones are the 6-32 inch t-nuts on the old playfield.

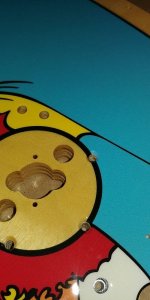
Countersinking the pop bumper nails didn’t turn out as bad as I had expected, not sure if it helped or not but I warmed the area with a hairdryer first in an effort to soften the clear coat and hopefully make it less likely to crack, going slowly and checking the depth with the head of the nail seemed to do the trick.

After this I really wanted to get the side rails installed to help minimise any flex in the playfield, which to me seems important with WW and the three large holes in the middle.
After this was installing the guide rails, before removal I wrapped a socket in tape until it fitted snugly under the rails and used this as a measurement when putting them back in, so I wouldn’t bash them too far in by mistake.

For these I drilled a hole slightly larger than the rails themselves a couple of mm into the clear, I read somewhere it’s a good idea to give them a tiny bit of clearance, so when a fast ball whacks them they aren’t pushing on the clear and risking cracking, I dunno, seemed to make sense so went with that method.
Then onto moving across the flippers and giving them a rebuild while there out.


A couple of lighting pcbs moved across without too much trouble, then onto the slingshots.
Rather annoyingly the hole for the star post on the left seems to have been made a little bit off, If this was anywhere else on the playfield I would have just gone with it, but being in such a prominent location, It would have bothered me, made up a template to try and drill the hole slightly more to the left, it worked ok, and now is in a similar position to its mate on the right.


That’s about where I’m at right now, hoping to get some more done over the next few days so will keep posting progress.
First up, knocked up a couple of rudimentary playfield stands, as an utter newbie I’m trying to do everything possible to make the job easier, so having the ability to have the playfields side by side seemed like a good idea.
Next job was getting the old playfield out of the cab, the labels were still on all the back box connectors so that was just a case of unplugging and feeding through the hole, so with the help of a glamorous assistant, the playfield came out without too much drama.
First job on the new playfield was giving the underside a good coat of varnish, went for some Matt Rustoleum Polyurethane Finish, apparently its suitable for spraying directly onto wood, and that’s exactly what I did with it.
Next up were a couple of jobs I have been really dreading, installing the t-nuts and countersinking the pop bumper nails. In the end I went with the good old hitting them in with a hammer approach. A couple of thoughts here, most of the holes were very tight and needed redrilling, it’s also quite hard to see which are the 8-32 inch and which ones are the 6-32 inch t-nuts on the old playfield.
Countersinking the pop bumper nails didn’t turn out as bad as I had expected, not sure if it helped or not but I warmed the area with a hairdryer first in an effort to soften the clear coat and hopefully make it less likely to crack, going slowly and checking the depth with the head of the nail seemed to do the trick.
After this I really wanted to get the side rails installed to help minimise any flex in the playfield, which to me seems important with WW and the three large holes in the middle.
After this was installing the guide rails, before removal I wrapped a socket in tape until it fitted snugly under the rails and used this as a measurement when putting them back in, so I wouldn’t bash them too far in by mistake.
For these I drilled a hole slightly larger than the rails themselves a couple of mm into the clear, I read somewhere it’s a good idea to give them a tiny bit of clearance, so when a fast ball whacks them they aren’t pushing on the clear and risking cracking, I dunno, seemed to make sense so went with that method.
Then onto moving across the flippers and giving them a rebuild while there out.
A couple of lighting pcbs moved across without too much trouble, then onto the slingshots.
Rather annoyingly the hole for the star post on the left seems to have been made a little bit off, If this was anywhere else on the playfield I would have just gone with it, but being in such a prominent location, It would have bothered me, made up a template to try and drill the hole slightly more to the left, it worked ok, and now is in a similar position to its mate on the right.
That’s about where I’m at right now, hoping to get some more done over the next few days so will keep posting progress.


")
 Congrats on the house move, a PF swap is way less stress than moving house, so your on the home straight now.


