What's new
Pinball info

Register a free account today to become a member! Once signed in, you'll be able to participate on this site by adding your own topics and posts, as well as connect with other members through your own private inbox!

Whatever you do.... do not take tips from this guy doing playfield swaps.....

Pick Holder

Site Supporter
Joined
Jul 18, 2016
Messages
5,259
Location
Bournville, Birmingham.
Well - I subscribe to this guy on youtube and spend now more time shouting at the screen. One of these folks you love to not love.


He is good if you are having trouble sleeping and you want to get off to snoozeville.

Almost makes me want to get a video camera running when I do pinball work......

I know a lot of people will say 'if you can do better then do it'. But it is an example of 'just because its on the internet - does not mean it is right'.
 
Been waiting a month for his latest escipades.

He makes a 1 minute job take 10 minutes.

Nearly as good as the other youtube guy Pinball Supernova.....
 
Watched a couple of that guys vids ahead of my playfield swap, plan on using a similar method for installing T-nuts, apart from taking much much longer, is there any reason not to do it this way?
 
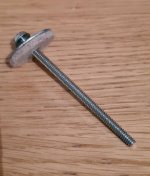
20210219_172413.jpg

When I did a full playfield swap on MB.

I put a bolt (the same one that holds the lane guides in place) through the playfield from the top and screwed on the T-nut.
Then, using an electronic screwdriver, from above I screwed it in to pull the T-nut in fully.
I had a large metal washer (the ones Stern put on to protect the slingshot plastics) with a felt pad (bit of scrap from a previous project) between it and the playfield. This ensured not only that the playfield was completely protected from scratches on the top and wayward hammer strikes underneath, but that when the final bolt was in place it would be perfectly perpendicular to the table.

Each T-nut took less than 20 seconds doing it this way. Not saying it's the right or wrong way but was really quick, simple and took minimal effort.
 
Last edited:
*photo coming when I get home.*

When I did a full playfield swap on MB.

I put a bolt (the same one that holds the lane guides in place) through the playfield from the top and screwed on the T-nut.
Then, using an electronic screwdriver, from above I screwed it in to pull the T-nut in fully.
I had a large metal washer (the ones Stern put on to protect the slingshot plastics) with a felt pad (bit of scrap from a previous project) between it and the playfield. This ensured not only that the playfield was completely protected from scratches on the top and wayward hammer strikes underneath, but that when the final bolt was in place it would be perfectly perpendicular to the table.

Each T-nut took less than 20 seconds doing it this way. Not saying it's the right or wrong way but was really quick, simple and took minimal effort.
That's genius, I'm definitely going to try that method
 
Thats obviously where i have been going wrong.. I dont have a "Deepe Throat C Clamp".......
 
You dont need fancy little things to put them in - just hammer them !

Do not over complicate matters.

In my time I have done 30ish playfield swaps. Always use a hammer. Never damaged a playfield.

Watch all the factory tours and see how they do it.

It is like getting out a can opener when it has a ring pull on it.
 
must admit. £950 brand new cpr playfield and i shiiiit myself hammering those medieval ******* in
Nah - best thing to do is get a bit of 3/4 inch ply the same size as a playfield. Put a towel in between and then screw in about 8 places thru one of the holes on the new playfield into the ply underneath.

Done it on Stern playfields, Chicago gaming PF's, CPR, NOS Bally/williams and Mirco made ones.

I would never use a bolt to pull the T nuts thru. You are asking for trouble (see the idiot videos).

If you move the end off a cheap G clamp (so you are left with a ball) - then that is a better idea. I have done this on the top of playfields before.
 
Re the hammering them in (at the factory) method. Would that not be before the top coat is put on? I'd be worried about the vibrations etc.
The cheap clamp method sounds @Pick Holder mentions makes sense. What about those not near the edge? How do you "clamp" those?
 
Nah - best thing to do is get a bit of 3/4 inch ply the same size as a playfield. Put a towel in between and then screw in about 8 places thru one of the holes on the new playfield into the ply underneath.

Done it on Stern playfields, Chicago gaming PF's, CPR, NOS Bally/williams and Mirco made ones.

I would never use a bolt to pull the T nuts thru. You are asking for trouble (see the idiot videos).

If you move the end off a cheap G clamp (so you are left with a ball) - then that is a better idea. I have done this on the top of playfields before.
With the new repro playfields do you re drill the t-nut holes first to remove clear coat thats in there?
 
What’s the point of writing on the tape and then writing on the connectors, why not just write on the connectors to start with ?
It is pointless doing that anyway. Everything is colour coded and the loom falls to the correct positioning anyway..... ie. You can not really wire say the two slingshots back to front as the cabling wont reach.
 
On my ES restore I spent hours labelling all the wires with zip tie labels put in the dish washer and it washed off the marker DOH, but as others have said the memory of the loom plus way it’s shaped the wires pretty much fall back within few cm of where they go any way plus you solder the obvious ones then just check rest via matrix / colour codes. Was far easier then I thought. Plus they are usually split into 3 separate looms lamps/coils/switches so always looks worse then it really is.
 
Back
Top Bottom