What's new
Pinball info

Register a free account today to become a member! Once signed in, you'll be able to participate on this site by adding your own topics and posts, as well as connect with other members through your own private inbox!

WH20 Project (ish)

Drew.m

Site Supporter
Joined
Jul 18, 2016
Messages
453
Location
Bradford/York
Alias
Drew
Recently Swapped a STTNG with a WH20 project that another forum member had started but had not had the time to complete due to busy family circumstances (congrats on the baby) . He had already done a nice job on the play-field including clear coating and purchased new ramps, spares and completely led'd it. I know it doesn't sound like i have anything left to do! the largest of the remaining tasks is to re house the machine in a new cabinet as the one it came with had been made by the guy i did the swap with, it was pretty good to be honest except the playfield was at a very low pitch. The swap included a new cabinet however the cab was made for an Addams Family which does not use the sliding mechanism as WH20 8F814079-1FF3-4D38-9C1D-B9E0DCE0C44C.jpeg so this requires modifying .
 
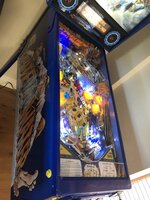
First thing is to find out what works and what requires attention, powered up and found the following: Service Switched dodgy, Pop bumper not popping, lights out on playfield lots of dead rafts, ball sticks on ramps, hot foot bigfoot lower switch dead, quite a few dead switches in a couple of optos on the VUK, No sound, shallow pitch on playfield. I must add at this juncture the seller made me aware of these issues at time of sale so non of this is meant as a moan. Nice pic of playfield all it needed cosmetically was a dust
F573B9D9-752F-4055-A2D5-A5F360A10AAA.jpeg

Time to start the move to the new cab now i am aware of the issues that need addressing and if anything else crops up it was my fault when moving the playfield. First thing is to install the skids and move the playfield supports

0B638CAF-6A0E-4D09-AA8B-786EC5CD31B6.jpeg

A couple of mm high but i am sure its ok, test fit the playfied and bugger! the plunger hole is too high so will need to move the hole. Filled and sanded

92424636-B9BE-496B-8070-866FA4A17302.jpeg

Better pic with the skids installed, i used screws rather than glue just in case i made a balls of it

8781666B-0556-4DC1-A78D-A8F7C544B880.jpeg

Moved the plunger hole (router) fit playfield and test height

85A4D504-2A1E-4035-AC2E-664734677634.jpeg

Quite pleased with that, ( the eagle eyed amongst you will be able to tell i took this picture a bit further on in the process as i forgot to take it during :) next up give the cab a spray and rub down


38CD613D-B9D7-4C89-A44D-4C4CE15C3CE1.jpeg

I know it looks like i have bitten out the plunger hole but i did tidy it up after this pic was taken, next strip all bits out of old cab and clean up, i decided to spray the power bits blue to go with the theme

9371D8A5-C195-4427-B6C9-2BF83B5A10C2.jpeg

after

95F32789-A9A8-4FF9-8EA7-B49A4890260F.jpeg

Also re-built test switch with supplied new switches and printed new instruction sheet (spot the mistake!!!)

867E0DD5-8F65-4415-AC5A-DCCEBDB7B56A.jpeg

Stuck the Side blades on with the help of a bit of spray mount and fit the cabinet components and earth braid.

200912CB-0AC4-4A36-ACA1-EA4F9B2F02AF.jpeg
 
Last edited:
Use blue on your corners of the cab otherwise it will stand out once redecaled.
;)
 
Fixed a few dodgy switches and re flowed insert board connectors and all is almost good. The only problem i can find and having problems fixing is opto 65 and 66 errors, i have changes the opto's and swapped out the cpu board to test.
 
Beautiful job! Love the blue coat on the metal parts. Thanks for posting the shop logs.
 
Thanks to Phil at pinball heaven for the countersunk screws, what an absolute gent

Drew
 
Back
Top Bottom