Pinball info
You are using an out of date browser. It may not display this or other websites correctly.
You should upgrade or use an alternative browser.
You should upgrade or use an alternative browser.
In Progress The next custom project
- Thread starter s000m
- Start date
OP
OP
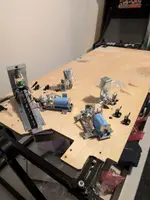
So I initially used visual pinball.Curious how do you plot the ball trajectory is there a design app that helps with that?
But you can just do it old school by holding stuff in by tape and throwing a ball around.
OP
OP
Buying all the parts meant ordering from various companies.
Mantis pinball for lane guides, harness support brackets and T support brackets
Marco Specialties for parts of the ramp diverter from HS2
Planetary Pinball for more HS2 ramp parts that even Marco didn't have
A ton of switches, targets, posts and star posts for the game from Retro Arcade Specialists
The list went on and on. I needed slot of coils, brackets and diverter brackets for trial and error.
I also bought a black Friday ramp bundle from ramp o matic to hopefully find a ramp which suited my requirements.

I also enlisted the help of David Morrell who helped me with my last custom ramps for Cyberpunk.

@Ant-H has also been instrumental in helping me with welds and cuts for my custom lane guides as well as some other elements I'm not ready to show yet


I went through many design amendments based on what I could physically make myself, buy to order or just physically get my hands on. Rebuilding a HS2 full ramp diverter assembly was challenging due to part availability but it paid off.

Once I was happy were everything would go I began making some permanent cuts..


Mantis pinball for lane guides, harness support brackets and T support brackets
Marco Specialties for parts of the ramp diverter from HS2
Planetary Pinball for more HS2 ramp parts that even Marco didn't have
A ton of switches, targets, posts and star posts for the game from Retro Arcade Specialists
The list went on and on. I needed slot of coils, brackets and diverter brackets for trial and error.
I also bought a black Friday ramp bundle from ramp o matic to hopefully find a ramp which suited my requirements.
I also enlisted the help of David Morrell who helped me with my last custom ramps for Cyberpunk.
@Ant-H has also been instrumental in helping me with welds and cuts for my custom lane guides as well as some other elements I'm not ready to show yet
I went through many design amendments based on what I could physically make myself, buy to order or just physically get my hands on. Rebuilding a HS2 full ramp diverter assembly was challenging due to part availability but it paid off.
Once I was happy were everything would go I began making some permanent cuts..
Attachments
Really interesting, all sounds expensive! (Having just ordered a load of hobbit parts form the US)
I've always been interested in trying to build one, but lack space and skill set. Thought it would be a good way to learn the electronics and coding elements. I've always thought a re theme would be a good starting point.
I've always been interested in trying to build one, but lack space and skill set. Thought it would be a good way to learn the electronics and coding elements. I've always thought a re theme would be a good starting point.
OP
OP
The playfield rotisserie? You can grab one from pinballshop.nl I think it was about £250 landed.Where did you get the Plainfield clamp turner thing from or did you make it?
Its utterly necessary if you want to get involved in playfield swaps. A re-theme is the way to go IMO if you are starting out. The coding is super complex. I've been dedicating literally full weekends to it and still barely have code thats seen as 'simple' I'm no Lyman sheets thats for sure

Anyway thats for a future post.
Was wondering why it was complex but just had a quick look, interesting never thought about having to maintain the state of the switching in memory to compensate for the pre defined rules as well as other factors. I'm assuming you also have to be careful regarding safety by not locking on coils.
It's beginning to become clearer the separation between design and delivery.
From the initial very quick look, yeh it's super complex!
It's beginning to become clearer the separation between design and delivery.
From the initial very quick look, yeh it's super complex!
Bobbdobalina
Site Supporter
Very impressive stuff! The folk on here never cease to amaze 
OP
OP
So once I began cutting everything and setting up the various mechs.


View attachment PXL_20241230_222334835.mp4
The next step was to build up the wiring and start making wire harnesses.


I also had to 3D print some brackets as finding them online was impossible.


Things were starting to come together

View attachment PXL_20250104_173156989.mp4
View attachment PXL_20241230_222334835.mp4
The next step was to build up the wiring and start making wire harnesses.
I also had to 3D print some brackets as finding them online was impossible.
Things were starting to come together
View attachment PXL_20250104_173156989.mp4
OP
OP
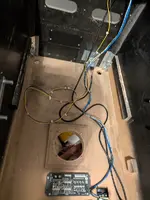
The next step was sorting power delivery in the cabinet. The cabinet I sourced was stripped bare not even the T-nuts were spared.
Sourcing the T-nuts for the wing bolts was a pain!
I decided to mimic the power delivery of WPC cabs since I was using a WPC cab.
I had to buy a filter box and line in box the lot.
I did however forget to buy the bottom plate for the filter box so rather than pay for another rip off shipping charge from the US I made one instead.


View attachment VID-20250310-WA0001.mp4


Sourcing the T-nuts for the wing bolts was a pain!
I decided to mimic the power delivery of WPC cabs since I was using a WPC cab.
I had to buy a filter box and line in box the lot.
I did however forget to buy the bottom plate for the filter box so rather than pay for another rip off shipping charge from the US I made one instead.
View attachment VID-20250310-WA0001.mp4
Attachments

OP
OP
Powering on the cab for the first time was a bit of a fingers crossed moment, but thankfully my wiring was good. The next step was to connect all the IO boards and create the IO loop.
Building out the various wire harnesses for the coils, switches and opto's took a hell of a lot of wire. By the end of it I ended up quite proficient at crimping. I colour coded my wires and built up a table for the wiring. This came in use later for the coding setup.
I opted for now to place the IO in the bottom of the cab. I may later migrate it to the final playfield once I'm happy no further changes to the design will occur.


Later on I ran harnesses down two paths (left and right) and routed all my wiring.


Building out the various wire harnesses for the coils, switches and opto's took a hell of a lot of wire. By the end of it I ended up quite proficient at crimping. I colour coded my wires and built up a table for the wiring. This came in use later for the coding setup.
I opted for now to place the IO in the bottom of the cab. I may later migrate it to the final playfield once I'm happy no further changes to the design will occur.
Later on I ran harnesses down two paths (left and right) and routed all my wiring.
OP
OP
So with the majority of the game hooked up, I got work getting the game communicating to MPF.
Getting the game communicating took some initial effort, but when I got the switch matrix up it was a source of elation.

I got to coding the game, learning Python wasn't easy. I used to code back in my uni days so at least I understand the logic. Still it took many days of solid effort to understand the structure and syntax.
Here's a video I put up showing some of my progress with the code.
Getting the game communicating took some initial effort, but when I got the switch matrix up it was a source of elation.
I got to coding the game, learning Python wasn't easy. I used to code back in my uni days so at least I understand the logic. Still it took many days of solid effort to understand the structure and syntax.
Here's a video I put up showing some of my progress with the code.
Great work  is it from the getaway?
is it from the getaway?
OP
OP
YessirGreat work
OP
OP
Work has been on pause while I wait for critical parts to arrive. I did however migrate my boards from the cabinet to the backbox.

I'll need to adjust and re-crimp some harnesses but it's all good at the moment.
My next challenge was to do with the shooter rod.
My BSD Apron and hooks are shorter (half an inch) compared to other games. This is due to it not needing a shooter rod (button auto launch system) which was a problem for me.
I had to hunt down the parts. One of them arrived today which is the Apron.

You can see the size difference here between a BSD and a ToM.

I then had to source the metal guide.


Still also waiting on the hooks.

The next challenge was adding a speaker panel.
Since this was a CV cab, the backbox doesn't accommodate the usual speaker panel design.
Thankfully since Ant is a Wood work pro he designed a custom panel for me based on my panel size and chosen speakers.
I think you'll agree he's done a bang up job!


Added a sub thanks to a spare sub bracket from David at Retro Arcade Specialists.

Hopefully the remaining parts arrive soon so I can continue the build.
I'll need to adjust and re-crimp some harnesses but it's all good at the moment.
My next challenge was to do with the shooter rod.
My BSD Apron and hooks are shorter (half an inch) compared to other games. This is due to it not needing a shooter rod (button auto launch system) which was a problem for me.
I had to hunt down the parts. One of them arrived today which is the Apron.
You can see the size difference here between a BSD and a ToM.
I then had to source the metal guide.
Still also waiting on the hooks.
The next challenge was adding a speaker panel.
Since this was a CV cab, the backbox doesn't accommodate the usual speaker panel design.
Thankfully since Ant is a Wood work pro he designed a custom panel for me based on my panel size and chosen speakers.
I think you'll agree he's done a bang up job!
Added a sub thanks to a spare sub bracket from David at Retro Arcade Specialists.
Hopefully the remaining parts arrive soon so I can continue the build.
OP
OP
Been waiting for parts to arrive for WCS so I've focused back on my homebrew.
Made some amendments to the design today, added some slim posts, a stand up target and some star posts to the playfield.

Made some amendments to the design today, added some slim posts, a stand up target and some star posts to the playfield.
OP
OP
Finally got around to finishing off the custom speaker panel Ant cut for me.
Added hinges at the bottom, recessed magnets at the top and fitted the Translite frame (modified H channel Ant cut for me) to the backbox.
Now when the panel is recessed it locks magnetically against the Translite frame.
Fitted the speakers and screen and made some custom brackets to hold the screen.
Finally got myself a modified WPC backbox