What's new
Pinball info

Register a free account today to become a member! Once signed in, you'll be able to participate on this site by adding your own topics and posts, as well as connect with other members through your own private inbox!

Technical Cabinet Question...

MadNat

Registered
5Years
Joined
May 11, 2019
Messages
1,068
Location
Warwickshire UK
Coud be a first - a technical question about a pinball cabinet?!

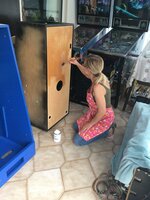
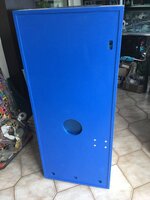
Inspired by @Beowulfz07 WHO2 restore, I've started a full cab restore of my TZ.

There has clearly been some fluid sitting in the cabinet at some point, as the particle board has bubbled up in relatively large patches in a comple of areas of the cabinet floor.

I'm thinking the best way to correct this is to replace the bottom panel with a new piece of plywood. After stripping the decals, and back of the cabinet, I cant see any obvious fixings going into the base panel from the sides... is it held in place by the block and nails around the edge?

Basically how easy is it to remove and replace the base panel? Has anyone removed the base from a cabinet? Any advice very welcome.
 
It actually slides in Mike. The bottom piece has recessed edges that slot into a groove on the side, rear, and front panels. I assume either the front or rear panels would have been put on last during the cab build.

Which basically means it's a case of (carefully) smashing/breaking it out when you need to replace it. You then create a new floor piece with the same edge recess. Since this will now push through from the bottom, you'll need to remove the lower part of the 'groove' on the side, rear, and front with a chisel. Glue and pin your new floor piece in, and then recreate the lower part of the groove with thin 5mm ply pieces put on edge, glued to the side panels (which also adds extra support). You'll need to sand these down to create a flush finish.

This is how I've done it at least, others might have a better way.

1600950962913.png
 
I removed the bottom support rails and glued and screwed them back in.
I also screwed the bottom panel into the support rails from the bottom.
If you’re painting the bottom you don’t have to go so close to the edge as you can recess and fill them, then paint.
For my TOM I wanted to clear varnish the bottom so I either had to match the filler colour to the bottom panel or , as I ended up doing, screwed them tight and the lip of the groove covered them
 

Attachments

  • 1EF40355-0455-4F89-8102-B3402F72B79D.jpeg
    1EF40355-0455-4F89-8102-B3402F72B79D.jpeg
    106.5 KB · Views: 35
  • 76892C3A-0082-4DAD-98A8-6BCC04CB5923.jpeg
    76892C3A-0082-4DAD-98A8-6BCC04CB5923.jpeg
    78.9 KB · Views: 35
So you used the plunge saw to remove the bottom edge of the groove on the sides and front?
 
I did came, out very nicely - the rails made the cuts easy, just had to nibble the corners to complete the cuts. After I got the old base out I chased out the old material from the groves on the sides, front and back.

To get a solid finish - I'm thinking I'll have to remove the front and slide in a new piece of plywood, with a rebate on each edge. Unless there's a better way?
 
Last edited:
The front of the cabinet came off easily and cleanly. The trick was to take a chisel from the inside and punch out the sides. These were 3 4" nails on each side holding the front to the sides; One at the top, and 2 near the leg bolt holes.

Once I exposed enough of each nail, I could use needle nose pliers to push the nails proud of the sade panel, then pull them out with pincers.

With the front and the bottom removed - its a lot easier to sand and prep for painting. Just waiting for some 18mm ply to arrive to make up the new bottom and fix that into the grooves. Glue and fix the front on - then good as new!
 
Back
Top Bottom