What's new
Pinball info

Register a free account today to become a member! Once signed in, you'll be able to participate on this site by adding your own topics and posts, as well as connect with other members through your own private inbox!

Complete Stern flight 2000.

I have a FT playfield swap with the ASBO rotisserie’s I made and waiting on stencils for a Future Spa so will be looking back in on your shop of that one😎
Its got be fun right because when the fun stops, stop!😂

Cant wait to see this one finished.
 
Some progress on the playfield build today. First time to pre-drill all the holes to prevent the playfield wood lifting and splitting.
73DC5A58-14C2-4AF7-95D8-1968233C39FB.jpeg
FBED9E1A-3747-4ED7-8A11-8A1D4DC62D11.jpeg

Next fitting of @AlanJ bigAlsicle’s , these are the mk1’s before the “x” marks the spot feature for easy installation. But still a great product. We love them. The mk2’s were recently used in our Xenon restoration.

05CE8168-D0FE-4C12-BFD8-F3214A4CA2DE.jpeg

Then the G.I. Lamps were installed and the wire strings fitted. These were all soldered in and the leds were tinned ready for the wiring loom installation. Rosie got the short straw doing all that tedious soldering. Notice the soldering iron temperature all you handbag lifters!.......👜🤣😉5D491D41-5C78-449F-8BE9-A0D78FA52AFB.jpeg

Here’s it after all the soldering has been done. Also a top tip for all you viewers using a roaster it’s a really helpful idea to install the siderails first as it keeps the playfield nice and solid for when you need to apply pressure from fitting stuff. Prevents warping. (Can never be to careful these days with the quality of new playfields).

F0CA34B1-EA00-4F72-97AB-24598DCCF04B.jpeg
We choose to custom paint the flight2000 rails in metallic silver and six coats of clear!......😎 all the best Keef........6FE7E5D7-2174-4814-922C-C8967A40544D.jpeg
 
Here’s it after all the soldering has been done. Also a top tip for all you viewers using a roaster it’s a really helpful idea to install the siderails first as it keeps the playfield nice and solid for when you need to apply pressure from fitting stuff. Prevents warping. (Can never be to careful these days with the quality of new playfields).
CPR had already sent me a bad print one and this one had a corner damaged😡
A pretty good one so kept it with a tiny discount🤦‍♂️
Broke my virginity earlier and enlarged some holes to put some rails on as I could see it was warped a bit just from standing very upright against a wall for a couple of weeks In a climate controlled room!
 

Attachments

  • 9E7F8C91-1FE0-4570-A0F1-A20DC8A4B763.jpeg
    9E7F8C91-1FE0-4570-A0F1-A20DC8A4B763.jpeg
    127.9 KB · Views: 21
I've just noticed that CPR have made the outhole arrangement the later 'eject hole' type rather than the traditional all-on-top thrower. That's sensible, really, and your original one was the same, anyway.
 
Ok, so this machine came to us in boxes and cartons, literally in thousands of pieces like a giant puzzle. Hopefully all bits are present but probably not!............ here’s the boxes and wiring loom, we cleaned the loom in the dishwasher, it has nothing connected to it, all switches and lamps have been removed!
3439EBAF-5067-40D6-9D6C-D14C9DECAB01.jpeg
Right after a quick inspection of the containers we have no ball wire guides so we will have to custom make these up.
Only progress has been the side rails fitted so here’s a quick picture......


40E10B8B-09B8-44D8-8C84-8247FD31B64B.jpeg
The light and camera are rubbish. They are metallic gloss silver😎
 
Some progress has been made over the last week or so.
The wiring loom has now been fitted to the underside of the playfield and all controlled lamps and G.I. Circuits have been connected. Also the flipper mechs have been rebuilt and fitted.
D931C48E-4821-4148-910E-5D0FF6988954.jpeg

CDBC72CF-84F3-42EF-A3DB-AFBEDF3D30F5.jpeg

All the mechs have been dismantled and ready for cleaning and servicing before refitting. This game has a fair array of mechs. Including four slingshots. 2 kickers. 2 pop bumpers and one staging mech for multiball. Lots of coils!
Here’s a couple of mechs before cleaning....
406AF204-EE78-459D-9543-D327CEF4E78D.jpeg


CE115124-4E54-49DC-ADA1-638FEBA14B52.jpeg
 

Attachments

  • 1B9B2053-E4D1-41DB-B0A6-9E2C8113F8F5.jpeg
    1B9B2053-E4D1-41DB-B0A6-9E2C8113F8F5.jpeg
    161.6 KB · Views: 0
Soooo many jobs to do on this machine I lost count. With time not on my side this time of year I cracked on and didn’t document the log as much as I would of liked.
Some decent progress has been made, which we are really excited about here at NFP.
First thing I wanted to do was to pimp the stand-up targets here they are ..... very tired and dull.....

45E74309-D5D1-49CE-9FC3-8722D7FAE5CC.jpeg

They have been transformed into 3d clear, two blue and one red. Like this....
7A4BA3C8-FA6B-412E-957F-6B890E5819B0.jpeg

Then the plan was to backlight them with some comet led strips............here’s one in place.....

2D7189C6-AC30-4AC7-A67F-8850265EFFEA.jpeg

Then led strip fitted....

3C1157D5-2FEB-4BEC-B3D2-C06CC2406684.jpeg

Next up pops, in lanes and top lanes.........
 

Attachments

  • 13A20FDF-08EF-4C8F-95EA-BCEEA8185C71.jpeg
    13A20FDF-08EF-4C8F-95EA-BCEEA8185C71.jpeg
    135.6 KB · Views: 3
The sound effect for the 'Spot Blast'/'Special' target, between drop targets 3 and 4, remains one of my favourite minor sounds.
Agree, some great sounds on this game for 1980. Did you own one of these @Jay Walker or just fond memories?
You should check out the updated slochar code.
It’s a bit glitchy still I think. But agree has good multiball and skill shot coding. Probably going to use the version on weebly.

Ok. So if you know a bit about flight 2000 you will know that it has very low mounted inlane plastics that are always damaged due to design. The best idea is to add an additional clear plastic to obtain a more robust inlane that will prevent premature damage and lane hopping. (Which we all detest). So here’s what the originals looked like!
E1E2AF51-B12C-4A0E-98B4-26CF57891F98.jpeg

With the help of Uncle Wobbles. (AKA @Colywobbles ) we set about designing an additional clear inlane . Here’s the results. I had them done in clear blue. Real pleased with the results. Thanks for your patience Col......😎

C2193718-6348-4475-B55D-746D098E5AAA.jpeg

Now onto the pop bumpers. Again stern used unique parts here originally. The rings were grey plastic and have long since been unavailable , they give a good bump so wanted them Original. But they have long been unavailable. Only resource that sprung to mind was the legend known as Gary Flower. @Gary Flower , one message later and n.o.s. Was Supplied by Gary. Thanks Gary, Fabulous....... in addition to original rings, yellow skirts (as originally fitted), blue transparent body and comet 18 led bumper lights were fitted...also we managed to bag the last stock of caps from PPS........ next up slingshot switch rebuilds.....
B45252EE-5FA4-4A61-9472-FC339A5A93E2.jpeg
 
Agree, some great sounds on this game for 1980. Did you own one of these @Jay Walker or just fond memories?
Both, in fact. The two competing local ops in the area each had one, one of which (No. 1140) I later bought after its retirement upon refurbishment of its arcade location. I'm sure I recall that the other ops' example had the information sheet in the cabinet screened onto a plastic sheet rather than printed on paper. Damaged flipper frame plastics used to result in a ball resting on the shoulder of a flipper, with repetitive flipping (as with a failed secondary winding) needed to dislodge it. The blank additional layer may also suit the other games with this arrangement, e.g. Cheetah. At the time, metal additions appeared at the ends of the plastics, but whether these were official I don't know.

In other areas, I remember taking pride in showing some French players around Flight 2000 at a bar in Dinard, Brittany, the following year.
 
Last edited:
Next up , the slingshots needed rebuilding , all the switches were extremely corroded,bent and have worn switch contacts.
Time to replace all switches, diodes and fit a few missing caps. Here’s all the old switches....
2909ADBF-B1E4-4D7E-AE9E-3F9B2358C247.jpeg

Here we have the new switches ready to fit, some needed cable replacement. The brackets for playfield placements were all cleaned and polished........
EC0652D1-2C5D-4D36-AF11-F0BD1E0494EA.jpeg

Flight 2000 has four slingshots so real important they function well. Keeps the ball alive. Great fun..... here’s a complete slingshot with all three posts illuminated, original tumbled stainless steel post caps and one of @Colywobbles bespoke plastic protectors in luminous yellow. Also the flippers have superbands fitted.....
A784780C-11A2-4722-A976-5D5DE6184F76.jpeg

Next is the spinners , one was missing so replacements arrived today. We strip off all old paint for redecaling, we used to respray the spinner but we no longer do this as over time we have noticed they chip and look old quick so we leave them without paint now... here’s what we do ..... first the spinner goes in a bag o paint stripper for a couple of hours...

57DACA31-726F-4694-B6C0-820A80BC5382.jpeg
And rinse off.... and it looks like this......
C9F87BE3-38B0-4740-9083-9FA5C421D179.jpeg

Next up. New drop targets , spinner decals and new custom coloured clear ball guides for the blast off feature......
 
The playfield swap is now complete. Very pleased with the results. Need to free up space somehow, so we can set up the cabinet and see how everything works? (Or not!......😆).....
Need to order a new Playfield glass and dig out the new Cpr backglass for new lift trim and side trims. Today the rest of the plastics were fitted, the spinners and the drop targets were also fitted today. G.I. Tested and all ok. Including post lamps.
Here’s a few pictures of the playfield so far....
7C6D21FB-6EF4-49CC-9489-42ABDBA3DBD0.jpeg0BF605A4-5C82-4A2F-9096-12D30A9A1964.jpegAFC0D8D3-4730-475F-8386-38960719A5D5.jpeg0BF605A4-5C82-4A2F-9096-12D30A9A1964.jpeg6ED754F7-D428-4669-9B4D-7F5E679357A0.jpeg
 
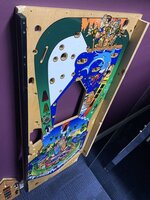
Finally our flight 2000 is in one piece, fully assembled. This feels like a great achievement when we look back at how it fist arrived, literally in a thousand pieces!……. Will it boot into attract mode?
Time will tell very shortly…..
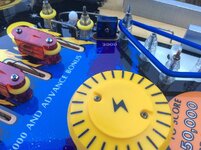
Here’s a few assembled pictures 😍

D0B7FFB3-C23F-42B2-A583-3AF98F48FC43.jpeg8BAD8825-570D-487C-8448-46CEF8E90F1A.jpeg355C5B65-DA9C-4258-8DBD-4BD781B5967B.jpeg
921DE39A-18E9-49FA-94F0-D19CE5318C79.jpeg96B2E799-3E65-489E-976D-4FF324E1835C.jpegDB183B53-5ADB-4AFB-9678-B11E8F60DC56.jpeg5CC33C9A-2C4D-43F6-92AD-066D571B5F44.jpeg

At this juncture I would like to offer some helpful suggestions for anyone intending to restore a classic Stern f2k.
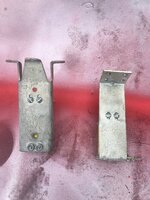
1). The old style playfield post studs do not work effectively in a new playfield, for two main reasons.: firstly, the new playfield wood seems to soft to allow sufficient gripping for the stud. Secondly, where the original studs were fitted with metal acorn caps the top threads are all damaged. So we strongly recommend the use of #6 t-nuts and the more traditional post studs as used in all classic Ballys. Here’s a picture of a Stern post stud……
FDFB4CF2-99BF-4138-BC16-488C56AA6FAC.jpeg

2). When purchasing a new playfield glass do not refer to the available Stern data on size or the IPDB information as both are incorrect. The correct size required in millimetres is 622 x 1162.
3). Do not chuck out the original shooter rod as replacements this size are virtually unobtainable. They are much longer than standard at 9 3/4”.
4). If replacing the mushroom shooter rod housing, the one we purchased from Marco wouldn’t accept the shooter rod without enlarging the hole!
Will fire it up tomorrow and see what works and what doesn’t? Sure to be plenty….
Have a great weekend…. Keef😎
 
Great news! She boots! And goes successfully into attract mode with the ball stepper testing for balls as it should.
Has the following faults:
1). Right spinner not settling back in position.
2). Drop Targets 1 - 5 not resetting correctly.
3). Right flipper dropping over stop.
4). Shooter rod mis- alignment .
5). Phantom scoring. (3k points). Probably a stuck switch.
6). 3k bonus led lamp inoperative.
Not bad really considering how long this game has been in a thousand pieces. Will fix these issues tomorrow.
Will it be ready for pinfest. Well the answer to that is yes. But we have no available transportation, sadly. 🙁
All the best to you all , and have a great weekend. Particularly if attending pinfest. Keef........👊🏼
Here’s a couple of booted shots. We will fit the backglass tomorrow as well........
32900F64-D46D-46BD-9541-27AF268B8B2B.jpegA73BB88A-7CBC-41CE-898E-FBC52F305182.jpeg
 
Re. the larger target bank having resetting difficulties; its sheer size can allow the lifting bar to lose some travel at the far end from the coil. A coil at each end would have been better, but I recall adjusting the attachment of the bar to compensate.
 
So it’s with the greatest of pleasure I mark this thread complete. I will post some pictures of it in attract mode when it’s darker later this evening. It plays beautifully. The ball stepper is awesome and the early sounds are sooo retro.....
Here’s a brief analysis of the faults....
1). Right spinner not settling back in position. = Spinner switch actuator set high.
2). Drop Targets 1 - 5 not resetting correctly. = This was due to worn lift arms and the target resets on the memory coils being worn, bent or mis-aligning.
3). Right flipper dropping over stop. = (Stop low, height adjusted, and flipper switch gaps adjusted wider for tap pass dudes).
4). Shooter rod mis- alignment . = shooter gauge legs straight, not allowing the ball to settle in the shooter lane.
5). Phantom scoring. (3k points). Probably a stuck switch. = inlane switch closed. Opening when flippers activated.
6). 3k bonus led lamp inoperative. = A resistor was cracked on the led pcb.
Here’s some pictures.........
57DDC4B8-D821-41A1-BF31-78828898E5DC.jpegBEA478CD-5629-4426-971D-B3F02509798E.jpegAC477237-86D1-422A-A675-23C22D18F493.jpegAAFB952E-AB61-441D-BAEE-E35FD0ED5C7A.jpeg36C60E92-ED67-4FEA-9738-AF12F063B84A.jpeg747B9C6F-8810-47B1-8A93-9FCA0CAE0820.jpeg1893E92A-5082-4C45-850F-9227368E3DD2.jpegD63A6F82-D417-4E8F-BD30-3D1746AEB060.jpeg39138F2E-28C8-4941-8261-3604C26C1F63.jpegAA92305E-FD56-4526-8E56-6F2DAD8E23ED.jpeg5106EE8C-1C65-44B4-A944-2F302CB8FE1D.jpeg
 
Back
Top Bottom