Thx @FinalFight appreciate it.Great work Scott! First time I actually noticed that cut pop cap on mine the other day you just don't notice with it being under the ramp.
I also use Autosol alot its great stuff.
I don't know what @Mozie is on about I actually think he's getting a bit mixed up because he always has this lying around in his gamesroom..
View attachment 288527
Pinball info
You are using an out of date browser. It may not display this or other websites correctly.
You should upgrade or use an alternative browser.
You should upgrade or use an alternative browser.
In Progress Star Trek: The New Regeneration
- Thread starter s000m
- Start date


mine was the same the rails were from Dr Who!Fully sanded down interior and exterior.
View attachment 288444
Needed several applications of wood filler to sort the gouges.
View attachment 288449
View attachment 288445
View attachment 288446
View attachment 288448
View attachment 288451
View attachment 288452
View attachment 288453
The support rails revealed wood from another game but I'm not sure where from.
View attachment 288450
Managed one coat of putty primer before I had to stop due to rain.
View attachment 288447
mine was the same the rails were from Dr Who!
How did it work, did cabs that didn't make the grade get cut up as rails? Or did they take cabinets back from location and use them for scrap?


Doing a great job!
Opening a new machine and seeing fragments of artwork from previous games on the rails inside, or the crossbar behind the cashbox, etc, was quite common at that time. I think the cabinet manufacturer(s) used rejected or left-over woodwork for the internal pieces.
Last edited:


Game would be finished by now, but my decals are doing a tour of Europe somewhere for the last 3 weeks  .
.
Powder coat is all done. Here it is on the phaser.


View attachment VID-20251003-WA0012.mp4
.Powder coat is all done. Here it is on the phaser.
View attachment VID-20251003-WA0012.mp4
Thanks it's a prismatic powder. It feels like a Stern Pro powder, but with sparkle added.I like that textured black powder coat


Snuck an hour in to assemble the Borg ship. This definitely should have been a cube over the ship from their first introduction. I was tempted to draw new animations for the DMD and replace the Borg ship for the cube on the playfield. For now, the original will do.


Looking good, the ship I believe when they designed the machine the Borg cube didn't exist. Hence the ship on the machine.Snuck an hour in to assemble the Borg ship. This definitely should have been a cube over the ship from their first introduction. I was tempted to draw new animations for the DMD and replace the Borg ship for the cube on the playfield. For now, the original will do.
View attachment 289801
View attachment 289803
That's turned out really well.Game would be finished by now, but my decals are doing a tour of Europe somewhere for the last 3 weeks
Powder coat is all done. Here it is on the phaser.
View attachment 289412
View attachment 289413
View attachment 289414


My other decals I ordered arrive tomorrow so I can finally do the cabinet art.
I've put some details back on the cabinet in preparation. I wanted to keep the original stickers somehow they kept their original adhesive strength.
Only 1 sticker needed outright replacing.


Meanwhile these arrived today.
I wanted Holly to paint the existing ones, but realistically she has no time now.


I've put some details back on the cabinet in preparation. I wanted to keep the original stickers somehow they kept their original adhesive strength.
Only 1 sticker needed outright replacing.
Meanwhile these arrived today.
I wanted Holly to paint the existing ones, but realistically she has no time now.


Did a Inspection of the playfield found some snapped wires.
Weirdly the previous person had wrapped them into the harness and left them snapped.
Glad I spotted them when I did.

Being mounted on the rotisserie means I can't mount everything.
I'll mount the playfield hooks, support hinges and backboard tomorrow.
Otherwise it's good for a cabinet install.


Quick video of the glitter on the legs.
View attachment PXL_20251017_201514807.mp4
Weirdly the previous person had wrapped them into the harness and left them snapped.
Glad I spotted them when I did.
Being mounted on the rotisserie means I can't mount everything.
I'll mount the playfield hooks, support hinges and backboard tomorrow.
Otherwise it's good for a cabinet install.
Quick video of the glitter on the legs.
View attachment PXL_20251017_201514807.mp4

Nearly there. Congratulation
Edging ever closer, man figuring out the order of the ramps was fun...
I have replacement ships from modfather. For some reason he chose to use crocodile clips instead of a molex connector.
I cut off the clips and re-crimped to 2 pin header.
Now it's plug and play as it should be.


The warbird I still need to sort, it doesn't fit onto the existing bracket so I'll sort that later. For the money he charges I'd expect better.

I'd say game is about 90% there now.


I have replacement ships from modfather. For some reason he chose to use crocodile clips instead of a molex connector.
I cut off the clips and re-crimped to 2 pin header.
Now it's plug and play as it should be.
The warbird I still need to sort, it doesn't fit onto the existing bracket so I'll sort that later. For the money he charges I'd expect better.
I'd say game is about 90% there now.
So the game is up, but not without bits challenges.
Whilst on a lamp test I smelt burning and eventually found this ...

Luckily I have a spare power driver board
Replacement board worked fine. Had to switch around a couple of targets and roll overs in wrong spots but they all worked and were sorted easy enough.
Had to fiddle with the switch alignment for the cannons. Right one still needs fettling but I'll get there.
Insert bayonets need amending I'll have to remove the subway to get to them.
Lamp boards needed messing with to get them to light up reliably.
Now onto the bigger issue, 4 coils refuse to fire.
Drop down, drop up, diverter bot, diverter top.
According to the manual it gets driven by the 8 driver PCB board .
I replaced the 8 driver board with my Indy one, no dice.
Upon further inspection of the MPU I can see history of heavy battery corrosion.... My money's on the MPU being faulty.


I've run out of time today but hey at least it booted!

Whilst on a lamp test I smelt burning and eventually found this ...
Luckily I have a spare power driver board
Replacement board worked fine. Had to switch around a couple of targets and roll overs in wrong spots but they all worked and were sorted easy enough.
Had to fiddle with the switch alignment for the cannons. Right one still needs fettling but I'll get there.
Insert bayonets need amending I'll have to remove the subway to get to them.
Lamp boards needed messing with to get them to light up reliably.
Now onto the bigger issue, 4 coils refuse to fire.
Drop down, drop up, diverter bot, diverter top.
According to the manual it gets driven by the 8 driver PCB board .
I replaced the 8 driver board with my Indy one, no dice.
Upon further inspection of the MPU I can see history of heavy battery corrosion.... My money's on the MPU being faulty.
I've run out of time today but hey at least it booted!
Max
Registered
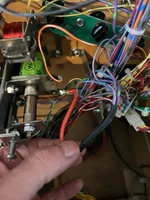
Looking good. This is the tieback, if the thin wire breaks off due to vibration this will damage/kill the aux driver board. I saw a few different ways to protect it, I went for what seemed the easiest which was: de-solder everything from that lug, solder the them together and attach a short extension wire, heat shrink the junction and then attach the extension to the coil lug. Now if the wire comes off the lug the feed to the aux board won't be affected. Excuse the gauge/colour..Can anyone tell me what this small violet with purple stripe on the 50v lug is for? Is this the tieback wire I hear about online?
Should it be on the drop target coil?
View attachment 290632