I have seen four of the Pinball 2000 motherboards so far. All of them had both the AT and ATX connections. I replaced my two power supplies with the newer ATX style power supplies for two reasons. The pinball 2000's power supplies are old, and my Revenge from Mars pin had a frozen fan! Plus the ATX power supplies are also easy to find. The original power supply in my pins were 230 watt.
You WILL need to make sure that the power supply has a REAR fan! Some have fans on the bottom of the unit, this will NOT work.
You will also need to make sure that the power connector to the motherboard is a 24/20 pin connector. The one I purchased has the extra 4 pin connector removable. Older ATX boards used a 20 pin connection, newer ones use the 24, so alot of power supplies come this way. Some may just be loose, others may have tape securing them in place. I have in the past, if there is room for it, to plug in a 24 pin connector leaving the 4 pins off to the side. This will work without any problems, unless there is something in the way.
I am assuming you know how to remove the CPU box from the Pin2k. If not, reply to the thread, and or later I will post this info as well.
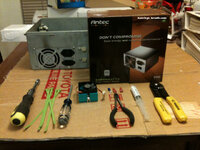
Tools needed: Phillips screw driver, wire cutters, nut driver, and wire cutters. Some zip ties, wire loop connector, and two crimp-on wire connectors for the power switch. (I also have some thermal heatsink compound and a new CPU fan, this is for another thread!)
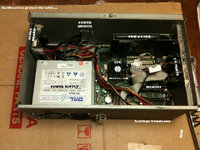
Layout of the CPU BOX. There are a few power connections, The power switch, motherboard, audio board, and sometimes the CPU fan. If you are replacing the power supply, everything goes back the same way it came out. Please note on the old AT power supplies the motherboard connection can be plugged in reversed!! SO BE CAREFUL! The set of black wires go next to each other when plugged in.
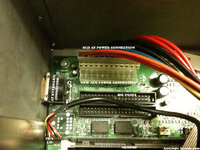
Here is the layout of the power section of the motherboard. Remove the power from the motherboard, audio board, etc...
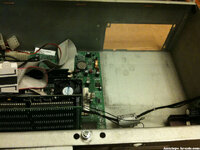
Remove the power supply by removing the power switch screws (2) and the four screws on the back of the CPU box around the power supply. Lift and remove the old unit.
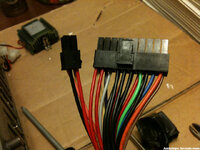
This is the new ATX connection to the motherboard, the extra 4 pin gets snapped off on this version.
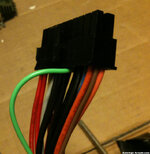
Locate the GREEN wire on the connector and CUT it as close to the connector as possible. This is the ATX "power on" wire, when shorted this turns on the power!
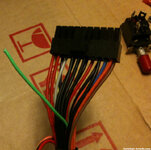
Here is the wire cut, and the power switch is there in the background, we will get to that part a little later. My new power supply has a protective cover on these wires, if you have this pull the green wire out so it is free of the rest of them.
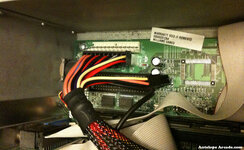
Unlike the AT connector, the ATX will only plug in one way. Plug in the audio bard, and CPU Fan.
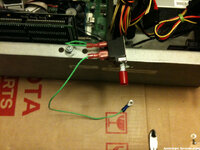
Install the ATX power supply in the box, and screw it back down. The screw holes will only line up one way. You can do one of two things at this point, just put the loop connector on the green wire and bolt it down, but this will have the PC on whenever power is supplied and you cannot switch it off for diagnostics, well unless you get to the back of the pin. The newer ATX power supplies usually have a switch in the back, so it's still possible.
Otherwise, locate the green wire, we cut earlier, and cut off a little bit. You should have plenty, we need only about two inches. Attach the crimp connectors to the wire, and attach the wire to the switch as in the picture.
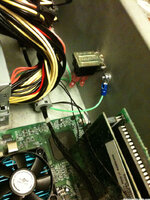
Attach the other end to the ground on the CPU BOX case. Now zip tie all the cables up nice and neat. There is some room on the top and side of the power supply, I tucked the extra cables there.
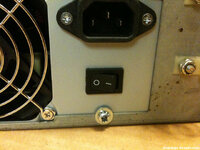
Please note there is usually a switch on the back of the ATX power supply, switch this ON, or nothing will happen. If you installed the switch in the front, make sure it is on as well.
Double check all the power connections are plugged in, especially the CPU fan! Plug in the power with the box open, and check to make sure the CPU Fan is working.
You WILL need to make sure that the power supply has a REAR fan! Some have fans on the bottom of the unit, this will NOT work.
You will also need to make sure that the power connector to the motherboard is a 24/20 pin connector. The one I purchased has the extra 4 pin connector removable. Older ATX boards used a 20 pin connection, newer ones use the 24, so alot of power supplies come this way. Some may just be loose, others may have tape securing them in place. I have in the past, if there is room for it, to plug in a 24 pin connector leaving the 4 pins off to the side. This will work without any problems, unless there is something in the way.
I am assuming you know how to remove the CPU box from the Pin2k. If not, reply to the thread, and or later I will post this info as well.

Tools needed: Phillips screw driver, wire cutters, nut driver, and wire cutters. Some zip ties, wire loop connector, and two crimp-on wire connectors for the power switch. (I also have some thermal heatsink compound and a new CPU fan, this is for another thread!)

Layout of the CPU BOX. There are a few power connections, The power switch, motherboard, audio board, and sometimes the CPU fan. If you are replacing the power supply, everything goes back the same way it came out. Please note on the old AT power supplies the motherboard connection can be plugged in reversed!! SO BE CAREFUL! The set of black wires go next to each other when plugged in.

Here is the layout of the power section of the motherboard. Remove the power from the motherboard, audio board, etc...

Remove the power supply by removing the power switch screws (2) and the four screws on the back of the CPU box around the power supply. Lift and remove the old unit.

This is the new ATX connection to the motherboard, the extra 4 pin gets snapped off on this version.

Locate the GREEN wire on the connector and CUT it as close to the connector as possible. This is the ATX "power on" wire, when shorted this turns on the power!

Here is the wire cut, and the power switch is there in the background, we will get to that part a little later. My new power supply has a protective cover on these wires, if you have this pull the green wire out so it is free of the rest of them.

Unlike the AT connector, the ATX will only plug in one way. Plug in the audio bard, and CPU Fan.

Install the ATX power supply in the box, and screw it back down. The screw holes will only line up one way. You can do one of two things at this point, just put the loop connector on the green wire and bolt it down, but this will have the PC on whenever power is supplied and you cannot switch it off for diagnostics, well unless you get to the back of the pin. The newer ATX power supplies usually have a switch in the back, so it's still possible.
Otherwise, locate the green wire, we cut earlier, and cut off a little bit. You should have plenty, we need only about two inches. Attach the crimp connectors to the wire, and attach the wire to the switch as in the picture.

Attach the other end to the ground on the CPU BOX case. Now zip tie all the cables up nice and neat. There is some room on the top and side of the power supply, I tucked the extra cables there.

Please note there is usually a switch on the back of the ATX power supply, switch this ON, or nothing will happen. If you installed the switch in the front, make sure it is on as well.
Double check all the power connections are plugged in, especially the CPU fan! Plug in the power with the box open, and check to make sure the CPU Fan is working.
