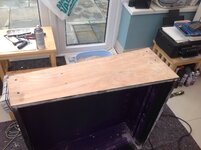
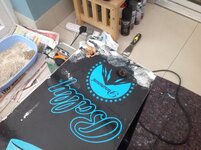
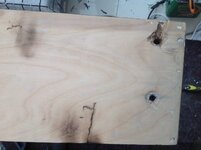
Might seem a daft question to you,s , who have been doing this for a while , but this is my learning curve , . Can my new decals go on top of the original artwork if I fill , sand everything down to get a good key , has anyone done it this way ?
You are using an out of date browser. It may not display this or other websites correctly.
You should upgrade or use an alternative browser.
You should upgrade or use an alternative browser.
New cabinet decals
- Thread starter Lee ellison
- Start date
What machine mate? If it's screened on like older 80s pins then just sand it off, fill it then apply your decals. If it's vinyl, get a heat gun and remove it with a scraper. Then fill and sand. Decals are expensive and it's a fiddle job. And quite a big job too. Not a small undertaking. If you're going to that effort you really ought to remove the old stuff. Any lumps and bumps and imperfections will show through and you'll regret it.
Says me whose never done it

Says me whose never done it

Lee,
you will usually get an awful finish if you do this - to get a good finish with decals you have to strip all the old back, fill the holes and then get the cab to a mirror finish with absolutely NO blemishes at all before fitting the new ones... i can guarantee that any blemishes or imperfections will show through....
Paul
Thanks Paul, looks like I will have to stick with it and get plenty of sandpaper !
It's a TAF, it looks screened to me as the coloured areas are raised slightly , but then again that's my view , a NewbieWhat machine mate? If it's screened on like older 80s pins then just sand it off, fill it then apply your decals. If it's vinyl, get a heat gun and remove it with a scraper. Then fill and sand. Decals are expensive and it's a fiddle job. And quite a big job too. Not a small undertaking. If you're going to that effort you really ought to remove the old stuff. Any lumps and bumps and imperfections will show through and you'll regret it.
Says me whose never done it

Taf is decals get yourself an electric random sander and heat gun
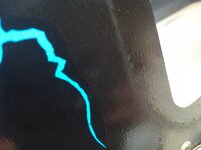
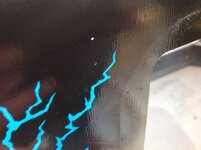
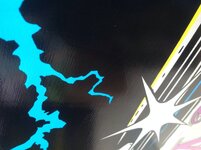
I,m not saying it is printed , but have a look at theses snaps , they make it look as though it is screen printed , the art work is not flat , it has different layers and it has a definite line going around the edges of the different shapes etc. and where a bit of the black has come off there is some of the lightning blue underneath , regards lee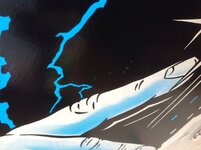


Raddom Orbital Sander the lot... it did mine... Well no i Belt sanded it - DONT do this...
- Joined
- Jul 21, 2011
- Messages
- 11,336
- Alias
- Ive
Get the lot off otherwise it will look crap.
You need to be down to clean, smooth wood to get a nice finish. A random orbital sander does the job but I like to use Nitromors as it doesn't create mountains of dust, and finish off with the sander.
I've seen a couple of machines where they have decalled over the old ones and they show through like a ghost image, awful.
What Steve said altho isn't nitromors just as messy?
What Steve said altho isn't nitromors just as messy?
Nitromors is easy. Pour it on, spread it out, leave for 15 minutes, scrape off old decal into a pile in the middle, use a scraper to shovel it into old newspaper, wrap up and chuck in the bin. Done!
Like the sound of that , cheers SteveSteveNitromors is easy. Pour it on, spread it out, leave for 15 minutes, scrape off old decal into a pile in the middle, use a scraper to shovel it into old newspaper, wrap up and chuck in the bin. Done!
All good advice already given.
TAF is a decal Check around where the legs fix, this will tell you thats its decal rather than screened.
TAF is a decal Check around where the legs fix, this will tell you thats its decal rather than screened.
Wernt all Bally Williams games of that era decals?
Nitromors is easy. Pour it on, spread it out, leave for 15 minutes, scrape off old decal into a pile in the middle, use a scraper to shovel it into old newspaper, wrap up and chuck in the bin. Done!
Hey Steve just giving this ago on my project as it's ****ing down so can't sand it outside atm. What do you do to neutralise the surface after? Or do you just wait till it's dried?
Keep going over it with a scraper and remove as much as you can, then let it dry and go over it with a 240 grit orbital. (Be careful not to dig the scraper in, keep it at a fairly low angle).
It will come up a treat!
It will come up a treat!
Cheers
Thanks for all the info guys
One question guys , I have seen videos of new decal installs and they do not seem to smooth out , fill the indents left by the coach bolts , is this the way to do it ? Or is it better to fill in the round indent left by the coach /cabinet bolts ? Cheers lee
Lee. Graphics will only copy / exaggerate the condition of the item it is going on to, it follows every nook and crannie and a grain of sans will look like a grain of rice I'd that makes sense.
The area must be mint, smooth and all primed and flatted down for the beat results. If you fill the dents nr bolts you might get the filler pop out soon as you put the bolt back through and tighten.
Sent from my iPhone using Tapatalk
The area must be mint, smooth and all primed and flatted down for the beat results. If you fill the dents nr bolts you might get the filler pop out soon as you put the bolt back through and tighten.
Sent from my iPhone using Tapatalk
Thanks , so what you are saying is don,t fill the indentation where the coach bolts sit ?
I didn't fill mine for the reason above - If you fill the slight dents (That will be covered by the new bolts anyhow) with filler, the tension of the new bolts will more than likely push the filler out...
However you DO need to make sure that the whole area to be decalled HAS to be mirror smooth and blemish free...
However you DO need to make sure that the whole area to be decalled HAS to be mirror smooth and blemish free...
Depends on how nice you want it I'd fill it but then I'm abit anal lol
You're gonna have to fill that left one, thats for sure. I use the Ronseal 2 part filler now after experimenting with 2 part Epoxy sticks. The advantage is that the sticks need 24 hours to sure, ronseal starts setting before you've finished mixing it (so be quick), however it ready to go within an hour or two...
http://www.diy.com/nav/decor/decora...-Wood-Filler-White-275g-9254235?skuId=9261934
Personally if i was doing that, i'd mix and fill, then stick a bolt in to make an impression and then the excess can be removed whilst still malleable so the bolt sits in the hole properly... Make sure tho, and i cant stress enough, that every single dink, groove etc is filled and sanded to a mirror finish with up to 600 Grit before even contemplating putting decals on. It needs to be perfect.
That hole doesn't need to be done up too tight when re-assembling - just a light tweak on it, as opposed to a bit tighter on the others..
And does the filler stay in place when you tighten the bolts up ?Depends on how nice you want it I'd fill it but then I'm abit anal lol
Thanks Paul , that's the filler I already have , yes as you've said smooth as a baby's bum , I have not come this far to rush it and make a tw-t of it , thnx for the advice , leeYou're gonna have to fill that left one, thats for sure. I use the Ronseal 2 part filler now after experimenting with 2 part Epoxy sticks. The advantage is that the sticks need 24 hours to sure, ronseal starts setting before you've finished mixing it (so be quick), however it ready to go within an hour or two...
http://www.diy.com/nav/decor/decora...-Wood-Filler-White-275g-9254235?skuId=9261934
Personally if i was doing that, i'd mix and fill, then stick a bolt in to make an impression and then the excess can be removed whilst still malleable so the bolt sits in the hole properly... Make sure tho, and i cant stress enough, that every single dink, groove etc is filled and sanded to a mirror finish with up to 600 Grit before even contemplating putting decals on. It needs to be perfect.
That hole doesn't need to be done up too tight when re-assembling - just a light tweak on it, as opposed to a bit tighter on the others..
And does the filler stay in place when you tighten the bolts up ?
Not on the head I did but I also didn't do them up stupidly tight

