What's new

My Next Hardware Project - System 80B CPU Board

myPinballs

Site Supporter
Joined
Nov 19, 2011
Messages
5,482
Location
Pudsey UK
Alias
Jim
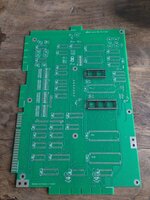
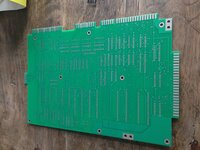
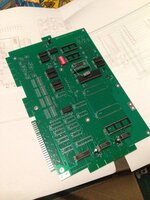
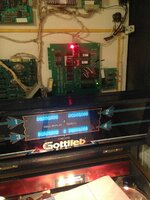
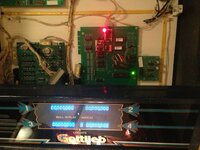
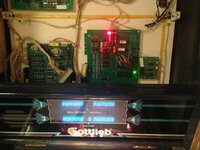
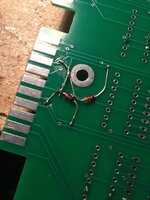
Working on a new cpu board for system 80b gottlieb games. Recently got my first proto boards through. some pics attached. Lots of improvements on the original design including:
  • Decent ground anchors
  • Test point pads
  • Leds for common signals and voltages
  • Reduced component count
  • Built in reset board option
  • Usage of my magic ram board - battery free operation.
  • Improved and simplified cpu reset section
  • Plate through design, socketed ics
Working on offering it as a self assembly kit and a finished board in the future.

Inspired from my recent Gold Wings restoration and the list of 80B games on ipdb that need some love

Also, i recently finsihed some other hardware projects see here:

myPinballs Gottlieb Pop Bumper Driver Board - New Design | eBay
myPinballs Magic RAM - Battery Free Pinball Operation | eBay
myPinballs WPC-95 Backbox GI Blackout Board -Attack From Mars, Medieval Madness | eBay
 

Attachments

  • IMG_1990.jpg
    IMG_1990.jpg
    102.7 KB · Views: 36
  • IMG_2015.jpg
    IMG_2015.jpg
    111.1 KB · Views: 38
  • IMG_2016.jpg
    IMG_2016.jpg
    134.7 KB · Views: 33
Nice work mate,

will happily test one for ya in TX or Franken Pin.

PLEASE keep me informed.

Nice to see this happen as no one else has done this

cheers
 
No one else has done it because you two are the only Gott nuts in the U.K. (Joking)
 
Yes sorry Pete you as well and I can only think of Jamie B as the final one so a total of four Gott nuts.
 
@myPinballs

Here's an idea that i thought of producing a while ago, however never got around to it - how about the anti-pop mod where it stops the pop when turning on/off a WPC game. I have the schematics somewhere ( I'll dig them out tomorrow)... I would be more than happy to buy a few of those!!!!

Will shove the link on here tomorrow....

Cheers
Paul
 
Progress of the first protoype assembly. testing the display section first, then switches, then coils. Just need to program some gold wings rome and get a 6532 ic then i'm ready to test the first part.

Also, For anyone who doesn't know, the set of 80b games is

Amazon Hunt II
Amazon Hunt III
Arena
Bad Girls
Big House
Bone Busters Inc.
Bounty Hunter
Chicago Cubs "Triple Play"
Diamond Lady
Excalibur
Genesis
Gold Wings
Hollywood Heat
Hot Shots
Monte Carlo
Night Moves
Raven
Robo-War
Rock
Rock Encore
Spring Break
Tag-Team Pinball
TX-Sector
Victory

Some great titles in there that deserve some love.
 

Attachments

  • IMG_2028.jpg
    IMG_2028.jpg
    87.2 KB · Views: 16
So i'll use this thread to update progress as i go and try to share what's going on in my head alittle....

I've been assembling the board in stages so that i can test each area and not confuse the issue by trying to do too much at once. Starting off with the basics needed to get the board running which includes the clock circuit, reset section, cpu, game roms, ram and rom address section. Also populated the 3 riot chips and the display output section (so can test in gold wings later).

Am also trying to use my new ram setup for battery free operation but having a few issues with where the data lines attach. I originally set lines D0-D3 to ram lines D4-D7 with ram lines D0-D3 tied to +5V after looking at some 5101 conversions for bally and stern games. But now after thinking about it some more and looking at the bally schematics where bally use D4-D7 lines themselves i think i got that bit wrong and need to move them. I originally thought the data bits would be r/w from wherever you set seeing as you are only using 4 bits of a possible 8. Now i'm not so sure and think it needs to be exactly mapped. Damn!

Things tested and working so far are:

clock circuit
reset section
address lines from cpu
data lines
r/w line from cpu

Did manage to get the IRQ line to pulse with the ram removed yesterday and very interestingly the switch riot was pulsing on output set B (switch strobes) which was abit of milestone!! So i think in part it must have started up. Nothing much going on with the display riot yet though.

I spent an age trying to work out what was going on with the rom address section as gottlieb seem to have used 7405 (open collector) inverters for some Address lines but regular 7404 invertors for others. Confusing?? I originally thought that you may be able to just use 7404s across the board, but now don't think so

Oh, yeah i also added a note to add a jumper or dip switch to set the slam switch type NC or NO in the next board revision. On this one i just set mine as NC on there
 
I'm short at least one working 80b mpu currently so would definately be interested in purchasing one or two of these. It's always surprised me that the only repro mpu available is for the earlier system 80 machines :(
 
Thinking about it, would it be atall possible to have it easier to set on free play or whatever, I'm yet to discover a decent way of doing that on system 80b :(
I also don't get why they used those weird rom chips in at least one of the game rom sockets , they're not strictly EPROMs are they? (Think they're basically unobtainable / un programmable unless you go to the yanks?)
 
I'm short at least one working 80b mpu currently so would definately be interested in purchasing one or two of these. It's always surprised me that the only repro mpu available is for the earlier system 80 machines :(

Thanks. I aim to expand my board to cover all 80 generation in the future to give everyone an alternative to importing from the USA all the time. But i need to stick to the 80b mission goals to begin with!
 
Thinking about it, would it be atall possible to have it easier to set on free play or whatever, I'm yet to discover a decent way of doing that on system 80b :(
I also don't get why they used those weird rom chips in at least one of the game rom sockets , they're not strictly EPROMs are they? (Think they're basically unobtainable / un programmable unless you go to the yanks?)

Yes good idea. I'll certainly look at that. Id love to hear from anyone else regarding updates or improvements that i haven't already covered in this thread.

Re: Roms on 80b. I just use regular eproms and work fine. and certainly on my board that's what will be needed in rom sockets 1 and 2. Nothing complex just plug in and go. gold wings uses 2716 and 2764. You can use a 2732 instead of a 2716 if you copy the program onto it twice and that's what i've done
 
Some major progress with the board. I have got the Leon test rom to run and pulse the test led along with alternating the outputs of all 3 riot chips.

quick talk through video here :

 
OK, so having finished some central heating updates in my house this week, i was relaxing in the lounge thinking about my mpu proejct and an idea sprang to mind with regard to the above issue. I remembered that the riots are I/O devices and that the first riot chip (for switches) is configured for inputs on the row side (PA0-PA7). These inputs tell the cpu what is happening on the switch matrix and the dip switches. Now, i've only populated up to the riots themselves at the mo to help simply the testing. So i'm wondering if because the inputs are not connected to any pull up or pull down resistors whether this is going to upset the cpu?? In 'modern' electronics like arduinos etc the inputs have built-in pull-ups so you kind of forget about it!!

I'm going to populated the parts needed on the switch matrix row side so that PA0-PA7 will be pulled-up automatically on the bench, then try again with the logic probe. Wish me luck! :)
 
Well, I now have the board powered up and running on the bench properly with the gold wings roms installed so the switch input pull-ups worked. Still working out a few issues with the display output side but progress. All display outputs look to be correct except for D0 which seems alittle odd at the mo
 
Well, today has been a great day! IT LIVES!!! Pics Attached.

Now for the technical bit.... It turns out that the reason the display wasn't showing anything even though the game code was running was because i had the clock lines for the 2 latch chips reversed so the timing was all screwed up. Swapped them over and now i get proper digits on the screen and in the proper places.

This proves the board is running correctly

Now for some fun and to populate the rest of the switch section, then to connect up some switches and hopefully enter the service menu. Then onto the lamps, sounds and solenoid outputs section

Bye for now, i'm off for a beer!
 

Attachments

  • IMG_2088.jpg
    IMG_2088.jpg
    94.1 KB · Views: 21
  • IMG_2089.jpg
    IMG_2089.jpg
    121.9 KB · Views: 19
  • IMG_2090.jpg
    IMG_2090.jpg
    131.9 KB · Views: 18
Switch matrix strobe chip added and now i can enter the service mode and run through all the tests etc. Talk through video of it running in my gold wings below

 
Last edited:
Lamp matrix section populated (just 4 chips) and we have lamps working. nice attract patterns

 
Dip switch changes now working. shot a quick video of the attract mode with the high scores list and the attract sounds turned on. Sounds are towards the end of the clip

 
It's all together and working !! Solenoid section added without issue. Nice to see it all come together. Had to swap a couple of lamp control lines as i had 2 crossed over, but all sorted now. Been playing games on gold wings all evening. :) :)

 
So today i've been playing a few more games, updating my schematics will all the changes i've made to the first revision and looking at some ideas for the free play option and whether the dip switch section can be simplified (i think it can. 15 switches and diodes for coin control is alittle excessive, especially for home use games!)
 
Update:

I added my first version of a free play option this weekend gone to my prototype, which allows a credit to be added when the start button is played directly on the board. This was something that was alittle tricky before due to the way the cabinet diode board was designed in 80b games. So now it will work without any additional mods needed and can be controlled directly on the board with a dip switch.

So all works perfectly now in test mode - when switch 47 (start button pressed) sw 47 and sw 17 are activated. Video later. However, sometimes at game start the game doesn't see the start button press and only sees the coin one. Something possibly to do with them activating at the same time, so i'm now looking at a few ideas to delay the coin sw activation slightly.

All the modifications from the first prototype have been added to the schematics now so the next rev is almost ready to be made. Need to decide whether to add anything else before sending the files off.
 

Attachments

  • IMG_2161.jpg
    IMG_2161.jpg
    71 KB · Views: 10
Last edited:
Update:

I added my first version of a free play option this weekend gone to my prototype, which allows a credit to be added when the start button is played directly on the board. This was something that was alittle tricky before due to the way the cabinet diode board was designed in 80b games. So now it will work without any additional mods needed and can be controlled directly on the board with a dip switch.

So all works perfectly now in test mode - when switch 47 (start button pressed) sw 47 and sw 17 are activated. Video later. However, sometimes at game start the game doesn't see the start button press and only sees the coin one. Something possibly to do with them activating at the same time, so i'm now looking at a few ideas to delay the coin sw activation slightly.

All the modifications from the first prototype have been added to the schematics now so the next rev is almost ready to be made. Need to decide whether to add anything else before sending the files off.

that's what I did to Frank N Pin pretty much - added a switch at the end of the start button and connected one of the coin microswitch cables to it.

Can't wait to try this new board:)

Can't really think of anything else to be added as you have the test points and indicator led's
 
that's what I did to Frank N Pin pretty much - added a switch at the end of the start button and connected one of the coin microswitch cables to it.

Can't wait to try this new board:)

Can't really think of anything else to be added as you have the test points and indicator led's

Thanks mate. Will let you know once next rev boards are on way. One other thing I thought of was adding an extra std molex connector for power in case you want to modify your game loom.
 
Back
Top Bottom