What's new
Pinball info

Register a free account today to become a member! Once signed in, you'll be able to participate on this site by adding your own topics and posts, as well as connect with other members through your own private inbox!

In Progress My garden games room build

Defrag

Registered
Joined
Feb 21, 2019
Messages
23
Location
Gloucester
I have started to put together a build log for my garden games room but it is quite picture heavy. Before I post it up here I just wanted to check how the forum prefers images to be posted so that I don't break any forum rules. Should I try and limit the number of images per post, are thumbnails preferred over the full image, etc.
 
If you exceed the number it will just tell you to remove some... Looks like this is currently set to 30 per post, max of 20096K each, and a max image size of 1200 x 1000 pixels...

Obviously it isn't a dumping ground though, so would prefer slightly fewer images, however those more pertinent to the build.. I could have submitted several of the cabling in mine, however 1 ended up illustrating nicely :)
 
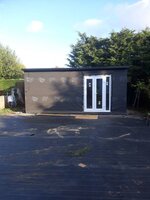
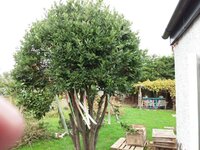
This started back in October 2017 when my wife and I thought it would be a good idea to build a “shed” for a pool table and a couple of pinball tables. I also decided to remodel the garden at the same time, “how hard could it be?” This is what we started with.
88908

After a couple of weekends with a chainsaw I had removed most of the bushes around the edge of the garden and had cut down the bay tree. Bonfire built and ready for November 5th.
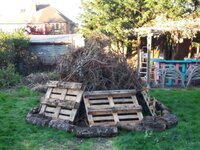
88909

Nice bonfire on November 5th. 1st valuable lesson learnt, don’t use petrol to start a fire, the ball of flame that engulfed me was quite spectacular and warm, thankfully no harm done.

88910

In early summer 2018 I started to level the garden. I took a week off work and hired a mini digger. My youngest son and I had great fun on this and by the end of the week we ended up with a huge pile of dirt. I got a quote to clear this and it was £5000, sod this thought I, I will clear it myself. 6 x 12 yard skips and a torn calf pushing the barrow up the ramp into the skip and I had managed to clear this pile.
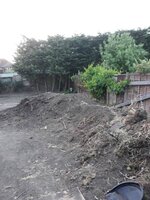
88911

Wood ordered and delivered. I used a local timber yard and the delivery driver helped me carry all of this to the back garden. What a nice chap as they normally just dump stuff on the drive.
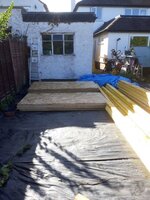
88912

This is the concrete base at the bottom of the garden. This was one of the few jobs I got someone else to do as I have no experience with concrete and thought this would be an expensive and timely thing to fix if I got it wrong. This was 2 days work for 3 local landscape gardeners. They worked hard and shifted 14 tonnes of hardcore by wheelbarrow. The base is 6m x 4.5m x 150mm.
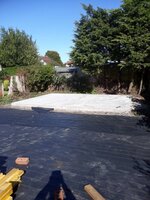
88914

The basic frame in place. This all came together very quickly and I was well chuffed with how well it all fit. I put a damp proof course between the wood and the concrete base and it is attached to the concrete with anchor bolts.
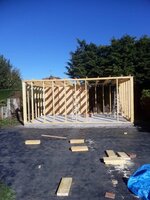
88915

9mm water resistant OSB board on the outside. Roof joists and firrings attached.
18mm OSB for the roof. I was originally going to build a warm roof on top of this but was starting to get worried about the height so I changed my mind and decided to get insulation sprayed inside instead.
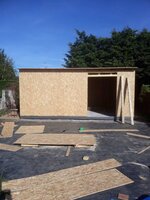
88916

Breathable building wrap applied and EPDM attached to the roof. Getting the EPDM onto the roof was difficult, this stuff is heavy, particularly as I went for the thicker one. A lot easier to apply than I expected though and I would definitely use it again.
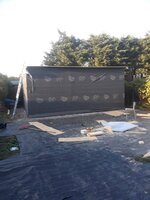
88917

Door in place and roof trim applied.
88918

Battens in place ready to attach the outside finish.
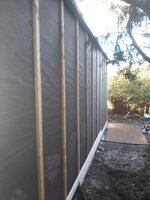
88919

I went for cheaper shiplap around the back and sides as this won’t really be seen and I used a slightly more expensive log lap on the front. If I did this again I would definitely buy a pre-treated wood as it took me weeks to treat the back of all these planks with Osmo oil before I attached them to the building.
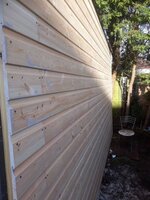
88920

Outside pretty much finished now. Just a couple of final pieces of trim to put in place. This Was the point at which the council turned up. Even though I had discussed the work with neighbours and let them know what I was doing someone had still put in a complaint. Thankfully the council were impressed with my work and research. They even suggested I could have put an apex roof on if I wanted it higher. They also said that the neighbours do not have a right to a view of my garden. At least I don’t need to worry about this any more and neighbours seem reasonably happy.
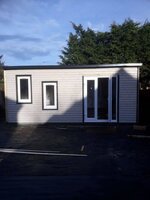
88921

On the inside I have 100mm Celotex (I really hate this stuff, hope I never have to use it again). You can see the spray foam insulation on the ceiling, I found a local company who do this for a lot of canal boats, only took a couple of hours. A layer of plastic sheet to cover floor, ceiling and walls, this may be slightly over the top but everything I have read has made me completely paranoid about interstitial condensation.
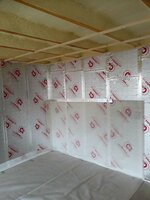
88922

18mm tongue and groove for the floor with a layer of 9mm OSB below this and 6mm foil backed insulation below this.

Used vinyl click flooring for the final finish.
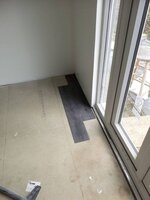
88923

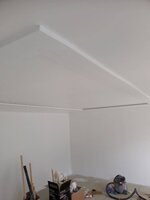
Plasterboard fitted and taped and filled joints. Painted with white paint, I won’t do this again as it took about 6 coats to get decent coverage. You can also just about make out the recessed LED strip light.88924

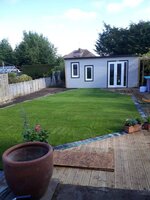
Since this photo I have completed the flooring and had someone in to install the electrics. A couple of bits left to tidy up and skirting to install but I have had to put the room on hold for a couple of weeks as I need to get the garden finished for my wife’s 50th in August. Once this is done I will be ready to buy my first pin almost 2 years after I started. Hopefully it will have been worth the wait.
88925

I was going to install an oil filled electric radiator but the room does get quite hot in the sun. It is not too bad with all the insulation but I am now thinking I need something that will cool in summer and heat in winter. Does anybody have any suggestions as to what might be best?
 
Really enjoyable read. Well done it looks brilliant. I am sure you'll enjoy it plenty. And don't forget to crank the sound up on the games you will get to please the neighbours!;)
 
Looks great! What do you think it cost you all in, if you don't mind me asking?

Did you put any insulation on the floor other than the 6mm?
 
Looks great! What do you think it cost you all in, if you don't mind me asking?

Did you put any insulation on the floor other than the 6mm?
It was just the 6mm on the floor. Do you think this will give me issues? Cost wise difficult to say as I was buying lots of small bits over a long period, i think about 6 to 8k.
 
It was just the 6mm on the floor. Do you think this will give me issues? Cost wise difficult to say as I was buying lots of small bits over a long period, i think about 6 to 8k.

Id certainly keep an eye on the temp esp in the winter. I don't think it will give you any big issues but you need to watch out for condensation. You could always put carpet tiles in which would add some more insulation.

looks great though! when you rolling in the pins?

Neil.
 
Good to see, mine will be ready in a week, (on and off 2 months to complete), space for 10 which I’m filling with spiderman, woz, Walking Dead, acdc luci, Iron Maiden, Metallica, lord of the rings, twilight zone, Addams Family. Also a vpin with 200/300 games, 8TB (yes terabytes) of emulation material, large fridge and dedicated mame cab, side pc office for Mac’s/pcs.
 
It was just the 6mm on the floor. Do you think this will give me issues? Cost wise difficult to say as I was buying lots of small bits over a long period, i think about 6 to 8k.

Yeah, from my experience I think that is a little low. Cold and damp always come from the ground. I have 100mm insulation and it’s perfect. As a rule of thumb, it should be insulated to at least the same thickness as is used for the walls.

Just my 10 cents.

It’s looks amazing by the way!
 
Thanks for all the comments. Will be 2 pins initially which I will hopefully rotate. I am sure this number will grow over the years.

Anyone got any experience of wall mounted air con / heating units. About 25sq/m of space. Looking for recommendations.
 
Here’s my games room :)
a91cadd29454f6dc99026f4919b0db76.jpg
 
Awesome build, really enjoyed reading this so far. I always find game room builds interesting as I have literally no knowledge on DIY and projects like this. Keep up the good work, it will all be well worth it in the end!

James
 
I would have a dehumidifier, to keep moisture down.Humidity transmitter with a display, so will tell ya temp and humidity.
celotex on the roof would have kept some of the radiant heat out.
Ta for sharing, good luck
 
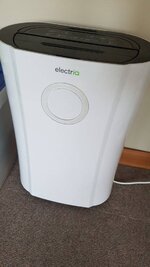
If ever tempted to get a dehumidifier, this is what i got when I was drying the plaster inside my games room. Used it maybe 3 days and that was it. It has been sat in the games room since then. That was last year. It was new last year.
 

Attachments

  • 20190722_200022.jpg
    20190722_200022.jpg
    54.8 KB · Views: 14
  • 20190722_200038.jpg
    20190722_200038.jpg
    49.7 KB · Views: 14
  • 20190722_200108.jpg
    20190722_200108.jpg
    32.7 KB · Views: 14
If ever tempted to get a dehumidifier, this is what i got when I was drying the plaster inside my games room. Used it maybe 3 days and that was it. It has been sat in the games room since then. That was last year. It was new last year.

Where is that one from?
 
Can't remember but I could find out at a push. Probably ordered online and it turned up at the house. Just like the rest of everything around here. How does it matter? Are there different suppliers?
 
Thanks! I have been using them 3M moisture collectors and they have been working fine, but they don’t look great and I have kicked them over too!
Sods law, I dumped a dehumidifier last week as I couldn't seem to sell it anywhere, you could of had it if I'd of know - sorry mate :confused:
 
Just my two cents, but too many people focus on insulation but forget about ventilation. Condensation will be worse if you don't let the room breathe.

But this is a fantastic build mate and two is a great number of pins. One quick player and one with more depth.
 
Just my two cents, but too many people focus on insulation but forget about ventilation. Condensation will be worse if you don't let the room breathe.

But this is a fantastic build mate and two is a great number of pins. One quick player and one with more depth.

Couldn’t agree more on both fronts! I always try and air my room whenever I can and ‘touch wood’ I have had no issues with condensation.

I have recently gone down to two pinballs (long play and a short play); I am happy and finally feel settled with the collection.
 
Back
Top Bottom