OP
OP
B Box Decals done....


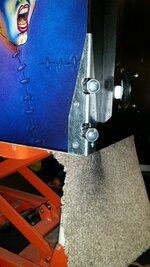
I like to use the lift bar in the mid position when working on pins. This puts localised strain on the PF so I have added an additional right angle section to spread the load as follows:
View attachment 11805
Looks like you're doing a great job. I don't mean to nit-pick, but in the picture showing the reinforcement you've added, one of the jet bumpers is visible - there's a washer visible under the 5/16" nut securing the linkages to the bumper ring. Is that the washer that should be fitted above the linkages?. I appreciate that it may have come to you like that, but factory fitment had thin washers between the shafts and the metal linkage, with the elastic stopnut tightened straight onto the fibre linkage.


Very nice.
Please don't get Elvira and Bride of Frankenstein mixed up. I do like you're custom paint jobs on the figures though, well done.

")