And I throttled the snack bar guy and then felt bad about it
Pinball info
You are using an out of date browser. It may not display this or other websites correctly.
You should upgrade or use an alternative browser.
You should upgrade or use an alternative browser.
Mini Shop Jobs - SURFER, CFTBL, Other
- Thread starter Fifty
- Start date
OP
OP
Fifty
Registered
I always have something on the go. I have a to do list that is a kilometer long. Projects, repairs, and stuff I just want to try.
This week I have a few things happening;
Creech apron cards have been finailised and have been sent to the printer. I've also started using Adobe Illustrator a bit more and have been trying to design some art for the bare walls of my little pinball room. In the garage I've been doing some woodworking (more on that on another day). Tonight I decided to start cleaning up another part of my Surfer. The crescent moon shaped piece of metal at the back. There are bits of rust on it that should be an easy enough fix. It bothers me every time I look at it so it needs to look better.


There are only 9 screws holding it in place so it was easy to remove. There was a lot more rust underneath than I had suspected. No one will ever see this clean-up job, but I'll feel better knowing it is done and can't get worse.


Neat little cut on the siderails that the metal slips into. It's neat to think that this piece probably hasn't been removed since it was built in 1976.

White piece removed. A little rust underneath too.


Off comes the rest.


It's neat to see the playfield without the back on it. Little surprise underneath all of that metal for me to find. Silkscreened into the wood is SURF CHAMP 386 and SURFER 387. The numbers represent the model number of each version of this pin.


Tomorrow I start cleaning up the metal with a brass wheel and then the Dremel for polishing. Kids are in bed and the noise emanates from the garage into the house and keeps them awake, so tomorrow it is.
This week I have a few things happening;
Creech apron cards have been finailised and have been sent to the printer. I've also started using Adobe Illustrator a bit more and have been trying to design some art for the bare walls of my little pinball room. In the garage I've been doing some woodworking (more on that on another day). Tonight I decided to start cleaning up another part of my Surfer. The crescent moon shaped piece of metal at the back. There are bits of rust on it that should be an easy enough fix. It bothers me every time I look at it so it needs to look better.
There are only 9 screws holding it in place so it was easy to remove. There was a lot more rust underneath than I had suspected. No one will ever see this clean-up job, but I'll feel better knowing it is done and can't get worse.
Neat little cut on the siderails that the metal slips into. It's neat to think that this piece probably hasn't been removed since it was built in 1976.
White piece removed. A little rust underneath too.
Off comes the rest.
It's neat to see the playfield without the back on it. Little surprise underneath all of that metal for me to find. Silkscreened into the wood is SURF CHAMP 386 and SURFER 387. The numbers represent the model number of each version of this pin.
Tomorrow I start cleaning up the metal with a brass wheel and then the Dremel for polishing. Kids are in bed and the noise emanates from the garage into the house and keeps them awake, so tomorrow it is.
just got a message that the snackbar just landed in Canada.... hopefully early next week
OP
OP
Fifty
Registered
Alright, a little more work on Surfer tonight. Inbetween making dinner and putting the kids to bed I managed to get 15 minutes to myself.
Grabbed the drill and a worn brass wheel and took off the white paint on the crescent piece of metal. Then took a new brass wheel and went over it again. I did both sides even though no one will ever see the belly of it.

First coat of paint. Took a look at my stock and found this Tremclad Rust stuff. I think I bought it back in 2012. Good enough. I shook the can up for about 2 minutes and applied the first light coat.


It's getting dark pretty early now, and the temperature has dropped quite a bit. This would have dried in about 30 seconds in July, but it was still tacky after 5 minutes in September. I set it up in front of my radiant heater to help it cure more quickly.

I hit it with the spray paint again. Another light coat. Most of it is blanketed now, but I can see some imperfections. I'll probably take some 800 grit to it tomorrow after it has fully dried and then give it another light coat. Then I'll reassess and decide if another sanding and fourth coat are required.

Again, I'm not looking for perfection here. This is not a complete refurb. I bought this pin completely busted up for $400.
I like my games to look good aesthetically, and I want them to play with zero errors. My games work 100%. No inconsistent lamps, no lamps out, all features work flawlessly, all mechanicals work flawlessly. I am the type of person that will notice a bulb burnt out in your game when you never even knew there was a socket for a bulb there. I'll notice the wrong type of screw, a loose star post, an incorrect coil or a dozen other things a normal person would be oblivious to. For me, it's all about the details.
Grabbed the drill and a worn brass wheel and took off the white paint on the crescent piece of metal. Then took a new brass wheel and went over it again. I did both sides even though no one will ever see the belly of it.
First coat of paint. Took a look at my stock and found this Tremclad Rust stuff. I think I bought it back in 2012. Good enough. I shook the can up for about 2 minutes and applied the first light coat.
It's getting dark pretty early now, and the temperature has dropped quite a bit. This would have dried in about 30 seconds in July, but it was still tacky after 5 minutes in September. I set it up in front of my radiant heater to help it cure more quickly.
I hit it with the spray paint again. Another light coat. Most of it is blanketed now, but I can see some imperfections. I'll probably take some 800 grit to it tomorrow after it has fully dried and then give it another light coat. Then I'll reassess and decide if another sanding and fourth coat are required.
Again, I'm not looking for perfection here. This is not a complete refurb. I bought this pin completely busted up for $400.
I like my games to look good aesthetically, and I want them to play with zero errors. My games work 100%. No inconsistent lamps, no lamps out, all features work flawlessly, all mechanicals work flawlessly. I am the type of person that will notice a bulb burnt out in your game when you never even knew there was a socket for a bulb there. I'll notice the wrong type of screw, a loose star post, an incorrect coil or a dozen other things a normal person would be oblivious to. For me, it's all about the details.
OP
OP
Fifty
Registered
Picked up the latest apron cards today. I'd say I'm 90% happy with them. The underlying shadows are gone, and the white text in the buttons is much cleaner, but some of the finer detail is still fuzzy. Unless I change the font, or the design more I don't think it will get better. For now I'm happy. So I cut the cards and go to put them in the pin and... they are the wrong size. I had selected DO NOT SCALE in the online order, so I don't know if the Printing company screwed up, or if I did something. My money is on the Printer though as I have had these printed out 5 times now and they've been correct each time. So, they don't fit. I'll have to send them in again. Sigh...


I did up this wall art as my second Ai project. It printed out perfectly. No issues with the sizing or the actual print design. Ran into IKEA on the way home and picked up a 41cm x 51cm frame for it. I designed it specifically to fit this size frame with the included matte. I am pretty happy with it. Jerry McGuire is one of my favourite movies so it just made sense. I don't know if I've seen this saying floating around on the internet or not. Either way, this one was created from scratch by me. Please ignore the shadows of my drum kit reflecting in the design.

Sanded down the white crescent moon for my Surfer tonight. I used 600 grit. Gave it another shot with the spray paint. The paint seems to be speckling. Maybe it's too cold in the garage, maybe I missed the seasonal window to be doing this type of work, maybe the paint is just too old. It's supposed to be warmer tomorrow so I'll see what tomorrow brings.


I did up this wall art as my second Ai project. It printed out perfectly. No issues with the sizing or the actual print design. Ran into IKEA on the way home and picked up a 41cm x 51cm frame for it. I designed it specifically to fit this size frame with the included matte. I am pretty happy with it. Jerry McGuire is one of my favourite movies so it just made sense. I don't know if I've seen this saying floating around on the internet or not. Either way, this one was created from scratch by me. Please ignore the shadows of my drum kit reflecting in the design.
Sanded down the white crescent moon for my Surfer tonight. I used 600 grit. Gave it another shot with the spray paint. The paint seems to be speckling. Maybe it's too cold in the garage, maybe I missed the seasonal window to be doing this type of work, maybe the paint is just too old. It's supposed to be warmer tomorrow so I'll see what tomorrow brings.
OP
OP
Fifty
Registered
Alright, more forward progress today.
Firstly, I mentioned I've been doing some woodworking. I am by no means an expert, but I'm able to follow plans, and I've accumalated the necessary tools in the 46 years of my life. So, I have been making cedar deck chairs. Our old ones are over 10 years old and are in very bad shape. The wood has fractured in critical areas. I've created some repair pieces to keep them alive, but they have turn into some Frankenstein's monster chairs. Today, I finished all of them. We had 4, so I had to build 4. This took about 3 weekends to complete.


This is the colour they will be stained. It is a transparent stain called JUNIPER ASH. I wish I was paid to give regular colours interesting names.

I also gave my Surfer crescent moon another sanding with 600 grit. It was looking great, but I'm dealing with outside elements. I left the piece outside in the sun to dry and a small blackfly decided to land in the paint. Bugger. So picked him out of the paint, sanded, then ran out of paint (of course) so off to the hardware store, and finally a final spray of white. (Sorry, no photos for this).
I started brass wheeling the second tier of metal too. This one is in bad shape.

Here it is after the first couple passes with the brass wheel. The metal doesn't seem to be raw. There's a tin coating on it. It's the tin coating that has bubbled and rusted. There is quit a bit of pitting. I am not sure how to deal with this. I might have to cheat here and use chrome spray paint to make it look presentable.

Firstly, I mentioned I've been doing some woodworking. I am by no means an expert, but I'm able to follow plans, and I've accumalated the necessary tools in the 46 years of my life. So, I have been making cedar deck chairs. Our old ones are over 10 years old and are in very bad shape. The wood has fractured in critical areas. I've created some repair pieces to keep them alive, but they have turn into some Frankenstein's monster chairs. Today, I finished all of them. We had 4, so I had to build 4. This took about 3 weekends to complete.
This is the colour they will be stained. It is a transparent stain called JUNIPER ASH. I wish I was paid to give regular colours interesting names.
I also gave my Surfer crescent moon another sanding with 600 grit. It was looking great, but I'm dealing with outside elements. I left the piece outside in the sun to dry and a small blackfly decided to land in the paint. Bugger. So picked him out of the paint, sanded, then ran out of paint (of course) so off to the hardware store, and finally a final spray of white. (Sorry, no photos for this).
I started brass wheeling the second tier of metal too. This one is in bad shape.
Here it is after the first couple passes with the brass wheel. The metal doesn't seem to be raw. There's a tin coating on it. It's the tin coating that has bubbled and rusted. There is quit a bit of pitting. I am not sure how to deal with this. I might have to cheat here and use chrome spray paint to make it look presentable.
Last edited:
OP
OP
Fifty
Registered
I took some time away from the pins on the weekend to rip out the carpet, underpadding, tack strip, staples, baseboards, and moulding in my son's room. We are having our floors refinished and decided to go whole hog and finally update our house. We've been in the same place for 10 years now. The house was built in 1968, which is pretty old for Canada. I know over in the UK a house isn't even broken in until it is at least 100 years old, but in Canada, trust me the majority of people live in newly constructed homes less than a decade old.
I had been waiting to get some sandpaper from Amazon. You can't get anything over 1500 grit in stores here, so Amazon has been a Godsend. I ordered sanding discs that would attach to my power drill that go from 60 grit all the way up to 10,000 grit and also included various buffer pads.

I bought these to try my hand at polishing metal (steel). Specifically the lockbar on my Creech which is scratch to hell (see images earlier in this thread), but I've always wanted to try to get a mirror shine out of steel. I have watched a bunch of YouTube vids on the subject and while they are all a bit different in method they all have similarities as well. I decided to try it out on the crescent moon metal and the straight rods that hold everything in place on my Surfer.

The one on the bottom I have not sanded. The top one is my first attempt. I started with 60grit and slowly increased all the way to 10,000grit. I focused only on the side with the screw holes. As you can see I didn't quite sand the very top flush so the mirroring, as I increased in grit, only started to appear on the rounded edges. The results are really satisfying. Here's another photo side by side.

Again, the one on the left is unsanded. The one on the right you can more clearly see the line up the middle where I didn't get it sanded well enough with the lower grits. Still though, look at that shine! I went to re-install everything in Surfer tonight but when I started re-assembling things I realised the side of these rails is what the player sees, not the bit with the screw hole. So I pulled it apart again and I'm going to try the sanding process again on one side tomorrow night. The side I'm going to face towards the player. The toothpicks are to help me line everything up with the holes in the playfield.

Oh, and I bought some Flitz metal, plastic polish as well from Amazon. This stuff is pretty awesome. I dripped it onto an old rag, then stuck the old screws into my Dremel one at a time and turned it on. Rubbing the screw head into the Flitz. The screws came out sparkling! You can see the dirt still in the slot, but the head is super shiny!

I had been waiting to get some sandpaper from Amazon. You can't get anything over 1500 grit in stores here, so Amazon has been a Godsend. I ordered sanding discs that would attach to my power drill that go from 60 grit all the way up to 10,000 grit and also included various buffer pads.
I bought these to try my hand at polishing metal (steel). Specifically the lockbar on my Creech which is scratch to hell (see images earlier in this thread), but I've always wanted to try to get a mirror shine out of steel. I have watched a bunch of YouTube vids on the subject and while they are all a bit different in method they all have similarities as well. I decided to try it out on the crescent moon metal and the straight rods that hold everything in place on my Surfer.
The one on the bottom I have not sanded. The top one is my first attempt. I started with 60grit and slowly increased all the way to 10,000grit. I focused only on the side with the screw holes. As you can see I didn't quite sand the very top flush so the mirroring, as I increased in grit, only started to appear on the rounded edges. The results are really satisfying. Here's another photo side by side.
Again, the one on the left is unsanded. The one on the right you can more clearly see the line up the middle where I didn't get it sanded well enough with the lower grits. Still though, look at that shine! I went to re-install everything in Surfer tonight but when I started re-assembling things I realised the side of these rails is what the player sees, not the bit with the screw hole. So I pulled it apart again and I'm going to try the sanding process again on one side tomorrow night. The side I'm going to face towards the player. The toothpicks are to help me line everything up with the holes in the playfield.
Oh, and I bought some Flitz metal, plastic polish as well from Amazon. This stuff is pretty awesome. I dripped it onto an old rag, then stuck the old screws into my Dremel one at a time and turned it on. Rubbing the screw head into the Flitz. The screws came out sparkling! You can see the dirt still in the slot, but the head is super shiny!
OP
OP
Fifty
Registered
Alright, assembly time! I think I figured out what was making that odd line in the middle of my polished rails. Here's how the rails look now. I only polished one side. No one will ever see the other side so why waste labour on it?


And here are the money shots,


Check out that mirror finish in the metal piece at the back! Woohoo! You can even seen the screw heads clearly reflected!
And here are the money shots,
Check out that mirror finish in the metal piece at the back! Woohoo! You can even seen the screw heads clearly reflected!

Yeah great results, I'm enjoying your log. I'm interested that you could sand to that high standard rather than using buffing compounds and mops similar to this
https://www.metalpolishingsupplies....ss-steel-3-x-1-2-metal-polishing-buffing-kit/
https://www.metalpolishingsupplies....ss-steel-3-x-1-2-metal-polishing-buffing-kit/
OP
OP
Fifty
Registered
Thanks @astyy. I did investigate compounds. I even wasted a few hours of my life trying to use red compound to bring out a lustrous shine only to later Google what I was doing wrong and learn that red compound is basically jewellers polish and has a grit rating of zero. No wonder it wasn't doing anything!Yeah great results, I'm enjoying your log. I'm interested that you could sand to that high standard rather than using buffing compounds and mops similar to this
https://www.metalpolishingsupplies....ss-steel-3-x-1-2-metal-polishing-buffing-kit/
I ended up buying two sticks of green compound, which has a grit rating of 6000 (thanks Google). I did try using it for this project, but honestly the stuff was difficult to work with. At least the stuff I bought was. It isn't a paste, it was a stick. It looks like green chocolate, but doesn't rub off easily. It's meant for rubbing onto a leather strop, which I don't have, so I was just trying to rub it into the buffing wheels and some of the low grit sandpaper wheels. That didn't really work well. Anyway...
You can't find a metal polishing kit or a bench polisher here in Canada. You would be surprised how difficult it is to find basic items here sometimes. If it wasn't for Amazon I wouldn't have even been able to get the sandpaper for this project. Amazon and eBay are often the only options. For example, the wood veneer that I used to repair my Creech earlier in this thread? Amazon. Home Depot here doesn't sell it, even though they carry it in the US stores. Water slide decals. eBay. Michael's (largest craft store here) doesn't sell them, even though they carry this item in the US stores. This is usually what happens.
[EDIT] Actually, Home Depot here does sell the wood veneer. I tried to order it from them originally. You can only order it online as it is not something they carry in store. I ordered it. 30 days went by and there were no updates. I cancelled. Ordered from Amazon, got the product the next day for half the cost of Home Depot.
Last edited:
OP
OP
Fifty
Registered
So I'm at work, and I took a look at the Creech apron cards in Ai. The measurements in Ai is 152mm x 82mm on v6. The same for v5, v4, v3... Odd. I'm using the pinballrebel website for card sizing and it shows Williams as 152 x 82.

Here are the properties in Ai.

When I print them, I have DO NOT SCALE selected. If I measure them with a tape measure (in cm) they measure just over 15cm which is exactly right.

For some reason they don't fit in the apron slots, while the other sets I have printed all do. So I took one off of the pin and measured it. The ones I printed out earlier are under 15cm! WTF is going on?!

I don't know what the hell is going on. I don't know why the earlier prints were all the incorrect size but ended up fitting and the correct size doesn't. I will have to take a look at this again when I'm home in front of the pin. @Inkochnito should I be using the Williams sizing on a Bally?
Here are the properties in Ai.
When I print them, I have DO NOT SCALE selected. If I measure them with a tape measure (in cm) they measure just over 15cm which is exactly right.
For some reason they don't fit in the apron slots, while the other sets I have printed all do. So I took one off of the pin and measured it. The ones I printed out earlier are under 15cm! WTF is going on?!
I don't know what the hell is going on. I don't know why the earlier prints were all the incorrect size but ended up fitting and the correct size doesn't. I will have to take a look at this again when I'm home in front of the pin. @Inkochnito should I be using the Williams sizing on a Bally?
OP
OP
Fifty
Registered
Okay, so I'm an idiot and the apron cards DO fit. When I cut them, I liked how they looked with a skinny bit of white trim around the edges. This was enough on all sides to throw off the sizing and have it buckle in the apron slot when installed. I am glad that is solved. Easy fix. I trimmed off the excess white edges and voila.
Oh, and I installed my v5 Swink's Snackbar mod tonight! Holy guacamole! I had the v1 a long long time ago. Bought it when I didn't even own a Creech and admired it in the shipping box for years. I finally installed it years later in someone else's Creech. It was wonderful. It had the EL wire in pink and it looked like it was born in the machine. It was just a great, great mod. I left it in the pin when the owner came to pick up his Creech. An expensive 'thank you' but honestly I just didn't want it to sit in a box any longer. Now I own a Creech! Now I own a v5 Swinks Snackbar! This version of the mod just blows my mind. If you own a Creech and don't own this mod you are doing the game and yourself a huge injustice.
Lastly, I played Creech tonight and got the pretzel award. It's HOT PRETZEL not warm pretzel. You guys tricked me. One more revision to the apron cards coming up! @Calimori I haven't forgotten about you. Sorry about the wait.
Kids are back in school today after a 7 month hiatus too!
Last edited:
awesome Tim, make sure to post a pic of the snackbar installed.... all the best to the kids heading back to school
also the games are looking great
also the games are looking great
OP
OP
Fifty
Registered
Okay, I know I was really dragging this out, but I wanted these to be as perfect as possible. Here are the FINAL versions of my apron cards. I added a little PayPal donate tagline to the bottom, but please don't feel obligated.
When you print these out make sure you select DO NOT SCALE. My preference has always been to use acid free white cardstock. Something between 90-120LBs gives a good heft to the cards so they don't feel flimsy and maintain their shape. When cutting, cut along the outside of the grey borders. This should ensure a perfect fit.
Please feel free to share these links. Let me know if you have any problems. As always I welcome comments for improvements.
Light pink
https://drive.google.com/file/d/1U_xH9_vuPTo2ZlQIFKXn5Ff9boDnUt_7/view?usp=sharing

Hot pink
https://drive.google.com/file/d/1qUB5BHmqUKcEMXton63COISJta6Y5lEE/view?usp=sharing

@Calimori
When you print these out make sure you select DO NOT SCALE. My preference has always been to use acid free white cardstock. Something between 90-120LBs gives a good heft to the cards so they don't feel flimsy and maintain their shape. When cutting, cut along the outside of the grey borders. This should ensure a perfect fit.
Please feel free to share these links. Let me know if you have any problems. As always I welcome comments for improvements.
Light pink
https://drive.google.com/file/d/1U_xH9_vuPTo2ZlQIFKXn5Ff9boDnUt_7/view?usp=sharing
Hot pink
https://drive.google.com/file/d/1qUB5BHmqUKcEMXton63COISJta6Y5lEE/view?usp=sharing
@Calimori
Last edited:
OP
OP
Fifty
Registered
No pinball updates of late, although I did do some LED swapping on my Creech and also purchased some new star post rollover replacements for Surfer. My Creech is looking great LED wise, but I'm finding the LEDs too harsh. Waiting on the AG (patiently).
Been busy tearing out baseboards on my house and moving the entire second floor to the basement so that we can have the floors refinished. Oh, and did I mention my sister is getting married in our backyard this Saturday!!! Due to COVID, attendance will be limited and the wedding was pushed up to this Saturday from Oct 2nd. This happened today! To say I'm running around like a chicken with my head cut off would be an understatement!
Here's some of the baseboards and door trim removed.
Last edited:
busy, busy mate
once they get married they all can pile in to play pinball, have a good one
once they get married they all can pile in to play pinball, have a good one
Oh that sounds like a lot of things all happening at once. But in these crazy COVID times, you just do what you can.
Great work on the cards. Currently, I am recovery from an operation but once fit, I can’t wait to get them over to the print shop.
Great work on the cards. Currently, I am recovery from an operation but once fit, I can’t wait to get them over to the print shop.
OP
OP
Fifty
Registered
This little running blog I have going has definitely helped me focus on getting things done on my pins. Items around the house for that matter too.
Okay, back at it tonight. I mentioned it earlier in this thread, but my Creech lockbar bothers me. There are a ton of scratches on it. It looks like someone dragged it through a gravel yard.


Now that I have all those sanding discs I've been meaning to try sanding them out. When I sanded the lockbar for my Surfer pin (earlier in this thread), I used a brass wheel in ended up looking awesome. That was with a $400 pin. Taking a brass wheel to my $7000 pin, well... Uh was a little more apprehensive. So, instead I used the sanding circles.
I didn't want to go any lower that 400 grit as it gets pretty abrasive quick. 400, 800, 1200, 2000 was what I ended up using. You can still see some of the really deep gouges that were in the metal but over all it is night and day looking at it now. I tried to capture some decent after photos.

You can see my mountain bike reflected in the metal.

Here's a real tight shot of one of the heavy gouges in the middle. It's barely noticeable now unless you capture it at the proper angle under the proper lighting. The camera captured the circling on the right but it's not actually noticeable at all. It's mainly the reflection of the light fixture over head.

Installed back where it belongs.
I even had time to work on my Surfer tonight. Two of the rollover inserts have broken legs and need to be replaced. Out comes the playfield. This insert needs to come out. One of the legs on the bottom has broken off.


I used my exact-o blade to trace the outside of the insert on the top of the playfield. This is to avoid chipping paint, or wood off of it. Using my heat gun on a low setting I applied heat to the bottom of the insert. Then I used a socket that fit perfectly and gently tapped it out.

Here's the first one out.

And here's the second one. Honestly, they came out much easier that I thought they would. The holes left behind are pretty clean. No trace of epoxy in them.

The inserts from the top. They are a bit of a mess.

The are a complete mess from the bottom. Ugh.

When I went to test fit the new inserts I noticed they were different. One was glossy red and the other was matte.

From the bottom, the new inserts are different as well. The left one has 5 legs, and the right only has 4. My pin uses the one on the right, but either would do as long as they all match (I'm planning on replacing them all). I spoke to my vendor and he told me I got the last 3 he had in stock. I'm guessing they are from two different suppliers. Probably PBR for the 5 leg and Pinball Life for the 4 leg.
So, that put a halt on my insert project for a bit until he gets more in. For now, I placed the playfield back in the cabinet to get it out of the way. I don't like leaving things lying around with the cats/kids here. The glass goes back on too.

Bit of a bummer, but what can you do?
Okay, back at it tonight. I mentioned it earlier in this thread, but my Creech lockbar bothers me. There are a ton of scratches on it. It looks like someone dragged it through a gravel yard.
Now that I have all those sanding discs I've been meaning to try sanding them out. When I sanded the lockbar for my Surfer pin (earlier in this thread), I used a brass wheel in ended up looking awesome. That was with a $400 pin. Taking a brass wheel to my $7000 pin, well... Uh was a little more apprehensive. So, instead I used the sanding circles.
I didn't want to go any lower that 400 grit as it gets pretty abrasive quick. 400, 800, 1200, 2000 was what I ended up using. You can still see some of the really deep gouges that were in the metal but over all it is night and day looking at it now. I tried to capture some decent after photos.
You can see my mountain bike reflected in the metal.
Here's a real tight shot of one of the heavy gouges in the middle. It's barely noticeable now unless you capture it at the proper angle under the proper lighting. The camera captured the circling on the right but it's not actually noticeable at all. It's mainly the reflection of the light fixture over head.
Installed back where it belongs.
I even had time to work on my Surfer tonight. Two of the rollover inserts have broken legs and need to be replaced. Out comes the playfield. This insert needs to come out. One of the legs on the bottom has broken off.
I used my exact-o blade to trace the outside of the insert on the top of the playfield. This is to avoid chipping paint, or wood off of it. Using my heat gun on a low setting I applied heat to the bottom of the insert. Then I used a socket that fit perfectly and gently tapped it out.
Here's the first one out.
And here's the second one. Honestly, they came out much easier that I thought they would. The holes left behind are pretty clean. No trace of epoxy in them.
The inserts from the top. They are a bit of a mess.
The are a complete mess from the bottom. Ugh.
When I went to test fit the new inserts I noticed they were different. One was glossy red and the other was matte.
From the bottom, the new inserts are different as well. The left one has 5 legs, and the right only has 4. My pin uses the one on the right, but either would do as long as they all match (I'm planning on replacing them all). I spoke to my vendor and he told me I got the last 3 he had in stock. I'm guessing they are from two different suppliers. Probably PBR for the 5 leg and Pinball Life for the 4 leg.
So, that put a halt on my insert project for a bit until he gets more in. For now, I placed the playfield back in the cabinet to get it out of the way. I don't like leaving things lying around with the cats/kids here. The glass goes back on too.
Bit of a bummer, but what can you do?
Last edited:
looks awesome mate, then some 2000 wet and dry with some water and will even be shiner....
OP
OP
Fifty
Registered
You can't find a bench polisher in Canada. I'd have to order one in from the USA. I would love to try one though. Especially on metal rails to give them a mirror shine. I use a power drill. It's able to rotate at a higher velocity than a cordless drill, at least my does. The sanding discs velcro onto the attachment that is installed in the drill. You can attach it directly or attach a sponge and then the disc. On flat metal I have found that attaching it directly is better. For rounded stuff, like this lockbar I did both. I started with the sanding disc on the yellow attachment, then put it onto the sponge and did the rounded edges. It really did come out nice.That lockdown bar looks fantastic Tim. Do you just attach the sanding discs to your cordless drill, or are you using a bench polisher?

I used 2000 dry. I'm suppose to be able to use them wet too, but the reviews on Amazon said the paper just falls apart. I've squirted a little of the Flitz polish in there though.looks awesome mate, then some 2000 wet and dry with some water and will even be shiner....
OP
OP
Fifty
Registered
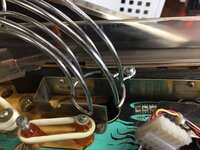
Unintentional shop job tonight. Aren't these just a kick in the teeth?
So I've been playing Creech lately like a man possessed. About every 10th shot towards the M (SLIDE) has been ending up with the ball getting stuck. A search always finds it, but it's been driving me nuts. I had been moving the left rail out in hope of a quick fix, but nope.
Time to dive in. Here is where the ball was getting stuck. Why? I've already removed the habit trail in this photo.

Upon closer inspection, I noticed the metal siderail was touching the wooden rail but then a gap slowly formed as you travelled up towards the VUK.

This gap was really apparent once the plastic was removed from the top of the area. Again though, why isn't it flush with the wooden rail?
Take another look.

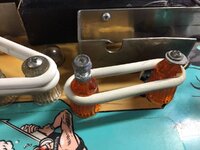
See it? That screw is meant to hold the metal rail to the wooden one. Instead it is inbetween the two pushing the metal rail out and causing the gap. Here's a better photo of it. The screw should not be inbetween. The screw should feed through the hole in the metal rail and tighten it down to the wooden rail. Who the hell would have done this? That's just lazy man!

It's behind this! Arrrrrrrgh!!!!! It's supposed to go through this hole into the wooden rail! Damn it!
Of course, this screw was located in the 7th layer of hell. Off comes the whirlpool ramp, off comes the habit trail, the Playground plastic, and I loosen off the right return ramp just so I can get my damn hand in there. THANKFULLY I just happen to have the PERFECT screwdriver for this. It was out of an old PC tool case that I bought 20 years ago for college. The screwdriver was literally a perfect fit. Perfect length, perfect size for the Phillips screw, it was so perfect it even slid through the hole in the metal rail. Check this out.


Note the little notch on the left side of the metal ramp that enabled the person assembling the pin at the factory to get a screwdriver in there too.
Once I had the screw out, I fed it through the hole properly and tightened it back down. I don't know if it came out of the factory like this, or someone shopped the pin and just said "Screw it" instead of correcting their error (more probable answer). Either way, it is assembled properly today. I re-assembled everything, but didn't have a chance to test it out. I am confident that I will no longer have balls stuck in this area.
So I've been playing Creech lately like a man possessed. About every 10th shot towards the M (SLIDE) has been ending up with the ball getting stuck. A search always finds it, but it's been driving me nuts. I had been moving the left rail out in hope of a quick fix, but nope.
Time to dive in. Here is where the ball was getting stuck. Why? I've already removed the habit trail in this photo.
Upon closer inspection, I noticed the metal siderail was touching the wooden rail but then a gap slowly formed as you travelled up towards the VUK.
This gap was really apparent once the plastic was removed from the top of the area. Again though, why isn't it flush with the wooden rail?
Take another look.
See it? That screw is meant to hold the metal rail to the wooden one. Instead it is inbetween the two pushing the metal rail out and causing the gap. Here's a better photo of it. The screw should not be inbetween. The screw should feed through the hole in the metal rail and tighten it down to the wooden rail. Who the hell would have done this? That's just lazy man!
It's behind this! Arrrrrrrgh!!!!! It's supposed to go through this hole into the wooden rail! Damn it!
Of course, this screw was located in the 7th layer of hell. Off comes the whirlpool ramp, off comes the habit trail, the Playground plastic, and I loosen off the right return ramp just so I can get my damn hand in there. THANKFULLY I just happen to have the PERFECT screwdriver for this. It was out of an old PC tool case that I bought 20 years ago for college. The screwdriver was literally a perfect fit. Perfect length, perfect size for the Phillips screw, it was so perfect it even slid through the hole in the metal rail. Check this out.
Note the little notch on the left side of the metal ramp that enabled the person assembling the pin at the factory to get a screwdriver in there too.
Once I had the screw out, I fed it through the hole properly and tightened it back down. I don't know if it came out of the factory like this, or someone shopped the pin and just said "Screw it" instead of correcting their error (more probable answer). Either way, it is assembled properly today. I re-assembled everything, but didn't have a chance to test it out. I am confident that I will no longer have balls stuck in this area.
Last edited:
OP
OP
Fifty
Registered
So it's possible when re-assembling this section that you did the same thing? I guess we will never know.I looked at my pre-shop out photos and only have one that shows the screw going through, didn't get any photos after shop out and don't have the game anymore.
")
no I used these photos for re-assembly.
the only new problem I had after my shop out was I installed a cliffy on the snackbar hole and the little clamp (part of the cliffy) that goes under and around the bottom of the playfield hole fowled with the ball in the subway - so I lifted the playfield, removed the subway and tapped the clamp bracket a little flatter and re-assembled = all good. It had me puzzled for a few games as a fast ball would make it but a slow ball would get caught.
the only new problem I had after my shop out was I installed a cliffy on the snackbar hole and the little clamp (part of the cliffy) that goes under and around the bottom of the playfield hole fowled with the ball in the subway - so I lifted the playfield, removed the subway and tapped the clamp bracket a little flatter and re-assembled = all good. It had me puzzled for a few games as a fast ball would make it but a slow ball would get caught.
OP
OP
Fifty
Registered
Thanks @Toxteth O'Grady I was hoping this shop log/blog would sort of give me a bit more incentive to work on some of the things that I procrastinate on. I think we all have those days when we get home from work, are tired, have to cook dinner, deal with the kids, and by the time you have some "me time" you just want to lie on the couch. I find the blog is providing that extra push for me, and even pushing me to try things that I haven't before (like swapping inserts).
I may have to look at my Cliffy as well. I installed it, and now the Snackbar shot is much, much tighter. You really need to hit it 100% or the ball just won't go into the hole. It doesn't get stuck, but shots that normally would have had no issues finding the hole are not making it.
OP
OP
Fifty
Registered
Only a few pinball updates this weekend. Our hardwood floors are being resurfaced on Monday, so the main focus has been moving furniture from the top floor of our house to the main floor, basement or garage. The master bedroom has been moved to the basement, and the kids are sharing the other half of the room. Baseboards were removed and door framing too.


The rest of the house is in utter chaos. Furniture is hidden everywhere we could find room. This is the first time since we have moved into this house 10 years ago that we are spending any money on aesthetics. We've dumped money into brickwork, chimney repointing, landscaping, a new roof, and some foundation work. I don't think we've even painted since we first made this place our forever home. Needless to say, it is overdue.
Pinball updates. If you are ever playing a Williams/Bally pin, drain, and the hear the trough kick multiple times it's because you have a broken trough wire gate. This is what my Creech was doing. It was driving me nuts. I managed to get one from a local merchant here. Used, but the price was free so I didn't complain.

For whatever reason, these gates always seem to be broken. Over the years, I've owned or had in my possession 10 Williams/Bally pins. Every single one of them had a broken gate, or no gate at all. Simple fix on most pins, but on Creech it's a bit of a pain in the ass because of the whirlpool. You have to move the whirlpool out of the way first.


Onto the plunger. For whatever reason, I find plungers are something that are never correct. More often than not, they have the incorrect coloured spring installed, or the improper washers installed. My Creech was no exception.
The e-clip was replaced with a makeshift one. Not a bad job in a pinch, but I can't let it stay this way. You can always tell something is wrong with the install of your plunger if you can't lift the playfield without it clipping the rubber tip, or without pulling the plunger back a bit. Most often the spring(s) need replacing, but I've found the spacer washers are often missing too.


Replaced the balls tonight too. New ones are on the bottom. The old ones weren't terrible, but they did have some pitting.

Cleaned up my Snackbar subway too. First image is the before. Second (Installed) is after.


Another thing that really bothers me on a pin, and is a simple fix is when the wood from the cabinet starts to peek through. I usually take some cheap craft paint, a paint brush, and a rag and fill in the wood that is showing. It was actually pretty bad on my Creech. Here's a BEFORE and AFTER of the area under the lockbar. I will get to cleaning the lockbar mech soon. Stickers on order...


Here's a photo of the BEFORE on the inside edge of the cabinet. Left side. You can see the wood peaking out under the plastic guide that the glass slides into.

Here is a photo of the right side. I've painted about half of it here.

Here is what it looks like finished. I've only done the right side. I use a brush to fill in the black, and then give it a rub with a rag to blend it. I allow it to dry overnight before putting the glass back in place. AFTER shot below.

Here is the paint I use. Nothing special. $2 at a craft store. I bought a bulk pack so I got a rainbow of colours.


The rest of the house is in utter chaos. Furniture is hidden everywhere we could find room. This is the first time since we have moved into this house 10 years ago that we are spending any money on aesthetics. We've dumped money into brickwork, chimney repointing, landscaping, a new roof, and some foundation work. I don't think we've even painted since we first made this place our forever home. Needless to say, it is overdue.
Pinball updates. If you are ever playing a Williams/Bally pin, drain, and the hear the trough kick multiple times it's because you have a broken trough wire gate. This is what my Creech was doing. It was driving me nuts. I managed to get one from a local merchant here. Used, but the price was free so I didn't complain.
For whatever reason, these gates always seem to be broken. Over the years, I've owned or had in my possession 10 Williams/Bally pins. Every single one of them had a broken gate, or no gate at all. Simple fix on most pins, but on Creech it's a bit of a pain in the ass because of the whirlpool. You have to move the whirlpool out of the way first.
Onto the plunger. For whatever reason, I find plungers are something that are never correct. More often than not, they have the incorrect coloured spring installed, or the improper washers installed. My Creech was no exception.
The e-clip was replaced with a makeshift one. Not a bad job in a pinch, but I can't let it stay this way. You can always tell something is wrong with the install of your plunger if you can't lift the playfield without it clipping the rubber tip, or without pulling the plunger back a bit. Most often the spring(s) need replacing, but I've found the spacer washers are often missing too.
Replaced the balls tonight too. New ones are on the bottom. The old ones weren't terrible, but they did have some pitting.
Cleaned up my Snackbar subway too. First image is the before. Second (Installed) is after.
Another thing that really bothers me on a pin, and is a simple fix is when the wood from the cabinet starts to peek through. I usually take some cheap craft paint, a paint brush, and a rag and fill in the wood that is showing. It was actually pretty bad on my Creech. Here's a BEFORE and AFTER of the area under the lockbar. I will get to cleaning the lockbar mech soon. Stickers on order...
Here's a photo of the BEFORE on the inside edge of the cabinet. Left side. You can see the wood peaking out under the plastic guide that the glass slides into.
Here is a photo of the right side. I've painted about half of it here.
Here is what it looks like finished. I've only done the right side. I use a brush to fill in the black, and then give it a rub with a rag to blend it. I allow it to dry overnight before putting the glass back in place. AFTER shot below.
Here is the paint I use. Nothing special. $2 at a craft store. I bought a bulk pack so I got a rainbow of colours.
Last edited:
OP
OP
Fifty
Registered
No pinball updates. My house is upside down. There is furniture everywhere EXCEPT the 2nd floor where the floors are being redone. The floor has been sanded and the edging done. Stain went down and oh man the fumes were strong! We were two floors away in the basement, openings sealed with plastic, and had every window in the house open. It was still pretty tough. If I had to do it again, I'd stay at a hotel for the night. But you know... COVID. When they do the main floor we are sleeping in a tent in the backyard. As long as it doesn't fall below zero Celsius.
Here's some pics. Camera doesn't really capture the stain colour. It's called SPECIAL WALNUT. We went just a bit darker. The original colour was just no colour. It was just the natural wood without stain and with layers of clear on it. Last photo is a side by side comparison of our refinished stair treads and the original flooring on the main floor that will eventually be refinished too. We just have to move all the furniture around again! My poor back...


In Canada, parquet flooring is from the 1970's or earlier. A lot of people here tend to rip it out and put it something newer or more trendy even if there isn't anything wrong with it. The majority of people here dislike the look of it. My family is trying to follow a zero-waste, or at least zero-plastic lifestyle, so we didn't want to rip out perfectly good flooring. Honestly, my wife and I both really like this style flooring too. Our parquet is 4x4. 4 smaller pieces of wood side by side in a 4" x 4" tile. Our flooring is red oak from 1968. Original to the house. It's nearly 53 years old! Try putting 53 year old red oak throughout your entire home nowadays! You'd have to sell one of your children!
By my next post, the 2nd floor should be back together and I can focus on getting baseboards started and hopefully do some pinball updates! I can't even play my games right now there is so much **** in the way!
Here's some pics. Camera doesn't really capture the stain colour. It's called SPECIAL WALNUT. We went just a bit darker. The original colour was just no colour. It was just the natural wood without stain and with layers of clear on it. Last photo is a side by side comparison of our refinished stair treads and the original flooring on the main floor that will eventually be refinished too. We just have to move all the furniture around again! My poor back...
In Canada, parquet flooring is from the 1970's or earlier. A lot of people here tend to rip it out and put it something newer or more trendy even if there isn't anything wrong with it. The majority of people here dislike the look of it. My family is trying to follow a zero-waste, or at least zero-plastic lifestyle, so we didn't want to rip out perfectly good flooring. Honestly, my wife and I both really like this style flooring too. Our parquet is 4x4. 4 smaller pieces of wood side by side in a 4" x 4" tile. Our flooring is red oak from 1968. Original to the house. It's nearly 53 years old! Try putting 53 year old red oak throughout your entire home nowadays! You'd have to sell one of your children!
By my next post, the 2nd floor should be back together and I can focus on getting baseboards started and hopefully do some pinball updates! I can't even play my games right now there is so much **** in the way!