What's new
Pinball info

Register a free account today to become a member! Once signed in, you'll be able to participate on this site by adding your own topics and posts, as well as connect with other members through your own private inbox!

In Progress Jan 1st Good day to start a refurb. 1964 GTB ‘World Fair’

Slingshot99

Site Supporter
5Years
Joined
Mar 1, 2020
Messages
333
Location
Northants
Although it’s not my first rodeo, it’s my first blog. Maybe it’s a NY resolution thing, either way I thought I’d give it a go. It’s not an ‘Ant-H’ resto it’s a ‘let’s smarten it up a little’ and play it. Budget is important becasue, if I come to sell it in the future, I’d like to get a little bit back for my efforts. No doubt any profit will buy another one!
Background to the buying the machine is that it was sold to a pal of mine 3 hours away from me. He spotted it in ‘Marketplace’ 5 minutes from my house🤬! However, first come first served and he took it away and got it as far as working. I’ve just finished a Wms ‘Magic City’, needed something to do (long time retired) and missed the World Fair I had pre-lockdown. I’d considered buying that one back but the owner was, understandably, reluctant to let it go. Thus I bought the one from 5 minutes away for a considerable amount more than the £50 my pal paid🫣
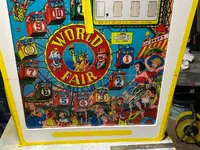
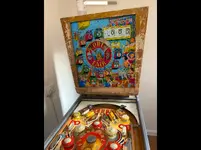
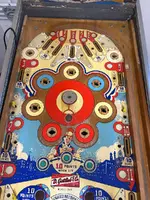
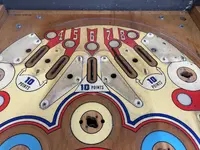
It’s a very cool machine, themed from the New York World Fair of ‘64. The aim of the game is to light all the gondola cars in order to light ‘replay’. It’s a tough game, but fun and achievable.
Enough waffle let’s take a look at what I bought;IMG_2216.webpIMG_2217.webpIMG_2220.webpIMG_2229.webpIMG_2232.webpIMG_2233.webpIMG_2235.webpIMG_2225.webpIMG_2224.webpIMG_2226.webpIMG_2234.webpIMG_2239.webpIMG_2238.webpIMG_2236.webpIMG_2237.webp

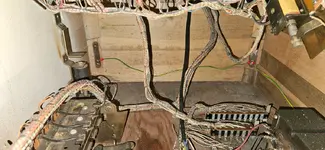
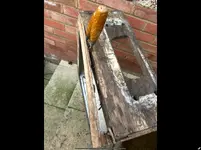
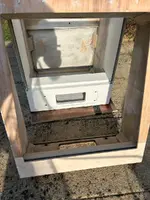
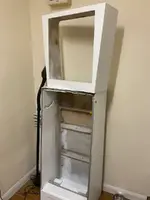
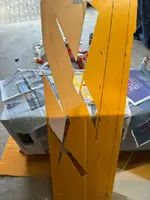
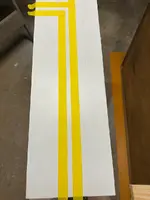
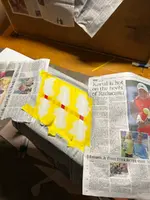
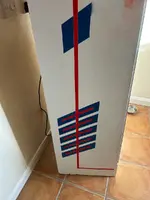
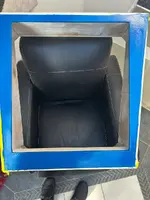
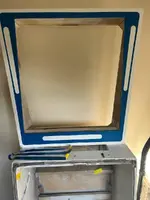
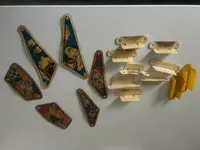
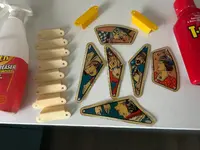
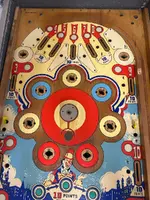
As can be seen, it’s a dog! Not the worst I’ve had but coincidentally my other World Fair had been ‘wrapped’ in Formica sheets, which is the blue panelling affixed to the whole cabinet but removed from the head. The head has its own problems as it’s delaminating and has been previously assaulted by a regiment of woodworm. The backglass isn’t too clever either, more of that in later posts………
 

Attachments

  • IMG_6568.webp
    IMG_6568.webp
    92.1 KB · Views: 4
I began the refurb today. I took a sander to the cabinet and lightly removed the old glue from the sides to try trace any sign of the design. Attempts to remove the glue with chemicals failed so it’ll be a full electric sand down when the time comes. Finding the design is a thing I’ve done a few times before as, for some bizarre reason, previous owners had decided they needed to cover a perfectly good WMS/Gottlieb design with their own diabolical effort, presumably to get the machine to match their existing decor? In one case a perfectly good machine had been painted in two big panels of red & brown gloss, and another blue, with a ‘fetching’🤬 pattern devised by painting over a paper *doily (ask your Gran😉)
With a gentle sanding the design popped out, no colour to be seen (maybe they removed it before applying lashings of evo-stik?). This allowed me to run a pencil over what I’d found ready for the next stage, which is adding a sheet of parchment/baking paper, which has to be white, so I could replicate the design onto the paper. That will eventually be used to make a stencil. That could be from Rowney oil board, a thin,hard,flexible reusable card. The fact the price of that material has gone up by a huge amount and you have to buy 10 big sheets at a time means, that for this project and the budget, I’ll use something else I’ve got tucked away for just such a task.
In the photo’s you’ll see the side of the head pre-sanded then the design appear, followed by the pencil work and finally the parchment paper completed with design. There won’t be a stencil yet as it’ll get done prior to spraying the colour on. IMG_2248.webpIMG_2290.webpIMG_2297.webpIMG_2298.webpIMG_2299.webpIMG_2300.webp
 
Last edited:
Spurred by my earlier success, I thought I’d use the rest of the day to make a start on stripping and cleaning the pf. I don’t take everything off, probably 95%, just to get me into the dirty areas so I can see what needs to be done later down the line in terms of paint resto. That won’t be perfect either. The aim is for it to be good enough for a blind man on a galloping horse 20’ away to admire😉. First job is to strip all the rubbers/screws/posts/plastics etc. Coloured plastics and plastic lane guides are cleaned with a cloth and a dab of ‘Kurd Kutter’ a really good, non abrasive, dirt shifter. Then the coloured plastics will have a gentle polish with t-cut. Fortunately they’re in very good condition, both in terms of paint and lack of damage. This is fortunate as a new set would be at least £150 from the States which is a bit heavy! There are a couple of before/between/after pics. This machine has a lot of nicotine discolouration so they didn’t get back to mint, but good enough and better than at the start. The pop bumpers will be replaced. They’re pretty knackered,warped, mismatched and miscoloured ditto the caps. That may have to wait as I’m going to the States before Summer and as postage is horrendous, I’ll have them sent to my holiday accommodation, unless I get impatient and just bite the bullet💰😁.
Part of the prep. for the pf clean is to remove all the bulbs. Unusually most of them are the later #44 type most of which will be replaced by LED’s (a taboo in the EM world😂)I put a drop of 3in1 oil into the lamp holder. This allows the fibre washer in the base to swell which tightens up the swivelling connector below. It will also help to dispel any moisture as the first clean will be with a chemical product and a little water. I also cover the copper contacts with heat shrink sleeping for 2 reasons, first they cut you up if you are polishing near them with a cloth. Secondly, if you use a buffing mop with a drill as I do, you’re likely to not see them and may rip them apart with the drill.
Once everything was removed the first pass was with a light spray coat of ‘krud kutter’ on the worst areas. It really cuts through the dirt that’s accrued over many years. I then wiped that off and applied a heavy coat of t-cut which I wiped over the pf, then applied a polishing mop. That was wiped over then in the areas where there was a lot of ball swirl I used t-cut on an ME pad but only applied light pressure as it can easily remove any colour. Next sweep was a hand polish with a fibre cloth over everything then into the Briwax, a soft dark wax stain that is very good at colouring wood that’s lost its sheen. I usually do the ball run up the shooter lane and arch that inevitably gets worn with a furniture repair pen. I didn’t feel it was needed on this one as it wasn’t too bad. All the wood areas got a good soak and polish in Briwax. It seems to have worked? When I come to repair the painted areas, which will be done way down the line and after the cabinet has been repaired and repainted, I’ll use isopropanol (99% alcohol) to remove any polish first, then do my best to get the damaged coloured areas back. Again I’m not looking for perfection just a little ‘Trompe l’oil’ (trick of the eye) work. I’m a harsh critic of my work but my Wife always reminds me that I work with my nose 1” off the pf so see all the defects, whereas when you play your eyes are at least 3’ off the pf and then distracted by the ball🤞. Before, to after, for now…………
 

Attachments

  • IMG_2301.webp
    IMG_2301.webp
    129 KB · Views: 27
  • IMG_2307.webp
    IMG_2307.webp
    133.9 KB · Views: 25
  • IMG_2314.webp
    IMG_2314.webp
    65.6 KB · Views: 24
  • IMG_2316.webp
    IMG_2316.webp
    91.5 KB · Views: 24
  • IMG_2319.webp
    IMG_2319.webp
    143.4 KB · Views: 24
  • IMG_2320.webp
    IMG_2320.webp
    130.4 KB · Views: 20
  • IMG_2324.webp
    IMG_2324.webp
    126.5 KB · Views: 23
  • IMG_2326.webp
    IMG_2326.webp
    120.3 KB · Views: 31
Last edited:
OK, that’s day 1. The cabinet sanding will be the next process once the Formica is removed but painting will depend on weather. The innards will need to be stripped out and all the inner surface sanded too. There’s a lot to do…………

**If anyone is actually reading this, and because it’s my first blog, I’d appreciate some constructive observations on the content. Is the spiel too long/about right? Are there too many pictures? It might be, as the task goes forward, there’ll be less to say or photograph but as these are meant to be a learning tool for others I’d like to think I’m aiming the content at the right level to achieve that🤞
It's great, and just right content wise . I really enjoy reading what others do in reviving sickly games. I keep meaning to do one of my own, but then realise too late after I've started 😕. I have a World Fair if you need a reference source - it's all working bar a minor bizarre fault that I haven't had time to investigate yet I
 
It's great, and just right content wise . I really enjoy reading what others do in reviving sickly games. I keep meaning to do one of my own, but then realise too late after I've started 😕. I have a World Fair if you need a reference source - it's all working bar a minor bizarre fault that I haven't had time to investigate yet I
Thanks for that, glad it’s of interest. I’ll take up the offer of info. This is missing the bell assy from inside the back of the cabinet so I don’t know which bracket system it has. If you could take a picture when you have time that would be helpful.
 
Hi @Slingshot99

I've done many a blog resto on arcade cabs, but only just dipped my toe into pinball.

I think you've got it bang on. Good descriptions of what done, reasons why and products used. Backed up with good quality before/after photos.

Watching with interest. Thanks for posting.
 
Thanks for that, glad it’s of interest. I’ll take up the offer of info. This is missing the bell assy from inside the back of the cabinet so I don’t know which bracket system it has. If you could take a picture when you have time that would be helpful.
will do, although I don't think mine has its bells either. I can't access it at the moment due to building work but I'll get you pictures as soon as I can
 
Thanks for that but I meant in the back left corner of the cabinet. I don’t think these had one on the 0–9,there’s the one in your pic in the back box/head and should be a larger one in the cabinet. It’s the latter I’m searching for. TIA
 
nothing there. but my schematic suggests there was only one coil operated bell in the game
 

Attachments

  • 20250103_132120.webp
    20250103_132120.webp
    221.1 KB · Views: 4
  • 20250103_132216.webp
    20250103_132216.webp
    120.6 KB · Views: 4
I’d appreciate some constructive observations on the content. 🤞
I'd suggest keep the text short, one bit of text for each picture describing what is going on (like Ant generally does). Rotate each picture so it is the right way around before hitting post, leave a space between each picture and ensure there is only one picture in a given bit of screen, rather than two next to each other - it's far easier to follow just having to scroll down rather than reading/scrolling across and then down.
 
Ok, that’s interesting. I was going off ipdb which says 2. I don’t have a schematic but there was a bell coil bouncing around in the bottom of the cabinet. Very odd that. I’ve got a pal who has my old one that was returned. I’ll get him to get into the cabinet. Thanks for checking👍
 
Ok, that’s interesting. I was going off ipdb which says 2. I don’t have a schematic but there was a bell coil bouncing around in the bottom of the cabinet. Very odd that. I’ve got a pal who has my old one that was returned. I’ll get him to get into the cabinet. Thanks for checking👍
The pictures inside the cabinet on IPDB don't show a bell. It would be my guess that the second bell would be one on the 0-9 unit although the game on IPDB doesn't have one there either.
 
The pictures inside the cabinet on IPDB don't show a bell. It would be my guess that the second bell would be one on the 0-9 unit although the game on IPDB doesn't have one there either.
I’m thinking a small bell on the 0-9 plus the other small bell in the back box isn’t enough sound ie you’ll need a big one for the hundreds and the backbox (not on the 0-9) one for tens?
 
the same bell is used for 10's and hundreds:
M is the 10 point relay, and Q id the 100 point relay

View attachment 268770
I'd suggest keep the text short, one bit of text for each picture describing what is going on (like Ant generally does). Rotate each picture so it is the right way around before hitting post, leave a space between each picture and ensure there is only one picture in a given bit of screen, rather than two next to each other - it's far easier to follow just having to scroll down rather than reading/scrolling across and then down.

Good comments. I think I straightened the pics out as I went on. As it’s my first time at this the tech had confused me a little. I’m trying to let the pics roll into order of what’s going on. Descriptions may get briefer as tasks go on, maybe apart from stencil/paint, as it’s about passing on knowledge. Those that are quick to pick it up can skim, others might want more assistance. Thanks for the comments.
 
the same bell is used for 10's and hundreds:
M is the 10 point relay, and Q id the 100 point relay

View attachment 268770


That’s fairly solid then. The bell coil rattling around made me think a bell had been taken off. Of course the fairly obvious thing is that I haven’t found stray wires yet. They could turn up stuck under a harness (from previous experience) but it’s now unlikely. It helps the budget😉
 
….and I’m back in the room! My last post on the work on the GTB World Fair was Jan 1st. I picked up a chest infection the day after Boxing Day and it all went down hill in January. Now, 2 months later, three courses of antibiotics and a course of steroids I’m back in the game. Looking back I had cleaned the playfield and pulled the Formica off the cabinet and sanded down enough of the glue to find the original design and make stencils. The head was too far gone on the front to find that design so I intend to wing it on that. I started some light work on the cabinet when we had that sunny spell a couple of weeks ago. Couldn’t do much lifting and moving but managed to apply paint stripper and clean off the glue from the previously applied adhesive. It took a lot of white spirit/scourers/sanding/scraping but I managed to get to a point where I could paint. A priority was to repair the head which had become delaminated and was badly damaged. I was able to remove the damaged front section and scarf a new piece of ply in. Sanding the inside of the cabinet was a real PITA as it had been done in grey gloss which was really hard to remove. When I’ve done cabinets in the past it’s usually a gentle sand to get the old white paint off then a repaint of the top couple of inches which can be seen in play. I’d then give some of the panels a mist coat of white paint. I absolutely hate what I call the Caribbean coffin where everything is thick white gloss on every surface inside.
 

Attachments

  • IMG_2567.webp
    IMG_2567.webp
    106.4 KB · Views: 5
  • IMG_2570.webp
    IMG_2570.webp
    91 KB · Views: 5
  • IMG_2571.webp
    IMG_2571.webp
    95.3 KB · Views: 5
  • IMG_6869.webp
    IMG_6869.webp
    86.1 KB · Views: 4
  • IMG_2583.webp
    IMG_2583.webp
    118.6 KB · Views: 5
My painting process is to sand to bare wood put a light undercoat on which highlights damage/holes/woodworm trails. I always use water based undercoat and satin top coat.The reason for this will become more obvious later when the colour goes on. After the first light coat I’ll put the filler in the holes and cracks. If it’s a big area of damage I’ll mix car body filler and fill with that, sanding it to shape on corners etc. I’ll the. keep sanding and painting till I’m happy with then I’ll start topcoats and do the same process. If I’m honest I don’t go for a pristine look as the wood in the EM’s is so old it’s really difficult to get it immaculate and I’m happy to settle with the odd fine battle scar. As you’ll see when I get past the colour stage and onto the *webbing, which is synonymous with EM’s you’d be hard pushed to see any defects. *It’s mostly Gottliebs that have the webbing look, Williams tended to use the ‘splatter effect’. I’ll give more detail when I’ve done that but both effects were applied to the white paint to hide the deficiencies in the wood and finish.
 

Attachments

  • IMG_2589.webp
    IMG_2589.webp
    31.7 KB · Views: 2
  • IMG_6871.webp
    IMG_6871.webp
    23.1 KB · Views: 2
Once the white is done then it’s time to decide how to stencil it. There are options.I used to buy a product called ‘Oil Board’ by Rowney. It would come in large sheets of thin card and it had the benefit of being easy to cut, reusable and thick enough for purpose, but not so thin it floats about or allows paint to seep through. The price of it has gone from £40 for 10 sheets to £80 so it makes it an expensive option. I’ve had a stencil set for World Fair previously but it had been binned. It was quite difficult to work with as the pattern is fiddly as the two colours touch (I’ve added a library ipdb shot) as you have to paint the red then the blue and they can easily leach into each other and you’re forever correcting those areas, which can make it look messy. I discovered another option recently when I had a delivery of some corrugated plastic roofing and it was protected by a thick corrugated card. I used that recently on a Wms Magic City. Like Oil board it’s good for large shapes so you can cut it into one large sheet, then paint a colour, block that newly applied colour with the piece you’ve cut out and do the next colour, then repeat. It has the added benefit that it looks a lot like ‘factory’ as they used large thin cut out metal sheets as templates, lay them on the cabinet and hit it with a spray gun. The finish had a slight tinge of overspray so the edges weren’t sharp. I’ve added a picture of that sheet and my Magic City so I hope that makes sense?
 

Attachments

  • IMG_2610.webp
    IMG_2610.webp
    77.8 KB · Views: 6
  • IMG_6898.webp
    IMG_6898.webp
    63.8 KB · Views: 6
  • IMG_6896.webp
    IMG_6896.webp
    43.5 KB · Views: 6
My choice for this paint job was to just use masking tape. If I had used the thin oil board, as I did in the past, then I would spray the board with adhesive, stick the tracing that I had taken to it and then cut out the relevant parts. Often I would need duplicate pieces so I’d make a duplicate tracing. I would do the long red line on the head and cabinet first, then paint the blue box sections over the red line with the ‘fingers’ of the red part of the stencil in place. Then the blue box stencil would be put back over to block the blue and the red area painted. Using the oil board also requires the use of numerous weights, large and small including lumps of wood, coach bolts and large heavy nuts. These would be used to hold down the board in various places. Spraying over the stencil with an aerosol can, without the weights, meant that a lot of paint leached under the board. With weights you’d get the desired ‘over spray’ look as it allows a certain amount of paint to drift under. This time I felt it would be easier to solely use masking tape. First I flipped the tracing I’d made and went over every line with a pencil so there was a design on both sides. I then applied the tracing sheet onto the cabinet and taped it down. I’d again go over the design which would apply a line of pencil lead to the cabinet (thing brass rubbing). Next step is to apply the masking tape. I use low tack tape as it’s going to be placed on top of the water based paint and also the aerosol gloss and I don’t want to peel previous work off. To prevent the leach of colour under the tape I use a useful Painters tip, which is to place your tape in situ, then in the area where you’re going to apply colour paint over the edges of the base colour ie the white top coat. This procedure means that the white top coat seals any space between the cabinet, which is far from being as smooth as glass, and the tape. In the case of the long strip I used a small brush to slap the paint on and then pressed hard on the tape edge to seal it. On the large areas I would use the brush at the edges then run a roller over it to spread it. Obviously a lot of newspaper is added to the line to protect the rest of the area. As is often the case, the paint drift is excessive, and it’ll often get into places you never expected. Because I use water based top coat and dirt can be wiped of with isopropanol (my go to for everything from wiping and cleaning contacts to removing paint). At the end of the whole colour application process, and before applying webbing, I will go over the whole of the white area, remove any colour defects/drift and put a coat of white on with a roller to refresh it.
 

Attachments

  • IMG_2594.webp
    IMG_2594.webp
    28.7 KB · Views: 3
  • IMG_2595.webp
    IMG_2595.webp
    103 KB · Views: 2
  • IMG_2596.webp
    IMG_2596.webp
    100.9 KB · Views: 2
  • IMG_2591.webp
    IMG_2591.webp
    32.8 KB · Views: 2
  • IMG_2592.webp
    IMG_2592.webp
    56.4 KB · Views: 3
  • IMG_2600.webp
    IMG_2600.webp
    29.1 KB · Views: 3
and so it goes on………. Inevitably I made a couple of mistakes in the process but everything can be corrected. I’m happy to show them as I can also show how to correct them later. Currently it’s all about getting colour on. Obviously, masking, sealing the tape, applying the paper, spraying then repeating is a little long winded and, as I’m not particularly patient, I will tend to rush ahead, which as everyone knows is how mistakes happen. Of course there’s also a learning element in this as every cabinet repaint done I learn what to do better next time. Also it’s not brain surgery, so no one’s life depends on it, therefore I don’t take it too seriously! The last picture is of a corner where the paint has leached under the tale. The cure for this and the others that occured, and from previous experience, is to put masking tape on the red line, dip a cotton bud in some isopropanol, allow that to dry a little then rub along the edge of the tape with the cotton bud. If you apply too much ISO it’ll either leach under the tape, or when you pull the tape off the colour will come off with it. In areas where a lot paint drift has gone under the newspaper then a rag with ISO will take the majority off the white area then tape, protect and repair the important bits. I mentioned earlier that I use water based paint for the top coat and the above is the reason why. If it was all spirit it based paint you’d never be able to repair your faults without making a huge mess. #learningcurve !
 

Attachments

  • IMG_2601.webp
    IMG_2601.webp
    17.4 KB · Views: 4
  • IMG_6886.webp
    IMG_6886.webp
    64.7 KB · Views: 4
  • IMG_2608.webp
    IMG_2608.webp
    92.9 KB · Views: 4
  • IMG_2609.webp
    IMG_2609.webp
    75.7 KB · Views: 3
  • IMG_2606.webp
    IMG_2606.webp
    78.8 KB · Views: 4
Blue section next and worth adding some info about paint. The blue application requires masking over the red so that needs to dry for about 24 hrs,and this also where the low tack masking tape comes in useful, otherwise it’s likely to pull new paint off. It’s fortunate that paint technology has come on leaps and bounds as they’re very easy to apply with little fuss, they also dry quickly and I’ve only ever had one colour react badly with another product. In terms of colour matching I was lucky to find that the Wilko stores had a red and blue that were pretty much identical to the original, bearing in mind that the originals are 60 years old. A good way of finding original colour is when the side rails come off there’s often a bit under there or behind the door frame. It’s worth remembering that it’s highly unlikely that 2 machines, refurbed by different owners, are going to be side by side, so you can get away with a little variation. As Wilko are now finished I’ll try other makes (unfortunately there are no paint codes on the old Wilko cans) on common colours ie red & blue, but where something specific is needed I resort to taking a sample of paint and getting a new aerosol made. The last 2, before and after, pictures are a case in point. A Williams Hayburners with a race theme pinball had a particular green paint that wasn’t going to be in the diy store. With that refurb I took a piece of paint off that needs to be at least the size of a thumbnail. This is taken by either using a blade to lift it, or if the paint won’t lift, a chisel to take a lump out. A bit brutal but it’s being repaired and repainted anyway. I took that sample to B&Q who have a paint match service. They’ll use that machine to produce an emulsion sample pot in the colour. I’ll then apply a that to white card and send it to a company that reproduce it as an aerosol, again quick drying and easy to apply. Again, some of the blue went astray and in later pictures I’ll show the repair process for that. Also worth saying that if you look carefully some of the white has leached under the tape onto the colour but that should be easy to remove with water and a soft scourer. I’m leaving it for a while so the colour paint fully dries.
 

Attachments

  • IMG_2612.webp
    IMG_2612.webp
    98.1 KB · Views: 4
  • IMG_2613.webp
    IMG_2613.webp
    92.3 KB · Views: 2
  • IMG_2615.webp
    IMG_2615.webp
    79.7 KB · Views: 2
  • IMG_2624.webp
    IMG_2624.webp
    42.9 KB · Views: 2
  • IMG_2623.webp
    IMG_2623.webp
    19.1 KB · Views: 2
  • IMG_6880.webp
    IMG_6880.webp
    73.7 KB · Views: 3
  • IMG_6883.webp
    IMG_6883.webp
    50.3 KB · Views: 4
As you can tell if you’re following this🤞then you can see that I’ve done quite a lot of work in the last couple of weeks, hence the need to catch up on the blog while I remember what the hell I did (old age sucks!). The last section, for now, is painting the front of the head. I mentioned earlier that I wasn’t able to find the design on the original head so had to wing it using the ipdb shots. Overall I’m pleased with the result, although it took nearly all day as it was quite fiddly to set up. With hindsight I may have to amend the white flashes down the right and left face as I think they’re too wide, that’s an easy paint over adjustment. Process was straight forward but fiddly, hence the time it took. First was to ‘guess’ the width of the white band on the edge and apply tape to what needs to be preserved. I placed a piece of tape over the corner and an appropriate sized coin (Old 10p) and cut round them to make the inner curves, I then spent a lot of time measuring and comparing, with the backglass in situ, and marking up the masking tape with guide lines. The right and left flashes were quite difficult but I put one piece of tape on a board and cut that to size again using coins (10p & 5cent!) to make the curves for those. Once I’d made one, I placed it over another length of tape and cut round it. Again, the benefit of low tack tape, it doesn’t stick like the proverbial so it can be easily pulled apart. Once masked up it was easy to paint it all in one go. In the last picture you can see I’ve retained the pieces of tape that covered the white detail, now overpainted blue, they’ll be used when I do the final touch which is the webbing. I’ll cut out a piece of Oil board place the blue piece on and cut that shape out. I’ll then be able to spray the webbing on. The webbing should go on next week once I’ve done a final tidy up including a white finish coat.
 

Attachments

  • IMG_2627.webp
    IMG_2627.webp
    20.4 KB · Views: 3
  • IMG_2628.webp
    IMG_2628.webp
    26.8 KB · Views: 3
  • IMG_2629.webp
    IMG_2629.webp
    43.4 KB · Views: 4
  • IMG_2634.webp
    IMG_2634.webp
    225.1 KB · Views: 4
  • IMG_2636.webp
    IMG_2636.webp
    67.1 KB · Views: 4
  • IMG_2637.webp
    IMG_2637.webp
    42.2 KB · Views: 3
Back
Top Bottom