These instructions tell you what needs to be removed and done to install Cliffy's two new AFM protectors. The front edge protector for the moving target bank and the mothership scoop.
The moving target edge protector is the easier one to install and can be done entirely from underneath the playfield if the wood is not damaged to the point of requiring filling. But you should line it up from the top to make sure it looks right. Mine is not that bad but I am going to smooth it out with epoxy while doing the mothership scoop repair.
Remove lockdown bar, glass, 4 balls and lift the playfield.
Remove the moving target assembly. Disconnect the two wire harnesses by using the quick disconnects and the motor by pulling the plug from the motor board. Also, remove the lower three twist lamp sockets from the bottom edge of the main light board. Then remove the 4 screws holing the motor assembly to the bottom of the playfield. Then the 3 screws (and washers) holding the movable target bank.
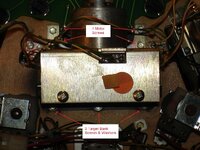
You can now install the moving target edge protector unless the wood is damaged to the point where it requires wood filling. You want the protector flush to the playfield so don't overfill. But deep ruts could cause the ball to dent the hyper-thin protector into the channels. Place the protector in the front of the slot (top if you are under the playfield) but line uf from the top. If loose use two #4 - 3/8 wood screws in the holes provided. Cliffy says they are really not needed unless it feels loose. (I did not need them, it was perfect).
You can now reinstall the moving target assembly in the reverse order of disassembly.
While under the playfield remove the nuts and washers (pictured) that are holding the two post on either side of the drop target in front of the mothership scoop hole.
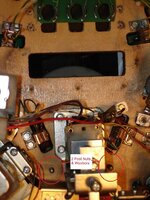
Now lower the playfield.
I did not remove the entire mothership assembly, but I moved it to the side. Remove the small saucer next to the back left of the mothership (twist and pop-off). Remove the two bolts holding the assembly in the back of the playfield backboard. Be careful with the darkened plastic shield. Pull the bracket up and off the backboard. (picture)
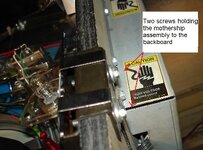
Put a piece of foam or folded tee-shirt down in the back right of the playfield and lay the entire mothership assembly on it. (picture) This leaves room to work. Of course if you are shopping the game you can remove more. But this tutorial shows you the minimum required to install the protectors.
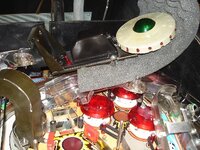
Remove the two Martians and the mothership plastics. If you are like me and have not shopped the machine yet you might be getting your first view of the full damage. Next remove the three sided metal ball guide that surrounds the scoop hole (two screws). To the left of the hole you will find another shield. One screw must be removed and the other loosened to allow the protector to slide under. This is also might be a good time to replace any bulbs in hard to reach places.
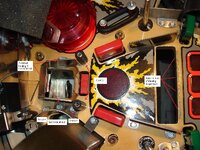
Clean the area pay attention to the two post holes. If these were very tight and squeezing the wood for years it may have created a divot that will need to be filled. Otherwise the tightening of the post may warp the Cliffy protector.
Cliffy says you can use a washer and/or clear epoxy to fill the divot. In that case you'll need to use a plastic straw as a dam or a post sprayed with a release agent like Pam or silicone. Even wax works well as a release.
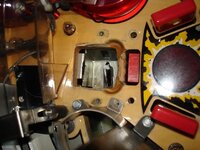
I am lucky that mine did not need the post holes filled as I did on the SOL install.
Test the fit of the Cliffy and prepare to build the wood back where needed. In this case I will need a complete wood ramp behind the drop target and a little on the sides.
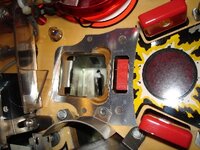
I use a Kraft Mac and Cheese box to make a cardboard mold. It has a nice shiny side that won't grab the filler as easy but a release agent would help. I decided to leave the drop target in place rather than remove. I used the target itself to wedge my cardboard mold against. Your repair may be different.
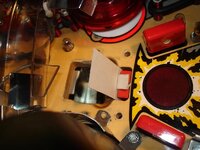
For my repair the cardboard for the front of the ramp was the only mold. I use blue masking tape on the good wood for clean lines and easy sanding without leaving a sticky residue. Use caution, tape can pull up loose paint, stickers and bad insert decals.
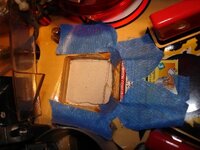
I am using Quick Wood epoxy to fill, a pinball sized ball would be more than enough. Push the epoxy against the mold, to the sides of the scoop hole and in front of the moving target bank. I sqeeze it in as close as I can to reduce sanding.
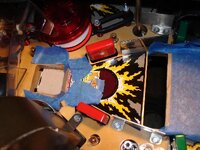
When it is dry (8 to 24 hours) it can be sanded. I waited 24 to be safe. I do not feel any of this repair work will be visible so I am not painting. Sand any bumps that will cause the protector to not seat flush. Try the protector, remove it, sand and repeat.
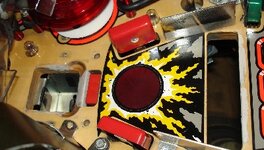
When you are happy put the protector in place. I found putting the posts in first lined it up close, but I did not tap down flush at first. Screw the left bald guide down, install the three sided ball guide and when everything is lined up in place tighten and tap posts down flush.
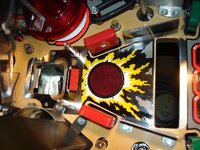
Now is an easy time to reinstall the plastics and Martians. Then put the mothership and front shield back with two bolts.
Also check the height of the drop target, in down position, to the protector. You can see mine was a little low in these pictures. Before, with the wood worn away, a slow ball landing on the target would just roll off the back into the scoop. Now, if too low the ball could get trapped and to high hit by the ball.
Lift the playfield and adjust the drop target stop bolt. This adjusts the resting position of a down drop target. I turned mine about 2 turns clockwise until the top of the target felt flush with the protector.
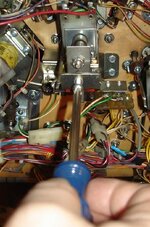
And while the playfield it up you can put the nuts and washers back on the posts, tighten but don't over tighten. If you did not install the protector or put the target bank back do that now. Make sure the edge protector is centered.
You are done. Install 4 balls, glass and lockdown bar and you can play. You should wait a day for the epoxy to fully harden, but I didn't. I played two games hammering up the center to make sure I did not see a sign of a lip. On game two I conquered Mars and felt satisfied..
Thanks as always Cliffy. I will have to figure out some day just how many of your protectors I own at this point.
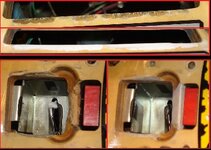 Before and after Quick Wood repairs. And with Cliffy's protectors the damage will not happen again.
The moving target edge protector is the easier one to install and can be done entirely from underneath the playfield if the wood is not damaged to the point of requiring filling. But you should line it up from the top to make sure it looks right. Mine is not that bad but I am going to smooth it out with epoxy while doing the mothership scoop repair.
Remove lockdown bar, glass, 4 balls and lift the playfield.
Remove the moving target assembly. Disconnect the two wire harnesses by using the quick disconnects and the motor by pulling the plug from the motor board. Also, remove the lower three twist lamp sockets from the bottom edge of the main light board. Then remove the 4 screws holing the motor assembly to the bottom of the playfield. Then the 3 screws (and washers) holding the movable target bank.

You can now install the moving target edge protector unless the wood is damaged to the point where it requires wood filling. You want the protector flush to the playfield so don't overfill. But deep ruts could cause the ball to dent the hyper-thin protector into the channels. Place the protector in the front of the slot (top if you are under the playfield) but line uf from the top. If loose use two #4 - 3/8 wood screws in the holes provided. Cliffy says they are really not needed unless it feels loose. (I did not need them, it was perfect).
You can now reinstall the moving target assembly in the reverse order of disassembly.
While under the playfield remove the nuts and washers (pictured) that are holding the two post on either side of the drop target in front of the mothership scoop hole.

Now lower the playfield.
I did not remove the entire mothership assembly, but I moved it to the side. Remove the small saucer next to the back left of the mothership (twist and pop-off). Remove the two bolts holding the assembly in the back of the playfield backboard. Be careful with the darkened plastic shield. Pull the bracket up and off the backboard. (picture)

Put a piece of foam or folded tee-shirt down in the back right of the playfield and lay the entire mothership assembly on it. (picture) This leaves room to work. Of course if you are shopping the game you can remove more. But this tutorial shows you the minimum required to install the protectors.

Remove the two Martians and the mothership plastics. If you are like me and have not shopped the machine yet you might be getting your first view of the full damage. Next remove the three sided metal ball guide that surrounds the scoop hole (two screws). To the left of the hole you will find another shield. One screw must be removed and the other loosened to allow the protector to slide under. This is also might be a good time to replace any bulbs in hard to reach places.

Clean the area pay attention to the two post holes. If these were very tight and squeezing the wood for years it may have created a divot that will need to be filled. Otherwise the tightening of the post may warp the Cliffy protector.
Cliffy says you can use a washer and/or clear epoxy to fill the divot. In that case you'll need to use a plastic straw as a dam or a post sprayed with a release agent like Pam or silicone. Even wax works well as a release.

I am lucky that mine did not need the post holes filled as I did on the SOL install.
Test the fit of the Cliffy and prepare to build the wood back where needed. In this case I will need a complete wood ramp behind the drop target and a little on the sides.

I use a Kraft Mac and Cheese box to make a cardboard mold. It has a nice shiny side that won't grab the filler as easy but a release agent would help. I decided to leave the drop target in place rather than remove. I used the target itself to wedge my cardboard mold against. Your repair may be different.

For my repair the cardboard for the front of the ramp was the only mold. I use blue masking tape on the good wood for clean lines and easy sanding without leaving a sticky residue. Use caution, tape can pull up loose paint, stickers and bad insert decals.

I am using Quick Wood epoxy to fill, a pinball sized ball would be more than enough. Push the epoxy against the mold, to the sides of the scoop hole and in front of the moving target bank. I sqeeze it in as close as I can to reduce sanding.

When it is dry (8 to 24 hours) it can be sanded. I waited 24 to be safe. I do not feel any of this repair work will be visible so I am not painting. Sand any bumps that will cause the protector to not seat flush. Try the protector, remove it, sand and repeat.

When you are happy put the protector in place. I found putting the posts in first lined it up close, but I did not tap down flush at first. Screw the left bald guide down, install the three sided ball guide and when everything is lined up in place tighten and tap posts down flush.

Now is an easy time to reinstall the plastics and Martians. Then put the mothership and front shield back with two bolts.
Also check the height of the drop target, in down position, to the protector. You can see mine was a little low in these pictures. Before, with the wood worn away, a slow ball landing on the target would just roll off the back into the scoop. Now, if too low the ball could get trapped and to high hit by the ball.
Lift the playfield and adjust the drop target stop bolt. This adjusts the resting position of a down drop target. I turned mine about 2 turns clockwise until the top of the target felt flush with the protector.

And while the playfield it up you can put the nuts and washers back on the posts, tighten but don't over tighten. If you did not install the protector or put the target bank back do that now. Make sure the edge protector is centered.
You are done. Install 4 balls, glass and lockdown bar and you can play. You should wait a day for the epoxy to fully harden, but I didn't. I played two games hammering up the center to make sure I did not see a sign of a lip. On game two I conquered Mars and felt satisfied..
Thanks as always Cliffy. I will have to figure out some day just how many of your protectors I own at this point.
 Before and after Quick Wood repairs. And with Cliffy's protectors the damage will not happen again.