What's new
Pinball info

Register a free account today to become a member! Once signed in, you'll be able to participate on this site by adding your own topics and posts, as well as connect with other members through your own private inbox!

IJ Board Confusion!!

Steve

Registered
10 Years
Joined
Jul 21, 2011
Messages
774
Location
Maldon,Essex
I'm putting the backbox on my IJ and am completely stumped. I've replaced the power driver board with a Pinled one as the original had some damage (but was working ok).
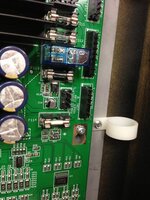
I've gone to connect J101 but the pins are different on the new one to the original?

On the original (from bottom to top) there is a set of 4 pins, a blank and then 2 pins at the top.
On the Pinled board there it's the reverse - 2 pins, a blank and then 4 pins??

Am I missing something or is this new board wrong? IMG_1964.jpgIMG_1966.jpg
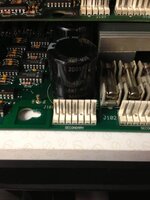
 
Looks like an error on pinleds side ... the missing pin on the new board is a loop from the adjacent pin(4) 13vac transformer secondary input, check on rear of new board if pin 3 goes nowhere as it should be the key

john
 
Looks wrong to me too. Factory error I would assume.

Unless they've jiggled the pins around to accommodate for that new display connector?! :eek:
 
That's what I thought. I've sent an email to Pinled asking them what they think.
I hope they don't give me a hard time as I bought it over a month ago and it's been sat in the box.
 
There is an arrow that points to where the pin should be missing (on the new board) and it points to the third from the top where they have left a pin. Pinled have made a mistake with the header pins so they should replace it for you.
If they don't, which they would have no excuse for, I can replace the header pins for you and have some black ones but they look slightly different and I know you seek perfection. Let me know.

As an aside, what damage did you have on the original as I would buy it off you as I quite enjoy fixing PCB's for some reason. :)
 
The board is quite bad mate, J121 has melted away the 2 right pins and there is loads of bodging on the back, with bridges.
I prefer to hang on to it but you could always charge me to repair it!
IMG_1803.jpg
 
There is an arrow that points to where the pin should be missing (on the new board) and it points to the third from the top where they have left a pin. Pinled have made a mistake with the header pins so they should replace it for you.

Well spotted Geoff. I had no idea that's what the arrows were for? I'll remove it from the machine and pack it up, it's going back.
 
Just got this email from them:

"Hi Steve,
Thank you for writing us. You are right there is a mistake on the pinled board. It should be the same as the original board.
To solve the problem you can do one of the following steps:
  • send us the board back an we will send you a new one back (but this is the most expensive option because of the shipping costs)
  • just cut the third pin with a pliers and you can put on the connector back again. In this option you will loose one pin (the one which was wrong cutted off)
  • best option is to desolder pin 3. pull the pin out and put it back into the board on position for pin 5.
We are sorry for this..."
Not really sure what the best option is, I'm a complete thicko with soldering and don't fancy cutting pins in case I bugger it up.
 
Paul's dead on the money for this, they should send you a replacement board
no quibble and return signed for postage label for the faulty one.

But to swap a pin over is a 2 minute job in reality :rolleyes:
 
They shouldn't charge you, it is a fault with their process.
However, I never thought of swapping over just the pin and will happily do that for you as it won't take long. I have a board you can practice on first if you want to try.
 
It sounds like the pin swap is an easy fix and saves me the hassle of sending it back, even though it is their fault. maybe I can leave it til your next visit Geoff and you can give me another quick lesson? I'm sure I have some more CFTBL bits that are looking for a new home!;)

The bloke that does the Quality Control needs sacking...

IMG_1969.jpg
 
Ok, with some coaching from Calimori I took the plunge and de-soldered the problem pin from the board. (Not brave enough to try and get it back in the right space though)!

It's now back in the machine and should be fine but I won't know for a while yet.
 
Glad to hear it Steve.
Putting the pin back into an cleared hole is actually the easy part as they just slide through the plastic and out the other side. Soldering is then a quick process, check continuity from the board to the pin and you are good to go. That or wait for me to come over. ;)
 
Back
Top Bottom