What's new
Pinball info

Register a free account today to become a member! Once signed in, you'll be able to participate on this site by adding your own topics and posts, as well as connect with other members through your own private inbox!

Has anyone replaced DE button housing?

Dinsdale

Site Supporter
Joined
Oct 19, 2022
Messages
318
Location
UK
Hi folks.

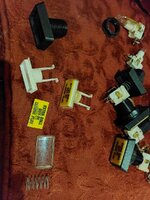
Got the replacement part for the button housing on my Data East Royal Rumble and want to replace it. The original is cracked.

It seems that removing the button may be easiest in order to get to the nuts but I don't want to go gung ho yet. Can someone provide any advice on how I should approach it?

The nuts inside are all rusty. I think this game was at the seaside or stored in a damp place at some time in its life. I've replaced the side rails so this is the last but I need to to get it looking somewhat newish in places.
IMG_8515.jpeg


IMG_8514.jpeg
 
Your nuts don’t look that bad ( oooh matron 😁) - just give them a good screw ( ooh matron #2😁)

You can remove the button lamp by pressing on the lock tabs and pulling hard ( oooh matron #3)
Christ 😂

Sorry for being thick, which are the lock tabs?
 
Gary I think you are replacing the wedge shaped black plastic. I would remove the nine 1/4 inch head screws that screw the 3 metal brackets into the cabinet and then it looks like 6 bolts on the inside. Clean it a up before reassembly. As grizz says the lamp and switch just pops out.
 
Gary I think you are replacing the wedge shaped black plastic. I would remove the nine 1/4 inch head screws that screw the 3 metal brackets into the cabinet and then it looks like 6 bolts on the inside. Clean it a up before reassembly. As grizz says the lamp and switch just pops out.
You're right, it is the black plastic housing.

The screws can be removed but the bolts are on the same plate and that's what I'm having trouble getting at. I think if I can remove the lamp/switch it'll make access easier.

I'll try looking for the lock tabs.
 
I think you will find it easier to undo the 6 internal nuts if you have the assembly removed from the machine by removing the 9 hex head screws. I find that DE lamps and switches just pull out with a little force and a jiggle so don't worry too much about finding lock tabs.
 
As above you need to remove the bracket to cabinet bolts as the housing is mounted by being pushed into the hole from the inside with the brackets attached to the housing already
 
I'd tackle that by sliding the plastic housing, with the mounting brackets still attached, upwards out of the gap in the upper edge of the cabinet. That would entail also removing the 'molding lock', which doesn't look particularly straight in any case. And detaching the ground braid from the brackets/cabinet.

The actual button housing and switch look like the (fruit machine) industry standard 'Starpoint' items; the white housing for the micro-switch and lamp pulls out of the black plastic housing. Then the button insert can be removed, if necessary, by pushing the two tabs on its back end, one of which operates the switch, inwards to clear the internal diameter of the housing, and pushing it out. Starpoint provide a special tool to unscrew the plastic nut for the button housing.
 
Last edited:
Thanks guys. Pulled button out, it seems a diode was soldered to the push tab which threw me but that came out easily.

I have removed all screws but the thing still won't budge. Any existing bolts/nuts are sitting external to the housing.

So I was hoping it would slide out, it didn't. Going to try and remove those other bolts but I fear it won't matter. What I have noticed is that by sight the housing looks like it's part of the cabinet (it isn't) because of how dirty and rotted it is.

It may just need a bit of brute strength.
 
Give the 3 metal brackets where the 9 screws were located some light taps with a small hammer. The metal brackets have probably rusted themselves onto the cabinet.
 
Got it. Used a rubber mallet to loosen. You're right, it was all merged together. I then had to pry the right angled bracket off.

Now need to find 500-5816-00 with the threading without it costing an arm and a leg!

Progress being made.
 
Is that the rectangular push button with "TAG" artwork on it? If so, I may have some have some in my stash if the same button is used for Baywatch. But the TAG artwork would need changing out.
 
Is that the rectangular push button with "TAG" artwork on it? If so, I may have some have some in my stash if the same button is used for Baywatch. But the TAG artwork would need changing out.
That's the one but I haven't been able to fathom how to open it to get to the artwork.

The idea was to get in and just give it a bit of a clean
 
.... without breaking it in the process, of course :)

I think they just snap together with lugs but they are tight to get out without breaking them. I will see how the BW ones come apart when I am home (at the office today).

Is the inside artwork really that dirty?
 
.... without breaking it in the process, of course :)

I think they just snap together with lugs but they are tight to get out without breaking them. I will see how the BW ones come apart when I am home (at the office today).

Is the inside artwork really that dirty?
IMG_8542.jpeg

A bit manky but not a deal breaker. Just thought of it was easy to get to it's worth giving a clean as I go. One of the holding posts isn't there either.
 
Gary use a screwdriver to compress the spring a little so you can push the white tabs in a little like the switch in the foreground. It will then just push through.
 

Attachments

  • 16856586196247145764174629666718.jpg
    16856586196247145764174629666718.jpg
    87.1 KB · Views: 6
Then you can prise the clear front cover off using a flat blade (a dinner knife will do the job). Dont worry if you break anything as I have plenty of spares (other than the tag plastic).
 

Attachments

  • 16856590444847133292601455437168.jpg
    16856590444847133292601455437168.jpg
    183.5 KB · Views: 6
Plastics like these clean up really easy if you just soak them for 30 mins in a small saucepan of warm water with a teaspoon or two of traditional washing powder like ariel or bold. Then just rinse off leave to dry and Novus 1 to polish.
 
You strike again, Pinball God!

Thank you, look at that detail. You do loads for me, thank you. Shall try all that tomorrow and report back.
 
The filth inside was sickening. 30 years of grease, grime, carbon, cigarette tar, and God knows what else.

IMG_8550.jpeg

But it come up like a new penny!

The dirt was covering some hairline cracks in the plastic but will be hardly noticeable.

Thanks very much! IMG_8551.jpeg
 
Back
Top Bottom