So i got myself a new game recently - Stern Batman TDK. Nice condition overall, but with a couple of niggles to solve. Just the way i like it.
So first up was sorting the joker mechanism.
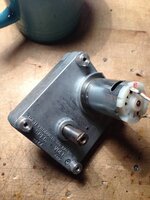
When first plugged in the mechanism was in the city scene position in game over not the joker toy position and playing a game did not seem to make any difference the position of the device. A quid inspection of the mechanism underneath, wiring , running the device test and checking things with a mutlimeter continuity test identified what looked like a burnt out motor
Also, on removal of the mech it became clear that the gearbox and motor are 1 unit, with the motor being fastened internally within the gearbox and the gearbox itself blind riveted together.

Checking Marco brought up this : http://www.marcospecialties.com/pinball-parts/511-5131-00. Joker indeed!
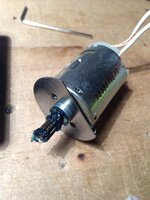
So, after studying the mech for a little longer i began to wonder if the motor itself was the same type as used in other williams mechs from the 90s. Another unknown due to the rivetingness was the size and number of teeth of the motor pinion. I decided to have a rummage through my spares and found a NOS whitewater bigfoot mech. Checking the motor on this looked to be the same dimensions, so i unbolted this one and had this

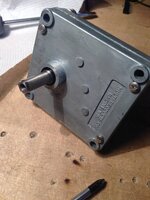
The only thing left to do now was to inspect the internals of the joker gearbox and see if the gears were ok and what the pinion looked like.
Drilled the 4 rivets out and plenty opened the gearbox casing, being very careful not to pull out and gears in the process so i could see it all in place and snap a quick photo for reference.


Amazingly the pinion and mounting holes for the motor were the same and the gears were all in nice shape. I removed the 2 gears above the motor and unbolted it, then bolted in the new motor

I then replaced the 2 gears, and also spread the grease around a little more evenly as there were large blobs of it not doing anything.
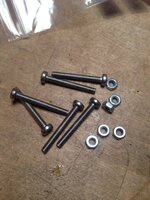
Now the gearbox was back together but i needed to find some nuts and bolts to hold it all tightly now the rivets were gone. M3 25mm looked to be the job, but could i find any?? Could i $%^$%^. So I had to leave it until the following morning, where i paid a quick visit to my local nut and bolt shop (yes, i have one just up the road!!)

Now it was all back together i gave it a quick test on the bench using a 12v supply and it all worked lovely.
I reassembled the opto board and then reattached it to the game.


Job Done
Here's a quick video of my first game start!
So first up was sorting the joker mechanism.
When first plugged in the mechanism was in the city scene position in game over not the joker toy position and playing a game did not seem to make any difference the position of the device. A quid inspection of the mechanism underneath, wiring , running the device test and checking things with a mutlimeter continuity test identified what looked like a burnt out motor
Also, on removal of the mech it became clear that the gearbox and motor are 1 unit, with the motor being fastened internally within the gearbox and the gearbox itself blind riveted together.
Checking Marco brought up this : http://www.marcospecialties.com/pinball-parts/511-5131-00. Joker indeed!
So, after studying the mech for a little longer i began to wonder if the motor itself was the same type as used in other williams mechs from the 90s. Another unknown due to the rivetingness was the size and number of teeth of the motor pinion. I decided to have a rummage through my spares and found a NOS whitewater bigfoot mech. Checking the motor on this looked to be the same dimensions
, so i unbolted this one and had this The only thing left to do now was to inspect the internals of the joker gearbox and see if the gears were ok and what the pinion looked like.
Drilled the 4 rivets out and plenty opened the gearbox casing, being very careful not to pull out and gears in the process so i could see it all in place and snap a quick photo for reference.
Amazingly the pinion and mounting holes for the motor were the same and the gears were all in nice shape. I removed the 2 gears above the motor and unbolted it, then bolted in the new motor
I then replaced the 2 gears, and also spread the grease around a little more evenly as there were large blobs of it not doing anything.
Now the gearbox was back together but i needed to find some nuts and bolts to hold it all tightly now the rivets were gone. M3 25mm looked to be the job, but could i find any?? Could i $%^$%^. So I had to leave it until the following morning, where i paid a quick visit to my local nut and bolt shop (yes, i have one just up the road!!)
Now it was all back together i gave it a quick test on the bench using a 12v supply and it all worked lovely.
I reassembled the opto board and then reattached it to the game.
Job Done
Here's a quick video of my first game start!