What's new
Pinball info

Register a free account today to become a member! Once signed in, you'll be able to participate on this site by adding your own topics and posts, as well as connect with other members through your own private inbox!

Do I need to replace my bridge rectifiers?

ffollim

Registered
Joined
May 8, 2025
Messages
18
Location
Yeovil UK
I have a Black Knight 2000 and want to put some preventative measures in where possible.

I read that System 11 pinballs did not have fuses between the transformer and the bridge rectifiers, and fires have been reported. Is this the case with System 11b based machines, or have they got fuses in place? (I can see a bunch of fuses on the aux power supply board so assuming yes).

Regardless of the above, is it worth replacing the bridge rectifiers for new ones with heat sinks?

Thanks, Matt

System 11 Pinball Machines and Fusing:
Early System 11 machines (System 11 and 11A) did not include fuses between the transformer secondaries and the bridge rectifiers for the high-voltage circuits.

System 11B and 11C:
By the time System 11B and 11C came along, Williams had improved the power protection. These later systems typically include:

Fuses between the transformer and the bridge rectifiers, especially for the high-voltage (e.g. 50V coil) and lamp circuits.

The fuses are generally mounted on the Auxiliary Power Supply Board or the main Power Supply Board.

These fuses are in line with the AC going into the bridge, not just the DC coming out — which is crucial for preventing transformer overloads in case of rectifier failure.

So yes — System 11B-based games (like "Cyclone", "Taxi", "Police Force", etc.) do have better protection, including those critical fuses.
 
If you plan to do this I would recommend sending it off than doing it yourself unless you are well versed in board repair. You can end up through holing your mount points and then someone is going to have to end up stitching traces.

I would focus instead on monitoring your voltages on the test points and ensure you are getting the rated voltages around the board. Insufficient 5v for instance leads to MPU resets.

New Caps (capacitors) resolves that particular issue. Again send off for repair if you haven't done this before.
 
I thought i would have a giggle and put this through AI and see what it came back with. DO NOT TAKE THIS RESPONSE AS BEING CORRECT AND DO YOUR OWN INVESTIGATIONS!

Excellent questions! It's very smart to be thinking about preventative maintenance on your Black Knight 2000. You're touching on some of the most important and well-known reliability issues in the Williams System 11 family.

Let's break down your questions.

1. The Unfused Bridge Rectifier Fire Hazard​

You are correct that early System 11 games (like High Speed, F-14 Tomcat, etc.) had a serious design flaw. The AC lines from the transformer's secondary windings ran directly to bridge rectifiers, which were often mounted in the backbox. If a bridge rectifier shorted, it would draw unlimited current from the transformer, causing the transformer to overheat, smoke, and in some reported cases, catch fire.

The good news is that Williams fixed this issue with the System 11B revision.

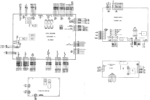
Your Black Knight 2000 is a System 11B game. The key architectural change from System 11A to 11B was the introduction of the Auxiliary Power Supply Board (C-11998).

  • How System 11B Fixed It: On your machine, the AC power from the transformer goes to the Auxiliary Power Supply board first. On this board, the AC lines pass through fuses (F1, F2, F3, and F4) before they reach the bridge rectifiers (BR1, BR2, BR3, BR4), which are also mounted on that same board.
Conclusion: Yes, your System 11B machine has fuses in place to protect the transformer from a shorted bridge rectifier. The cluster of fuses you see on the auxiliary power supply board is providing exactly that protection. You do not need to add any new fuses.


2. Replacing the Bridge Rectifiers​

Even though the fire hazard is addressed, your second question is still extremely relevant.

Regardless of the fuses, is it worth replacing the bridge rectifiers for new ones with heat sinks?

Answer: Yes, absolutely. This is one of the best and most highly recommended preventative maintenance tasks you can perform on a System 11B/11C machine.


Here's why:

  1. Age and Heat Stress: The original bridge rectifiers are now over 30 years old. They are under constant thermal stress every time the machine is on, especially the ones driving the main logic power and the lamps. Electronic components degrade over time with heat, and bridge rectifiers are a common failure point.
  2. Improved Reliability: A failing bridge rectifier doesn't always die spectacularly by shorting out. More often, it will start to fail "softly." Diodes within the bridge can open, leading to half-wave rectification. This results in weak or noisy DC voltage, which can cause all sorts of bizarre and hard-to-diagnose problems, such as:
    • Game resets
    • Humming or buzzing from the speakers
    • Flickering lights (especially GI)
    • Weak flippers or coils
  3. Inadequate Original Cooling: The original design simply bolted the bridge rectifiers to the circuit board, using the board's ground plane as a minimal heat sink. This is adequate, but not great. Heat is the enemy of longevity for these components.

The Recommended Upgrade Path:​

When you replace the bridge rectifiers, you have an opportunity to make a significant upgrade for very little cost.

  • What to Buy:
    • New Bridge Rectifiers: Get new, modern replacements with a higher rating than the originals. A KBPC3504 (35 Amp, 400 Volt) or similar is a perfect, robust replacement. They are very inexpensive. You will need four of them for the Auxiliary Power Supply board.
    • Heat Sinks: Buy four small, individual heatsinks that can be bolted onto the new bridge rectifiers. Search for "KBPC heatsink" or "bridge rectifier heatsink."
    • Thermal Compound: A small tube of thermal paste (like the kind used for computer CPUs) is essential. This ensures efficient heat transfer from the rectifier to the heatsink.
  • The Process:
    1. Power off the machine and unplug it.
    2. Remove the Auxiliary Power Supply board.
    3. Carefully desolder and remove the four old bridge rectifiers.
    4. Apply a thin layer of thermal paste to the back of each new rectifier.
    5. Bolt the new rectifier to its new heatsink.
    6. Solder the new rectifier/heatsink assemblies onto the board. Ensure the polarity markings (+, -, AC) on the new bridge align with the markings on the PCB.
    7. Reinstall the board.
The result will be a rock-solid, reliable power supply that runs cooler and will last for decades, eliminating a major source of future problems.

Other Key Preventative Maintenance for BK2000​

While you have the soldering iron out and you're in the mood for reliability mods, here are a few other highly recommended items for a System 11B machine:

  1. Replace Connectors: The #1 cause of problems in games of this era is bad connectors. Inspect all the power connectors, especially the GI (General Illumination) connectors on the interconnect board. If they look browned or burnt, replace the pins in the connector housing and the header pins on the board. At a minimum, reseat them all firmly.
  2. Replace Capacitors: The large filter capacitors on the power supply boards dry out with age.
    • Auxiliary Power Board: Replace the large axial capacitor (C2, typically 15,000uF at 25V).
    • CPU Board: Replace the main 5V filter capacitor (C30, typically 100uF at 25V). This is a very common cause of game resets.
  3. Batteries / NVRAM: Check the CPU board for any battery leakage from the original AA batteries. If there is any green/white corrosion, it needs to be neutralized and cleaned. A great upgrade is to install a remote battery holder (to move the batteries off the board) or, even better, replace the memory chip (6116 RAM) with an NVRAM chip. This eliminates the need for batteries entirely.
Enjoy your Black Knight 2000! It's a fantastic game, and putting in this work now will ensure it runs reliably for many years to come.

If you need any work to be carried out I'm happy to help.
 
@s000m 's advise is also AI generated so I wouldn't pay any attention to it, however correct it may seem.

These AI models hallucinate really badly for fringe subjects like pinball.

This forum is supposed to be an invaluable knowledge base, amongst other things, so please let's keep it free from bad advise and AI munge.

To the OP @ffollim I'd recommend watching the first 10 minutes of this:


Everything you need to check your own pin yourself.

HTH!
 
If you plan to do this I would recommend sending it off than doing it yourself unless you are well versed in board repair. You can end up through holing your mount points and then someone is going to have to end up stitching traces.

I would focus instead on monitoring your voltages on the test points and ensure you are getting the rated voltages around the board. Insufficient 5v for instance leads to MPU resets.

New Caps (capacitors) resolves that particular issue. Again send off for repair if you haven't done this before.
thanks for this, I’m fairly experienced in soldering - is it not just a case of using a solder pump on the four legs, removing the old bridge rectifier, then soldering the new one or is there more to it than that?
 
thanks for this, I’m fairly experienced in soldering - is it not just a case of using a solder pump on the four legs, removing the old bridge rectifier, then soldering the new one or is there more to it than that?
You have to be really careful not to pull the throughholes, since the traces on these boards are less than paper-thin. Iron at the right temp, and be 150% sure that solder is melted both sides 👍
 
Matt,

As s000m mentions (apparently with AI help), the 'Aux Power' circuit board takes care of fusing the ac bridge rectifier inputs for the two solenoid/flashlamp power rails, 25 & 50v, which was lacking not just for earlier Sys 11 games, but right back to the first Williams solid-state pinballs. It also provided a location for the Solenoid Extender relay and its linking diodes, rather than squeezing them in under the playfield somewhere, and similarly includes eight TiP 36C '3rd stage' coil drive transistors, able to operate coils from the 50v rail instead of costlier relay driver boards in this role. Earlier games, (e.g. F-14, which had six coils driven from 50v, each with its own relay board as a 3rd stage) were rather crowded under the playfield, along with the solenoid extender and diode board, and flashlamp resistors. The Aux Power and Backbox Interconnect boards tidied things up a little.

Paul, I thought on reading your catch from the AI pool, 'The Aux power only has two bridge rectifiers, what's this about four?' And they weren't "bolted to the boards' ground plane", whatever that's meant to mean.

And when working in the back box, I heard it's better to turn the machine Off, but leave it plugged in for an earth connection.

The 18v lamp supply was left much as it had been before, with the rectifier fixed to the metal panel inside the back box (is that this 'ground plane'?) and the large capacitor attached nearby, though it did now have a fuse provided.
 
Last edited:
The answer is to add all the knowledge from pinwiki into the AI. Have been doing this on a private instance, and when you do stuff like this, it is VERY good. You feed it the knowedge, and then it regurgitates when asked..

Generic ChatGPT isnt great - it is helpful, however i do find that the intricacies is is lacking in.

Paul, I thought on reading your catch from the AI pool, 'The Aux power only has two bridge rectifiers, what's this about four?' And they weren't "bolted to the boards' ground plane", whatever that's meant to mean.

And when working in the back box, I heard it's better to turn the machine Off, but leave it plugged in for an earth connection.
:rofl: :rofl:Illustrates my point :)

Personally i wouldnt go changing the BR's unless its known there is a fault with them or unless following a diagnostic train-of-thought....
 
The fuse information it suggests turns out to be nonsense, too. No's 1, 2A, 2C, 3 & 4 are all on the dc side of the rectifiers. The ones which ffollim was worried about being absent (for the rectifier inputs) are No's 7 & 8.

And looking again, the number quoted for the board is more likely for the relay driver/3rd stage board I mentioned. Beginning with Taxi, a pair of new boards appeared in the right-hand half of the back box - D 12246 produced only the logic and display power, with D 12247 as the 2nd design of Aux Power board.
 
Last edited:
@s000m 's advise is also AI generated so I wouldn't pay any attention to it, however correct it may seem.

These AI models hallucinate really badly for fringe subjects like pinball.

This forum is supposed to be an invaluable knowledge base, amongst other things, so please let's keep it free from bad advise and AI munge.

To the OP @ffollim I'd recommend watching the first 10 minutes of this:


Everything you need to check your own pin yourself.

HTH!


You make it sound like the information was incorrect, when it wasn't..


Don't worry I'll leave it the experts from now on
 
Matt,

As s000m mentions (apparently with AI help), the 'Aux Power' circuit board takes care of fusing the ac bridge rectifier inputs for the two solenoid/flashlamp power rails, 25 & 50v, which were lacking not just for earlier Sys 11 games, but right back to the first Williams solid-state pinballs. It also provided a location for the Solenoid Extender relay and its linking diodes, rather than squeezing them in under the playfield somewhere, and similarly includes eight TiP 36C '3rd stage' coil drive transistors, able to operate coils from the 50v rail instead of costlier relay driver boards in this role. Some earlier games, e.g. F-14, had six coils driven from 50v, each with its own relay board as a 3rd stage, all crowding under the playfield along with the solenoid extender and diode board.

Paul, I thought on reading your catch from the AI pool, 'The Aux power only has two bridge rectifiers, what's this about four?' And they weren't "bolted to the boards' ground plane", whatever that's meant to mean.

And when working in the back box, I heard it's better to turn the machine Off, but leave it plugged in for an earth connection.

The 18v lamp supply was left much as it had been before, with the rectifier fixed to the metal panel inside the back box (is that this 'ground plane'?) and the large capacitor attached nearby, though it did now have a fuse provided.
Hi Jay,

Thanks for such a detailed and clear reply. That is very useful to know. My Aux power supply has two bridge rectifiers that are soldered to the board.

Cheers,
Matt
 
Back
Top Bottom