What's new
Pinball info

Register a free account today to become a member! Once signed in, you'll be able to participate on this site by adding your own topics and posts, as well as connect with other members through your own private inbox!

Decal job on WPC era games. Filling indented captive bolt holes

DRD

Registered
Joined
Oct 26, 2014
Messages
5,434
Location
Newark
All

The head of the game has numerous domed headed captive bolts on the outside. These generally leave dents in the external face of the wood. These dents in turn can ripple the decals

You can see these ripples on the old original decals below, see the top 2 holes .......
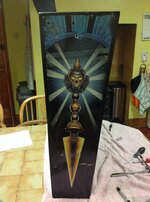
image.jpg

The dents are visible in this part sanded shot, as the remnants of the decals remain in situ by the time you hit the wood around them ...
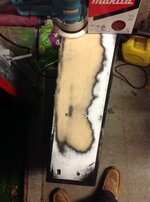
image.jpg

Is it advisable to fill these dents, bearing in mind that a bolt will then be pressed tight against a small area of filler ?

Or is there some other way to prevent future rippling of the decals where bolts pass through them ?

Thank you
 
Good point, I would cut the decal hole slightly bigger but just slightly smaller than the dome part of the bolt, or put a few slits in the decal all round the holes. Maybe others will have a better solution
 
Having slept on it, i have just sanded the dips out.

They looked a lot worse than the actually were, and avoiding filling them seemed the lesser evil
 
Having slept on it, i have just sanded the dips out.

They looked a lot worse than the actually were, and avoiding filling them seemed the lesser evil

Hmmm! that might create a dip in that area unless you sanded the whole side down to match?
 
I would say that the dip in the wood was a small fraction of a mm. As I am using a 150mm sanding disc and going from 40 grit progressively down to about 240 or 400 grit, i don't think it will be discernible as it will be graduated in with the rest of the box

When you strip these things down you find all sorts of nonsense. They are quite crudely manufactured and painted. I am actually concened about making it "too good". The relatively undamaged wood that surrounds the translite for instance will be much rougher than the sides by the time i have finished with them, so I will have to figure out what grit looks right on this area of the backbox as i think a super smooth finish might look wrong
 
no - the final finish before applying decals needs to be glassy smooth - any (and i mean ANY) imperfections will look 100x worse when new decals applied!
 
@Paul

How finely do you sand the visible bits of painted black wood that surround the translite please ? (The bits on the inside edges of the backbox)

Do you take this to 240 grit ?

The factory finish does not even look sanded at all, so is quite grainy
 
The Front edges you mean? I just sand them until they look reasonable. They are end Grain, so unlikely you will ever get them smooth - But yes i sand the same as the others - As long as you get a knife-edge corner.

Because they are effectively the side of the wood, you will always have grain showing... Just sand, primer and top coat :)

EDIT - Sorry - Misunderstood - thought you meant the front edge of the backbox!

I just hand sand them with a sanding block :)
 
Back
Top Bottom