What's new
Pinball info

Register a free account today to become a member! Once signed in, you'll be able to participate on this site by adding your own topics and posts, as well as connect with other members through your own private inbox!

In Progress Congo restoration

Hiro996

Registered
Joined
Mar 24, 2013
Messages
470
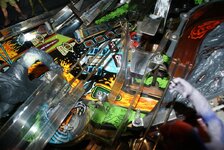
I have recently purchased a Congo pinball machine and due to my OCD issues with pinball machines I am going to give it the restoration treatment, it doesn't look too bad but I want it as mint as possible!

Missing plastic:

DSC03534.JPG

Jump ramp broken - secured with a DIY bracket and screw through the ramp:
DSC03534.JPG
Incorrect target fitted at skill shot area and incorrect (white) flippers all round:
DSC03547.JPG

Incorrect colour targets for the 'We are', 'Watching' and 'You' targets:
DSC03560.JPG

The usual broken (and repaired - complete with custom lava paint finish!) volcano popper:
DSC03557.JPG

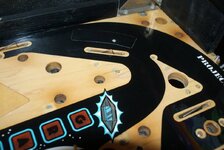
Time to start stripping the playfield to see what else we find, fingers crossed there's nothing too bad!
 

Attachments

  • DSC03546.JPG
    DSC03546.JPG
    157.7 KB · Views: 9
Finding some incorrect screws used (same thread fortunately so no threading issues) and also seeing the usual dirt tracks which should disappear after the treasure cove polishing treatment!

DSC03676.JPG

Also seeing some surface corrosion to a couple of the gates - the Tumbler should solve that problem.

Starting to find some broken plastics as expected but I've ordered a full new set so not an issue:

DSC03693.JPG
 
Pop bumpers removed as I will be re-building these with new parts - I've seem damaged bumper skirts before but one of the bodies on this machine has a hole in it! Also one of the metal ring mounting arms (the right arm of the left metal ring in the image) had snapped so it was only held on to the coil mechanism with a single arm/nut!

DSC03857.JPG
 
The underside of the playfield proved to be pretty clean but the usual black marks were evident in areas close to the sling solenoids:

DSC03863.JPG

Cleaned off and looking much better:
DSC03864.JPG
 
There are some marks to the left side of the cabinet (inside) - the cause of these quickly became apparent - the left upper flipper assembly location has resulted in the flipper bracket protruding past the playfield - I will set the Dremel on this to remedy the situation:
DSC03879.JPG
 
Whilst on the subject of flippers, they are all very dirty so don't look like they have been serviced so I will be re-building all of these:

DSC03877.JPG
 
Some of the new parts have been arriving ready for the re-build. I'm still waiting for two of the ramps and the plastic set though (which is stuck in customs as the only country I could source the plastic set from was the USA). Notice the new volcano popper - you can't tell in this image but the eject area is strengthened with additional bracing so it shouldn't snap like the original:

DSC03897.JPG
 
Treasure cove treatment completed and also three coats of carnauba wax - looking much better!

Track marks gone:

DSC03919.JPG

Pop bumper mechanisms fully re-built with new coil sleeves, metal polished and new playfield side parts fitted - looking much better:

DSC03904.JPG
 

Attachments

  • DSC03920.JPG
    DSC03920.JPG
    94.5 KB · Views: 5
Another area with all ball track marks removed - has a fantastic deep shine now!

DSC03920.JPG
 
I like my machine to be as perfect as possible and one aspect of this machine which was troubling me was a single insert. The insert in question is the large blue item to the left of the 'permieter defence' target - it has a graphic partially covering it but the insert was raised slightly on my machine and the result of this was that a small part of the graphic covering the insert had chipped off:

DSC03528.JPG

This was enough of an issue for me to search for a new playfield but I soon discovered finding a new playfield would be a real challenge and after treasure cove polishing my playfield I realised it was only this insert which was a problem, the rest was actually looking great! So I decided to repair the damage.

First I re-seated the insert using a technique I found online:

1. Heat the insert from the underside using a hair dryer - be careful not to over-heat and damage it
2. Re-seat the insert so that it is flush - to do this place a completely flat piece of hard wood over the insert and hit it with a hammer (this was scary but it worked perfectly with no damage and only a couple of new grey hairs!)
3. Super glue the insert from under the playfield ensuring it remains flush.

The next step was repairing the damage to the graphic covering the insert. I scanned the playfield using a 900DPI hand scanner and then spent some time on my PC re-creating the missing area of the decal.

I tested for a match using photo paper (which is cheaper than the water slide paper I was going to use for the actual repair but gives similar colour matches) and when I was happy I printed my repaired part of the graphic on decal paper:

DSC03916.JPG

As you can see, I printed a number of copies in case I damaged one on the first attempt.
 
Before using the water slide paper you need to seal the ink in otherwise you can have issues when putting the paper in water (this paper is the same as the decals you use on model kits so you put the decal in water to remove it from the backing paper before applying it to the target surface). In order to seal the paper you use a clear spray laquer (I used three coats, 20 minutes between each coat and then left the decal sheet for 24 hours before using it).

The water slide decal paper is available in both white and transparent. Transparent makes cutting easier of course but I chose to use white as transparent would have shown too much light through when the insert flashed where as white background would give the original look. The only issue with white is that you have to cut right up to the edge of the printed part and cannot leave any gaps around the perimeter - this took a while!

Finally I had cut the decal out, placed it in warm water for 30 seconds to remove the backing paper and then applied it to the playfield using tweezers which I found enabled me to get precise positioning.

Once I had mounted the decal on the playfield I waited for the backing paper to dry (the bit which had been in the water) and then used that as a template for a piece of mylar. I then protected my applied water decal with the mylar.

One of the great things about this approach is that the water decal is very thin and with the mylar added to protect it, it is now at the same level as the original insert finish so the end result is fantastic (at least in my biased opinion!):DSC03922.JPG
 
Before fitting the new Volcano popper I decided to add an LED modification - I have added red LEDs to the popper which will be lit in two stages during multiball - this will give the Volcano a red glow but will still allow the brighter flasher bulbs to provide their effect at appropriate times. Here is the new popper fitted with the LED strips attached (I have four strips, two on each side):

DSC03924.JPG
 
The playfield is coming back together nicely now - with all parts having been tumbled, polished and/or changed, it's looking a lot better than it did!DSC03928.JPG

DSC03931.JPG

DSC03932.JPG

DSC03933.JPG
 
I've also replaced most of the jewel posts with green and orange posts rather than re-using the black ones as I found the black ones a little dull (except at the top of playfield where I feel they look appropriate against the black playfield finish:

DSC03937.JPG

DSC03938.JPG
 
Before proceeding any further I am having to wait for the plastic set and remaining ramps to arrive (which has given me time to finally post the progress so far!). I'll continue this thread when the bits arrive, I hope the progress so far has proved to make interesting reading/viewing to some fellow forum members!
 
I'd not noticed that @cooldan ! Jeremey is looking great thanks! He is currently face down on the floor under another machine!
 
That's good to hear, thanks @Paul , they do have some slack in them though and some dirt - I wanted them mint so went ahead and rebuilt them.
 
Great work, such a big difference achieved so far.
Looking forward to the end result , it's going to be a stunning example of a Congo once finished.
 
Looking forward to putting a few games on this one soon! I still can't believe how quick you work. Do you sleep? ;)

And when it's stripped I'm going to have to get you to Treasure Cove my Gold Ball playfield. Reckon it'll come up a treat and it only had a few minor areas of wear.
 
Thanks @Nedreud . They'll be an invite out to you as soon as it's complete! I must admit there have been a few late nights in this restoration process!

Sure, I'm more than happy to treasure cove polish the gold ball play field for you anytime.
 
Back
Top Bottom