What's new
Pinball info

Register a free account today to become a member! Once signed in, you'll be able to participate on this site by adding your own topics and posts, as well as connect with other members through your own private inbox!

Best paint and tools for redecalling?

J.C.Rox

Site Supporter
1 10 Years
Joined
Apr 11, 2015
Messages
3,014
Location
Haddington East Lothian
Hi all,

I'm about to embark on my first 're decal of a Dr. Who, what is the preffered spray for black? Satin or matt? Is simonz the best one to use?

Following the video of a young @Matt Adams redecalling an IJ what else do I need? Any recommendations for;

A hard roller or a squeegee to get out wrinkles and air bubbles?

Cheap heat gun and scraper to get off old decals?

Cheers fellas,

Jon
 
I use satin black simoniz paint and felt edge squegee

heat gun and scraper to remove old decals and then remove glue then and orbital sander working down to 400 grit(obviously after filling any dings with a good wood filler) so its a smooth as a baby's ass!!

Cheers

Kev
 
I use satin black simoniz paint and felt edge squegee

heat gun and scraper to remove old decals and then remove glue then and orbital sander working down to 400 grit(obviously after filling any dings with a good wood filler) so its a smooth as a baby's ass!!

Cheers

Kev
Thanks Kev, the TZ you did for me looks the dogs danglies and has inspired me to have a go! I also know who to call when it goes wrong!

Cheers
 
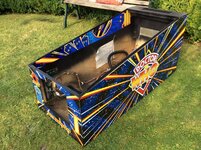
Just finished one!......agree with all of above...but I prefer the look of simoniz gloss black...so do most of my customers. The vinyl adhesive lifts easier off it to. We use the dry method like matt....
One tip I have learnt is after you have trimmed you may have a small residue of adhesive left on the black, use adhesive remover for this as it does not effect the paint or the vinyl. EDIT....art blades from pinball center gmbh.
IMG_2587.JPG
 
Last edited:
Just finished one!......agree with all of above...but I prefer the look of simoniz gloss black...so do most of my customers. The vinyl adhesive lifts easier off it to. We use the dry method like matt....
One tip I have learnt is after you have trimmed you may have a small residue of adhesive left on the black, use adhesive remover for this as it does not effect the paint or the vinyl.
View attachment 50651
Looks great Keith, thanks for the tips. I like those artblades too, did they come from Pete B too?
 
Rudi I have a spray gun and compressor for my VW but still unused so this would be my preferred method too, I take it by ready mixed you don't need to add thinners and what do u use for cleaning the gun afterwards? Any product names/links would be appreciated.

Regards
Chris

Sent from my Nexus 5X using Tapatalk

If you use ready mixed cellulose (about £20 on eBay) then cellulose thinners
 
Simoniz satin in rattle cans is fab.

Few tips for you - practice cutting the decal using off cuts before you apply it. If your knife is too sharp, it will cut into any rough wood. I actually used a small pen knife to do it. This gets gummed up with glue as you do it, so i cleaned my blade after each cut. Also, practice cutting the start hole - making sure it is nice and smooth (and painted) to start with. Many decal jobs have a poor round cut here and it is very obvious

I recommend the stern hidden leg protectors. Cut your decal about 5mm away from these. this will stop wrinkling and be hidden under the legs.

My final super nerd point is, watch out for the legs. If they are at all buckled, the stern leg protectors will not lift the legs clear of the cab they will still press against the decal

best of luck
 
Agree with @DRD here - it;s not worth mixing up or even getting the compressor out - the Simoniz rattle cans are fine... Realistically you are only looking at corners and edges if you are only re-decalling anyhow...
 
Agree with @DRD here - it;s not worth mixing up or even getting the compressor out - the Simoniz rattle cans are fine... Realistically you are only looking at corners and edges if you are only re-decalling anyhow...
I 2nd that and agree with paul
 
Agree with @DRD here - it;s not worth mixing up or even getting the compressor out - the Simoniz rattle cans are fine... Realistically you are only looking at corners and edges if you are only re-decalling anyhow...

Agreed, I used the simoniz stuff for DW and it's perfect, and I have a compressor and spray gun.

It's all about the preparation it needs to be ultra smooth and flat otherwise it will show through on the decal, also keep area clean any dust or crap will show through
 
I've toyed with the idea of re-decaling my RFM for a long time, probably won't get around to it but one thing I've always wondered is how do you trim the decals when dealing with a curve? like the head on RFM? a straight edge is obviously no use there, the decals on my RFM have been trimmed very badly by hand around the head.
 
I've toyed with the idea of re-decaling my RFM for a long time, probably won't get around to it but one thing I've always wondered is how do you trim the decals when dealing with a curve? like the head on RFM? a straight edge is obviously no use there, the decals on my RFM have been trimmed very badly by hand around the head.

As RFM has a moulding over the edge I would just overlap it but cut loads of slits all the way along the overlap and fold ot over, never see it when the red mould is on
 
I've toyed with the idea of re-decaling my RFM for a long time, probably won't get around to it but one thing I've always wondered is how do you trim the decals when dealing with a curve? like the head on RFM? a straight edge is obviously no use there, the decals on my RFM have been trimmed very badly by hand around the head.
Hi Kev,

have a look at my shop log on re-decalling a RFM - the first decal job I had ever done - the edge bit was easy just trim it all the way round flush as the t moulding hides the cut edge anyway

Cheers

kev
 
Hey gang, I'm building up my courage to start this but can anyone advise me what best to use to remove the adhesive? Also what is the best tape to reapply the side rails later? Cheers, J
 
Back
Top Bottom