Pinball info
You are using an out of date browser. It may not display this or other websites correctly.
You should upgrade or use an alternative browser.
You should upgrade or use an alternative browser.
Complete Bally Minizag 1968 shop log - The final furlong
- Thread starter Ashbo
- Start date

OP
OP
Ashbo
Site Supporter
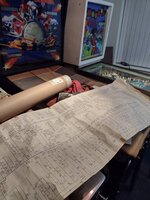
Wow thanks sir!!! My machine would look cr@p without all your help. Very much appreciatedOh - and while I was making a quick keyfob for the new owner - scanned my scorecard - as it's pretty 'Groovy' itself - thought you may like a copy..
I have the original dirty scan - I cleaned this up a little..
FWIW.")

OP
OP
Ashbo
Site Supporter
Fuses and fuse holders came from Pinball Mania today, so this evening added a new mains cable, replaced the 8amp fuse holder on the live line to the transformer and then tested the voltages. 55v and 6.4v both AC. Should be 50 and 6, so close enough.
Next added a fuse holder under the playfield for the 1.25amp 50 v line to the flippers and a new fuse.
Connected the Jones plugs, three in the base and three in the head and powered on. Magic, we had light. Lovely.
Pressed the start button and the motor went round with a few clacks, credit dropped by one and nothing.
It seems a few switches on the playfield needed re-gapping and then was able to get the outhole kicker to serve up the ball.
Shooting the ball up the lane didn't do anything and the ball limply bounced it's way back to the outhole and back out to shooter lane ....hmmmmm, surely the switch at the top of the shooter lane should bring some power to proceedings. Hold the switch on, no joy....hmmm, use a screwdriver to connect the leaf switch points.....BANG, holy sh!t, there is the blue smoke. Seems the ball counter unit had a fit.
Cleaning, gapping and three more 10amp fuses later that's it for the day. I think this weekend I'll take the ball counter relay to bits and make sure it's not at fault, knowing my luck it will be a short somewhere else foreign up when the 50v is activated. We will see....
OP
OP
Ashbo
Site Supporter
Found the issue, seems I have had three leaf switch blades snap of during power tests, two in the score reels and one on the match unit. Seems if a NC doesn't open a coil may lock on and blow a fuse.
Plan for today, see what I have in spares to repair else post some wanted adds for leaf switch blades. Anyway, that shouldn't stop progress now.

Plan for today, see what I have in spares to repair else post some wanted adds for leaf switch blades. Anyway, that shouldn't stop progress now.
Last edited:
got these 3.7mm long. 4.5mm if you include the solder lug

OP
OP
Ashbo
Site Supporter
@AlanJ these look the exact right fit!!!!got these 3.7mm long. 4.5mm if you include the solder lug
View attachment 186396

pm your address and i’ll send you some
OP
OP
Ashbo
Site Supporter
Dropped you a PM thanks sir.pm your address and i’ll send you some
OP
OP
Ashbo
Site Supporter
So, decided to replace some springs. Got a box of new springs on Amazon Here that seem to fit the description....


Lovely ....
Gave the reel mechs a bit of a clean...54 years of sh!t on these bad boys...

So bodged the score reel switches for now and had a try to see whats working and what's not....I may not be pleased with my clear, but that ball doesn't half glide!!!
Lovely ....
Gave the reel mechs a bit of a clean...54 years of sh!t on these bad boys...
So bodged the score reel switches for now and had a try to see whats working and what's not....I may not be pleased with my clear, but that ball doesn't half glide!!!
Last edited:
OP
OP
Ashbo
Site Supporter
Thanks @Phil Lee . Got the zaggler working tonight, along with occasional flipper zip.Makes the ball 'zig zag' down the zagger lane - and ensures it's slow enough to activate each rollover switch to add both bonus and add 'Groovy' light where corresponding 'TV screen' is lit. So basically - timing..
Also put some new numbers on the score reels and cleaned and sanded the relay contacts in the backbox.
First time working with a full size schematic....10x easier than on a pdf or painted on A4!!

Also dropped another order in to Amazon for some Rolson e-clips - assorted sizes. The score reels are held in by twisted fuse wire!!!! This makes them slip and lock on the coils.
Attachments
OP
OP
Ashbo
Site Supporter


OP
OP
Ashbo
Site Supporter
Wow, it's been a while since I updated the log. Managed to give myself a back injury so haven't done much (I type this waiting for my physio appointment). But to summarise what has been done...
1) the ball count unit wasn't working properly, seems the springs I replaced were too strong. Replaced with slightly less strong ones, result!
2) match unit coil was melted, bypassed match unit for now. Need to order new couple.
3) hold relay was too weak and eventually melted. I have bypassed this for now until I do a coil order.
4) playfield protector in progress. Nice low impact activity.
OP
OP
Ashbo
Site Supporter
Will be ordering another sheet of petg. Had a quick crack at cutting the way out holes....The 5cm drill bit was fine for the first .5mm of the cut them tore a bigger hole and skipped and left a scratch...DOH!!!.. I will reassemble and play with the shooter lane to see if I can cut and sand a long V ....nothing to lose now ")
I'll tidy up and count to 10 then take some photos....
Every day is a school day. I'll look for a different kind of 5cm bit.
I'll tidy up and count to 10 then take some photos....
Every day is a school day. I'll look for a different kind of 5cm bit.
OP
OP
Ashbo
Site Supporter
Hmmm, lots to improve on, especially the shooter lane and the roll over buttons Are impacted by the protector, they drop too low. I'll investigate this.

Way out hole = nasty...
...but looks really reflective


Way out hole = nasty...
...but looks really reflective
OP
OP
Ashbo
Site Supporter
After literally months of injury induced hibernation, I decided to have a little pootle in the shed... There is nothing like the smell of sandpaper on mingy old painted and rusty legs!! This stage is going to take some time to complete.....nice


OP
OP
Ashbo
Site Supporter
A total of 7 hours combined work in total, the paint is stripped off and rust sanded off. The yucky brush applied black gloss is now gone! Hurrah!! I'll be ordering some paint next.


Are you finished now dad? Yes Harry
Are you finished now dad? Yes Harry
OP
OP
Ashbo
Site Supporter
The sun is shining, time to get some colour onto these legs....

OP
OP
Ashbo
Site Supporter

Was raining yesterday eve, so first coat got 48 hrs, a quick once over with 1200 grit (sanding block) and second coat of primer on.
This time tomorrow, some black gloss on. Exciting times this watching paint dry

OP
OP
Ashbo
Site Supporter
What's better thank watching paint dry??? Why watching filler and glue dry!!!
1st we break it down, literally..


Then we clean up and put back together

Whilst I wait, plenty of bits to fill, sand, fill,sand...results later

1st we break it down, literally..
Then we clean up and put back together
Whilst I wait, plenty of bits to fill, sand, fill,sand...results later
Last edited:
OP
OP
Ashbo
Site Supporter
I was planning a day of it today, but in a small garden, it wasn't just me drying things, once the washing was in the line, no more dust from sanding. Lack of rain stopped play....until tomorrow

OP
OP
Ashbo
Site Supporter
Washing in.....a quick spray.

OP
OP
Ashbo
Site Supporter
Got the legs in last night so I could start on the backbox...


Just off to hobbycraft to get some more low tack tape, a new craft knife and some brown paper. Next coat will be the black round the inside of the frame, then light blue stripe on the front.
Then....we will start on the stencils for the side of the head.
Just off to hobbycraft to get some more low tack tape, a new craft knife and some brown paper. Next coat will be the black round the inside of the frame, then light blue stripe on the front.
Then....we will start on the stencils for the side of the head.
OP
OP
Ashbo
Site Supporter
The Range was closer and had everything I wanted.
Started to plan out the design this afternoon. The big area of dark blue will be masked out with low tack tape, the rings I'll make some stencils.
Second sketch...


Traced onto some mylar sheets I had

Double checked it's the right size...it is.

Started to plan out the design this afternoon. The big area of dark blue will be masked out with low tack tape, the rings I'll make some stencils.
Second sketch...
Traced onto some mylar sheets I had
Double checked it's the right size...it is.
OP
OP
Ashbo
Site Supporter
A quick spray before work...


OP
OP
Ashbo
Site Supporter
Time for a cuppa, let's remove the paper ..phew, that'll do

OP
OP
Ashbo
Site Supporter
Ok, a few touch ups required, but next job, making some stencils. Weekend off promised to the family, so I'll return next week.
OP
OP
Ashbo
Site Supporter
Off to Brum later so have the day off. Just doing a bit of touching up. I'm definitely on a learning curve with the spray paint.
Somehow I got black over spray despite masking. Think I did it when I turned the head upside down. I'll try not to do that again. Sanded off, masked and try again.


Also having put some primer on the body, I then saw thousands of scratches from her last "refurb". These were present after I sanded back, so these are being filled. I'm finding cheap watery filler is doing a grand job on these...this is before by the way

Somehow I got black over spray despite masking. Think I did it when I turned the head upside down. I'll try not to do that again. Sanded off, masked and try again.
Also having put some primer on the body, I then saw thousands of scratches from her last "refurb". These were present after I sanded back, so these are being filled. I'm finding cheap watery filler is doing a grand job on these...this is before by the way