What's new
Pinball info

Register a free account today to become a member! Once signed in, you'll be able to participate on this site by adding your own topics and posts, as well as connect with other members through your own private inbox!

In Progress Bally Heavy Metal Meltdown (HMM)

cNp

Registered
Joined
May 31, 2016
Messages
29
Location
Reading, UK
Alias
cNp
The other half of the barn find to biglouieuk's William's Hurricane was this Bally Heavy Metal Meltdown. I got a heads up on these two pins from a workmate who came in one Monday and showed me a photo he'd taken in his father-in-law's barn and said "you're into these sorts of things aren't you?". Quick version of the history is the guy ran music events and used them in green rooms and back stage for artists as well as part of some events... eventually they were in a games room in his house and finally moved to the barn where they've been the last several years.

Fast forward 7 months and skip lockdown and we finally went to pick up the pins, one at a time, on Saturday. I'd read up a bit on the 6803 machines and had also been told it'd be a miracle if it booted up so I wasn't expecting much to start with but I love cleaning stuff up so knew I had some fun ahead :D

IMG_7211.jpg

When we pulled up I was alarmed to see the HMM turned on given the damp conditions. We got that turned off as quickly as was polite although it was heartening to see it would fire up in some capacity.

The HMM was filthy and rusty but did have the keys so I could remove the topper (although it involved plunging my hand into a dark, cobweb filled hole!), fold the head down, and get it loaded up easy enough.

IMG_7212.jpg

I'll just add some pics here and not go into too much detail...

IMG_7221.jpg
In the garage and drying out with some bits off for cleaning.

IMG_7227.jpg
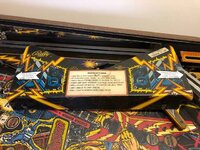
The apron cleaned up nicely although it's clearly been shattered into several pieces by what I can only assume is the glass being smashed at some point.

8A384026-7328-4887-A33F-1D2E9862BA63.JPG
A lot of the playfield is covered in mylar and wax and grime... cleans up ok though.

dirt.jpg
clean.jpg
Went around removing plastics bit by bit and giving an initial clean... you actually couldn't really see through the bits that were meant to be transparent!

onceoverclean.jpg
Clean...ish.

damage.jpg

The non-Mylar'd paintwork is mostly ok but this bit in particular is actually flaking away :-/
My main wish here is to secure this in some way to prevent further flaking and then decide on an approach to touching up and further protecting. Really keen for advice on what I can use to carefully paint over what is there to just stabilise the paintwork?

The Mylar that's all over most of the playfield... am I best to just leave that in place? it cleaned off fine but does give a slightly dull look to the artwork.

Anyway, lots to do on it but I'll post separately as I tackle the various issues.
 

Attachments

  • IMG_7225.jpg
    IMG_7225.jpg
    67.8 KB · Views: 11
Cool man, I do love a bit of HMMD. Personally I’d leave the Mylar alone mate. It’s won’t add or detract from value at all and god knows what you’ll pull up. With some patience and elbow grease you can get a decent shine on Mylar
 
I had a project one of these a while back I “think” the cabinets are MDF rather than ply? So it will need a good dry out! It does look surprising ok? I don’t think there’s many of these about? Still love that topper seen them with additional LED’s etc
 
Last edited:
Cool man, I do love a bit of HMMD. Personally I’d leave the Mylar alone mate. It’s won’t add or detract from value at all and god knows what you’ll pull up. With some patience and elbow grease you can get a decent shine on Mylar
Yeah, I think you're right, I'll look into tips on shining up the Mylar :)
 
I had a project one of these a while back I “think” the cabinets are MDF rather than ply? So it will need a good dry out! It does look surprising ok? I don’t think there’s many of these about? Still love that topper seen then with additional LED’s etc
Yeah, I think it is... the barn was mostly dry so the pins weren't water damaged in any way, just that pervasive dampness you get as a film over everything... the bottom of the sides are maybe a mm wider from the moisture but yeah, surprisingly good condition overall.

The topper is so cool, makes the whole thing really tall though... I have it in pieces at the minute for cleaning and it's coming up nice.
 
Heavy! Metal! Meltdoooown!

Awesome pin and reasonably rare too, you guys must have been over the moon walking into that barn. Those kind of opportunities don't come up very often. Looks pretty decent too, other than that playfield damage which might prove a bit troublesome. It needs to be sealed somehow, I would have said a clearcoat, but I'm not sure what you do when there is mylar to deal with as well? I wonder if you can just clear over the top?
Yeah, it seems a really fun theme... screams the '80s. Very happy with the overall condition considering I'd only seen a couple of dimly lit phone pics until we got there.

All I've found so far on playfield restoration refers to touching up worn areas and then clear coating but not how to stabilise flaking paint... I need the number for The Repair Shop... I've seen them stabilise flaking paint on stuff before attempting anything else :)
 
What is it Goose says in Topgun, "I need the number for that paint touch upschool, Paintmaster I think it was"

I'm sure it was something cool like that 😬
 
I wouldn’t even bother mate. Maybe just touch in the plain black. Then look into a plastic playfield protector. Although not sure they do one for that machine as it’s not too common.
Infact, as it’s such an obscure title which no one has, it’s almost guaranteed that CPR will make a repro playfield for it 🤣
Doesn't look like there's a playfield protector available for HMM unfortunately. The only repro thing I've found is a ramp which is good as, whilst usable, my one has clearly seen several repairs and is still cracked in places.

I would actually enjoy touching up some artwork but it's just this area that is flaking away that worries me a lot; I've no idea how far it will flake away before it becomes stable.
 
Last edited:
Working and waiting for some bits but have managed to continue the clean up on a few bits and cleaned and put the topper back together with freshly sprayed speaker grilles. If it was summer I'd have the whole thing outside and paint it but tbh unless you're 7 foot you won't spot most of the wear on it :)

paintedplastic.jpg
Touching up the speakers and a snapped plastic I found inside.

prespray.jpg
paint mostly stripped

respray.jpg
Silver spray

topperdone1.jpg
Back in place

topperdone2.jpg

surroundpre.jpgsurroundafter.jpg
Just a soak in Vinegar and a soft brush on the shooter rod surround, happy with that.
 
A couple more small things but ones that really help the overall aesthetic when you stand in front of the machine...

oldglasslift.jpg
newglasslift.jpg
New glass lift strip... just needed about an inch sawing off one end.

shooter.jpg
New tip rubber and both springs replaced as well as a bit of a clean up of the rod. The small spring visible to the player was completely rusty so this really helps the look of the thing.

keyring.jpg
Oh yeah and I needed a keyring as they were just on a rusty ring so... :D
 

Attachments

  • shooter.jpg
    shooter.jpg
    90.4 KB · Views: 8
Spent the weekend stripping the playfield so I could clean the harder to get to bits and also replace every rubber part as they had all perished/hardened. Also fitted a repro ramp as mine, whilst working, has been glued over the years and I figured I'd best buy whilst available and my budget allowed for it after finding the game much more functional from the get go than I had suspected it would be.

stripped.jpg
Stripped... mostly... new rubbers already added to the bottom.

laidout.jpg
Every bit of rubber was perished but, apart from snapped bits off plastics, most stuff is in decent nick... all the star posts are fine (whereas on my Getaway some are crumbling to pieces).

rubbers2.jpg
rubbers1.jpg
newramp.jpg
New ramp

alldone.jpg
All back on :)

So, I have a sound fault that developed shortly after I got the game home. I've reseated the socketed chips on the sound board and unplugged and replugged the connectors a few time but nothing else... tbf that's all I know to do :D


Other things to do...

- Troubleshoot non-functioning left flipper.
- Check how to remove side rails and see what can be done with the rust
- remove metalwork around/under the head unit to clean up and respray
- Remove legs, clean up and respray... maybe get all the metalwork shot blasted and powder coated/sprayed
 
That flipper...

Do you have power to the flipper? Test with a meter?

Def got the wiring the right way round? Maybe someone fixed it and got it wrong? Might have therefore mashed a transistor on the board.

Be good to check how to test voltage at the flipper with a meter and go from there. Maybe ask Phil? (•‿•)
 
  • Like
Reactions: cNp
Flipper fixed. The leaf switch in the flipper assembly that should return to closed was just stuck open and was just about snapped off.

Luckily there was a spare inside the machine when I got it, along with a few other bits so just fitted the new one.

Nice to play a game, albeit without sound... New DAC will fix that hopefully...
 
The new DAC (https://www.mouser.co.uk/ProductDetail/Analog-Devices/AD7533JNZ?qs=NmRFExCfTkEksuXX0NIXvA==) fixed the horrible loud white noise sounds that were drowning everything out, yay!


Well happy about this, game is now playable and I can start trouble shooting any issues that come up in play now... played quite a few games yesterday and it's great fun.

LOAD CHAMBER shows up on boot so that's something to look into.

Also I think when the ball goes up the ramp on the left side (not up the power amp entry) it should trigger the "gate" to rise up so you start locking balls but that doesn't happen. Solenoid self test shows that functioning fine so I suspect it's the trigger switch on the ramp as the ball goes around that isn't working correctly. Will look at the weekend...
 
Chris, did you get to the bottom of the switch test showing all switches as closed?

I know they seem to work, but why would test show them closed?
 
Chris, did you get to the bottom of the switch test showing all switches as closed?

I know they seem to work, but why would test show them closed?
I did not Rob, about to do a little write up of what I did at the weekend and will maybe make a post about the switches all reporting closed in self test over on the tech section.
 
Had some time again over the weekend to work a bit on the pin... I've added LEDs to most of the game now, colour matched the HEAVY and METAL in Blue and orange and similarly elsewhere... warm whites as well so it doesn't look crazy bright.

I got a new repro Keypad from a seller on eBay in Hungary and it works great, an absolute joy after using the in built one which I suspected was making double presses anyway... testing is now even easier than ABC :-/
newkeypad.jpg

The speakers in the topper were pretty shot and that was really noticeable when the volume was increased so I put some new ones in that also have tweeters... sounds great. I need to put a little riser on the bolts to give a couple of mm clearance so I can get the silver grilles back in now but they look alright without.
newspeaker.jpg
newspeakersin.jpg

I thought this area looked really dull so I started thinking about some sort of toy to go here...
preamp.jpg

I've prototyped a Marshall amp out of a Vectrex cart shell, sticky back leather and printable sticky paper... happy that it will "work" there so I'll work out how to make an acceptably finished thing next.
postamp.jpg

Also thinking aesthetically I am going to fashion stickers for the drop targets to have the speaker cones from the apron art... think it will look cool... will colour match them blue, orange, etc. and see what that looks like.
target_blue.pngtarget_orange.png

Functionality-wise the game now plays well afaict apart from the ball lock does not work and so you cannot build up multi-ball which is pretty fundamental to HMM's game-play mechanic. In self test the solenoid works and the 2 pronged "gate" rises up and lowers fine but in game when the ball goes around the ramp and triggers the switch (that presumably should raise the gate) nothing happens and the ball comes straight out and, usually, drains.

In self test again but for the switches it seems that (most) every switch reports closed regardless of if I hold them down or not... yet in game they function fine. Reading around it sounds like one fault switch will cause subsequent switches to report falsely? Should the switches report Open unless depressed?
 
That Marshall amp mod looks pretty cool!

Regarding the switch problem, it could be a short somewhere in the switch matrix - maybe a bad diode or something. Can you tell if the problem is specific to one or more rows/cols ? If convenient, you could also try disconnecting half of the rows or columns to narrow things down.
Thanks Fubar :)

I'll do some reading this week on the switch matrix stuff you mention (I'm a complete newb to a lot of this) and try to trouble shoot some more.
 
Back
Top Bottom