What's new
Pinball info

Register a free account today to become a member! Once signed in, you'll be able to participate on this site by adding your own topics and posts, as well as connect with other members through your own private inbox!

In Progress Bally Corvwrecked (Corvette) Pinball Restoration

Dunc

Registered
Joined
Jul 17, 2014
Messages
367
Location
Derbyshire
Well, i have been meaning to do a restoration thread on my progress to date on my Bally Corvette machine. After seeing @newdos thread, and thinking, 'hmmm mines just as bad, thank god theres someone as stupid as me!" , i decided to post up on here for you all to see.

After my mate @strobey has had pinball machines for as long as i can remember, even when we were young, ive always liked them and really fancied one. Being into my cars, i wanted a Bally Corvette, but found they didnt come up that often, and always out of my budget when they did come up (which was peanuts as i had a house restoration on at the time!).

Anyhow, come 2009 (i think) @strobey text me to tell me there was a Corvette on eBay needing restoration, so that said, going in blind as it was 150 miles away, with a winning bid of £400 it was mine! The guy was very clear from the start, and said that it was once a mint condition/collectors condition machine, but unfortunately, the machine was in storage which got flooded out. Now, the machine was on a pallet and was just above the water level, but no one reailsed the storage place was flooded for months, and the damp atmophere did its damage.

So, I trundled down to the outskirts of London one evening after work to collect it, and to my suprise, the guy had set it up and it actually worked!!!! Ok, a few bulbs here and there were out, and the display had a few lines out, but pretty much everything was there, and 90% working! So, i handed over my cash and headed home, knowing i had let myself in for a big challenge! But i was just super happy to have my first pinball...and a Corvette at that!

Now, over the next few years, i didnt really do anything to the pinball apart from have a few games on it and thats about it. It then went in and out of storage (thanks @strobey again for looking after it ) while i carried on my house renovation and other priorites. each year i would go to the Pinball Party and say "Gonna get cracking on mine when i get home!".....this never happened lol.

Fast forward to 2013 and i had my Double Garage built at home and bought the pin back to mine!

By this time, the cabinet had deteriorated even more. It was hardly holding together. I decided it was time to restore! But, it just sat in the corner of my garage for the next 2 years collecting dust as i was now onto restoring my Uno Turbo and tinkering on my Clio Williams. The pinball never got forgotten, just needed to finish some projects first before tearing down the corvette!

Hope you are all still reading LOL....

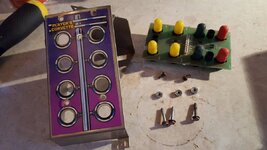
This brings me up to summer 2015 when i finally bit the bullet and decided to take many photos for referance and start pulling it apart. Now i knew how much work there was going to be, and i knew that there was ALOT of rust to sort, the cabinet to sort, the playfield to sort.............heres a few pics i took....

As you will see....it was a mess. Rust everywhere...playfield staining the lot. Even trapped/lost balls that had fully rusted!

Now, im sure loads of you would have just parted it out as its not really worth it. But i like a project and a challenge! Bit like @newdos :D

Sorry if all the pictures arent fully in order, it's taken a while to sort through them! :D I do have more pictures of it complete, but Tim has these on his computer, need to get hold of them!

20150906_173234.jpg


20150906_172413.jpg

20150906_172405.jpg


20150906_172400.jpg

20150906_170719.jpg

20150906_170716.jpg

20150906_170711.jpg


20150906_125332.jpg


20150902_190059.jpg


20150902_185111.jpg


20150902_184944.jpg


20150901_204737.jpg


20150828_083330.jpg

20150906_184720.jpg


20150906_170727.jpg


20150906_191040.jpg


More to come........

Dunc
 
Here are a few of the playfield horrors!!! :( Turn away now if you are easily scared!

20150911_143748.jpg

20150911_143740.jpg


20150910_173052.jpg

Just a few chunks of wood come off! thats how rusty parts were!

20150909_182612.jpg

20150909_181417.jpg

IMG-20150908-WA0023.jpeg

IMG-20150908-WA0021.jpeg

IMG-20150908-WA0019.jpeg

IMG-20150908-WA0015.jpeg

IMG-20150908-WA0013.jpeg

IMG-20150908-WA0011.jpeg

20150906_184709.jpg

20150906_184703.jpg


----------------------------------------------------------------------------------------------------------------------------------------------------------------------------


After alot of working out which chunk of wood came from where, a good amount of wood glue, some clamps. some filler and some sand paper the playfield was looking alot better.

I won't post the glues pics, but heres a couple from the rear of the playfield once i had gona over it with the orbital sander and then used Treatex Hardwax Oil on the rear to smarten it up

20150928_183527.jpg

20150928_183535.jpg


Then, the artwork side of the playfield....... :D sanded, prepped and clear coated!

20150927_153915.jpg

20150927_153850.jpg

20150927_153844.jpg

20150927_153837.jpg

20150927_153827.jpg


20150927_153821.jpg


And how it looked after. As you can see, there is still rust staining that has bled through the playfield. Theres nothing i can do about this unfortunately. But is should all be well hidden once back together :)

20150927_165350.jpg

20151022_093508.jpg

20151022_092437.jpg
20151022_092426.jpg

And then once finished and fully polished

20151017_234643.jpg
20151017_234700.jpg
20151017_234717.jpg
20151017_234721.jpg


more to come! Just takes a while to do! lol

Dunc
 
Last edited:
The rear upstand panel also had a nice ammount of rust, rot and mould. Properly grim!

Before....

20150908_174658.jpg
20150908_174644.jpg
20150908_174626.jpg

20150908_174604.jpg

and the ball kick off the back board...check out the lovely parcel tape!

20151002_183529.jpg

So i decided to get a new back panel made by a local joiner who took an interest in the project, and while i was at it, i got him to knock me up some new Oak side rails as my original ones actually snapped when i took them off!! Always liked the way oak ones look!

20150916_180942.jpg

20150916_180922.jpg

20150916_180916.jpg

Got a new Decal from USA

20151016_115758.jpg

Painted up the new back board and put it back together. Didnt get any full after photos of it on its own. But you will see it on the play field later

20151018_121421.jpg 20151113_154009.jpg

Oak rails painted up in the Treatex Hardwax Oil and fitted

20151004_105711.jpg

20151022_183816.jpg

20151022_183825.jpg


And heres a few pictures of parts removed to give you all an idea of the state of stuff!


The Engine
20151004_142121.jpg
20151004_142057.jpg

20151004_141817.jpg

20151004_140445.jpg


And heres all the metal work from the playfield laid out before i sent it off for re finishing

20151004_163529.jpg

And after...

20151029_180223.jpg

Still more to come......

Dunc
 
Last edited:
Continued cleaning up parts. This seemed to be a never ending process! lol

Using the dishwasher for proper things other than pots..(wife was out :D )

20151113_102621.jpg
20151113_102630.jpg

nice and clean!
20151113_124343.jpg


Next up, dirty boards from under the playfield.....hmmmmmmm more dirt!
20151116_174908.jpg
20151116_174900.jpg
20151116_174856.jpg

nice and clean!
20151117_185116.jpg


New parts being ordered constantly....just a few pics of various deliveries over the months lol

20151112_174544.jpg

20151002_115546.jpg
20151002_115540.jpg


also bought a new plastics set from a member off here. Didn't need them all and i shall use as many originals as possible, but i was missing a couple and its always nice to have spares.
20150914_113113.jpg

Re wrapped the coils and put the engine back together
20151115_115258.jpg
20151115_183218.jpg

Built up the ball trough (i re wrapped the coil after this picture was taken)
20151104_185141.jpg


And heres a general shot from the underside of the playfield at this stage
20151118_090825.jpg

As you can see, i had rebuilt and fitted a fair few other bits including fitting all the wiring loom holders etc. I didnt want to bore you with loads of pictures of all these stages lol

More to come...

Dunc
 
Last edited:
So, after all that above, i put the pinball restoration to one side again. Lost motivation and had other projects again (more house stuff mainly). This was about December 2015. It sat in the corner of the garage once again waiting for me to crack on with it. I bought a Getaway Pinball so time was spent playing and tinkering on that instead lol :D

Now, roll on to a few weeks ago, approx begining of August 2016 and i decided i really wanted to finish off my Corvette. Motivation at maximum, i got ordering more parts and made a list of where i go to and what was still needed and still left to do....which is plenty!

So, first off i got the playfield uncovered and set back up.

Fitted the restored back panel
20160830_212128.jpg


Lower ball guides fitted
20160830_212134.jpg

Oak side rails again....just cos i like them lol! Also, note the corvettes cab in the background....notice the floor of it hanging out! hahaha!
20160831_191906.jpg


Ball guides polished and fitted at the top of the playfield.

20160831_213920.jpg

20160831_213912.jpg

20160831_213905.jpg


Apron Fitted....dont ask about the random round hole in the apron....no idea lol! Luckily this is covered by the rule sheet!

20160831_174030.jpg


Here are the other ball guides i really need help with. Can anyone fix these for me? Or have any ideas? As you can see, the threaded bits have rusted and snapped off. This has happened on about 5 of the ball guides :(
20160831_181637.jpg
20160831_181634.jpg

20160831_181630.jpg

Some rusty posts i need help with too. Anyone got any spares?
20160901_082722.jpg

20160901_082725.jpg


And an over view of the guides i can fit, fitted!
20160831_213900.jpg


nearly there.....

Dunc
 

Attachments

  • 20160831_193227.jpg
    20160831_193227.jpg
    90.8 KB · Views: 3
Last edited:
So this pretty much brings me up the the weekend just gone. I'm not working on it all the time as im now halfway through my garden project since we have had an extention built, it ruined it!

So this is the latest update...

More dirty parts and wiring

20160901_082326.jpg

20160831_193227.jpg


all cleaned
20160902_082301.jpg

I also wasnt happy with the Pop bumper centres, even after going through the dish washer, so i ordered new parts along with 2 new pop bumper brackets as 2 of mine had snapped bits! Also, i needed a new coil and new sling shot arms.

20160902_193351.jpg


Comparrison pic of old v new!
20160902_195738.jpg


And fitted!

20160905_085557.jpg


And here is the play field pretty much up to date!
20160905_085611.jpg

As you can see, thats a brand new engine Ramp fitted. That actually came with the machine when i bought it with a few spares! bonus!

Will try to keep this thread up to date now with updates!

Hope i havent bored you all too much haha!

Dunc
 
Last edited:
Nice one mate. Im sure you'll do it proud. And fair do's I love the old Uno turbos. My mate had one in the 90's. 2 stand out things for me. 1. The red carpets
2. My mate flicked his fag out the front passenger window where it promptly came straight back in the rear passenger window and hit missus straight in the eye then burnt a hole in the rear seat.

Ahhhhhh good times
 
Wow amazing based on your starting point.

What clear coat product & tool did you use?
 
Last edited:
It looks like you're doing well. I'd not noticed the shark in the artwork before (it would be hidden by the Skid Pad ramp from a players' pov). There were two 'Mako Shark' GM show cars, which AIR influenced the 1968 Corvette.
 
Glad to see you are putting the time in to save this.
Yes it's only a Corvette but I'd rather see one saved than scrapped.
I can do the ball guide lugs that have rotted off and will see what posts I have spare for you.
 
Wow.

Truly impressive stuff. A nice one sold on ebay recently for £1,900 - so good to see some love for this title.
 
Glad to see you are putting the time in to save this.
Yes it's only a Corvette but I'd rather see one saved than scrapped.
I can do the ball guide lugs that have rotted off and will see what posts I have spare for you.

@replicas thanks! I too don't like to see pinballs scrapped. Like you say, it may only be a Corvette, but I really like the game...plus this was my first pin...so want to keep it haha!
You can fix my ball guides?? That would be fantastic! And if u have any posts that would also be amazing! I'm coming to a bit of a halt at the moment due to the ball guides and posts!


Wow.

Truly impressive stuff. A nice one sold on ebay recently for £1,900 - so good to see some love for this title.

Cheers @DRD It's been a hard slog, but I thought I'd I can do this as my first pinball restoration, I should easily be able to restore others in the future! Go head first right into the deep end! Haha

Dunc
 
Great that you are,taking this on, many would have passed! I had a quick look for that diverted, no luck so far but I can't imagine I have thrown it out. Looking again tomorrow :)
 
Great that you are,taking this on, many would have passed! I had a quick look for that diverted, no luck so far but I can't imagine I have thrown it out. Looking again tomorrow :)

Cheers @Matt Adams Maybe I should have passed haha...but too far in now!
Ahh cheers for that! If you can find it, I'd be forever grateful :) Any thoughts on that playfield lol

Dunc
 
Small up date. More cleaning last night. This time it was the raceway's turn.

Few pics before and as it was taken apart

Before
20160905_175025.jpg

20160905_175028.jpg
20160905_175037.jpg

20160905_175351.jpg

After and fitted
20160905_192511.jpg
20160905_213110.jpg

20160905_213105.jpg


Cleaned up the flippers.......but ones broke. Might just buy new ones tbh!

before
20160905_203451.jpg
after
20160905_204545.jpg


Also took the 'Skid' ramp apart ready for cleaning and a new metal entry flap fitting
20160905_202625.jpg

Dismantled and and partially cleaned. Will look like new when finished. Will have a flame polishing before fitting ;)
20160905_210138.jpg


Cheers

Dunc
 
Well a bit of an update....

I popped the posts I got from replicas into the tumbler and they came up like new! Absolutely brilliant!
20160925_165210.jpg

Now, the main update. I've always been missing the diverter for the Route 66 ramp. This, as you can imagine, is a game specific part and I didn't have a clue where to start to find one. To my luck and amazement, @Matt Adams messaged me to say he broke a Corvette many years back and was sure he had a diverter! So at NLP at the weekend, he handed me this....
20161010_180601.jpg

This also led @Matt Adams to say he had a really nice playfield that had been professionally automotive clear coated!
Now, this was a couple of weeks back before NLP, so I said to bring it along for me to have a look. Bear in mind I was thinking I was pretty happy with my effort in restoring my playfield! Also I felt as I had started putting my game back together, getting a replacement playfield now would mean a step back.

Anyhow, to cut a long story short, as matt took me to his van to get the diverter, he opened the door and I was greeted by a beautifully clear coated corvette playfield! I had to have it!
These pics don't do it justice, the clear cost is glass like as nice and thick where it indents slightly into the holes if that makes sence!
20161010_181001.jpg

20161010_181031.jpg

20161010_181012.jpg

20161010_182350.jpg

Really pleased! So, the only part which was going to let my resto down was the playfield, this is now not the case and I'm on my way to a super minty mint corvette!


I also picked up a few other bits at NLP.

Some mirror blades off @chris b
20161010_180433.jpg

And some other bits off @Pinball daze and Jim at @myPinballs
20161010_180658.jpg


I've sanded the back of my new playfield and sealed it, but will take pics and update this tomorrow night!

Cheers

Dunc
 
OK, so last night, I got the back of the playfield sanded.

Before...
20161010_182516.jpg

20161010_182525.jpg

What's this random smiley face stamp about?? Any ideas?
20161010_183723.jpg

Time to break out the Random Orbital Sander!
20161010_191307.jpg

After....
20161010_192426.jpg

Then time to seal the back. I use Treatex Natural Wax Oil. It gives it a slightly white wash, but makes it look super clean and new as well as sealing it nicely to stop dirty finger prints etc in the future.
20161010_193832.jpg
And sealed!
20161011_074021.jpg
20161011_074031.jpg
That's it till the weekend. Have to let it cure fully and then it's time to transfer everything over from the other playfield. Shouldn't be much of a job as everything is fresh and clean with new screws!

Dunc
 
very nice indeed, Dunc. you were lucky to run into Matt Adams, he's one of the very, very best.
good to meet you and Tim by the way, and thanks for the Popeye photo idea
 
That diverter was a lucky find, it took 4 go's! gonna be an awesome Corvette. Good to meet you at NLP Dunc :)

Cheers @Matt Adams . It certainly was a lucky find! I wasn't sure what i was going to do! Thought about getting a corvette owner to lend me a diverter if i could, so i could get it copied!! And i really hope this comes out now as one of the best corvettes in the country after all this work! especially now you have sold me the lovely clear coated playfield! Was great ot meet you too matey!

very nice indeed, Dunc. you were lucky to run into Matt Adams, he's one of the very, very best.
good to meet you and Tim by the way, and thanks for the Popeye photo idea

Indeed, very lucky! He certainly is one to the best! and a fellow Who Dunnit owner...was great to have some W?D convo with him haha!

Was good to meet you too! And yeah, i was pretty pleased with my Popeye photo suggestion lol!

Dunc
 
Top work @Dunc! And nice meeting you and @strobey at NLP and shooting a balls on BSD :D Your restoration work is great. I'm particularly impressed with you work on the playfield. I've got a can of Autotek on the desk next to me and hoping it will ultimately fix the appalling playfield on my soon to arrive MR & MRS PAC-MAN!
 
Ok, so after along time without an update.....i have an update!

I have still been doing bits and bobs on the Corvette, but im now back up to speed on it and will bring you up to date with some pictures!

I started to slowly put a few bits on the new playfield after a good polish!
20161016_174631.jpg
20161016_174644.jpg


I then removed the light boards back off the old playfield, this picture was just for reference. You can see how badly stained the rear of the playfield was from the rust.
20161018_184652.jpg


The main Route 66 Ramp looking nasty! This was really dirty, rusty ramp entry flap and other rusty parts. The was fully stripped and cleaned along with a new entry flap fitted. More pics of this later
20161101_084033.jpg

More parts and hardward delivered!!
20161028_114659.jpg


This was pretty much it for 2016! The next pictures are from the last 2/3 weeks so pretty much up to date!

I dropped off the wireforms, some cabinet parts and the sides of the engine to Derby Plating Ltd for chrome plating back in september and kinda forgot about them! Ooops! :D I got them to polish the wireforms too to get them extra shiney! I picked them up in January lol! my bad?
20170120_170416.jpg

20170120_170422.jpg

As soon as i got these bits back, i built the engine up to have a look

20170130_210929.jpg

I then sent @replicas my engine ramp and main route 66 ramp for him to rivet on brackets and a new entry flap. All selotaped in place ready for him lol
20170201_195714.jpg

20170201_195721.jpg

20170201_195748.jpg


More to come........


Dunc
 
This takes me up earlier this week.

Ordered some more parts and bits i needed from @pinballmania and they arrived the next day! Brilliant service!
20170207_104837.jpg


Now this little delivery allowed me to fit a few more parts Tuesday evening (7/2/17)

In my delivery i got the pop bumper body screws and cap screws and the screws needed for the ball lanes to be fitted. So got all those on
20170207_202751.jpg

20170207_202936.jpg

And heres just some overall pictures to see where i am currently at. Ive fitted one of the wireforms as you can see and a few other bits.

20170207_202816.jpg

20170207_202838.jpg


20170207_202956.jpg

20170207_203020.jpg

20170207_203043.jpg

20170207_203059.jpg

20170207_202845.jpg

Bloody love my oak side rails! :D lol

So thats where i am at! I have had my ramps arrive back safely from @replicas (cheers matey!) so i can now crack on and fit quite a bit more!

Will hopefully have another update tomorrow!

Dunc
 
Last edited:
Back
Top Bottom