I’m relatively new to the dark forces of the SS world (and this forum) so on acquiring a Hobbit Smaug Gold recently (thanks Chris B) which had a home made acrylic topper(good effort but not what I wanted) I set out to plan and design my own. This was done with the aid of a pal who’s a Signwriter and Printer. My brief was to make it different to what’s on the market but instantly recognisable and not too Heath Robinson.
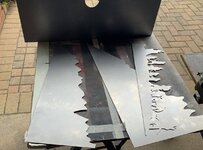
My pal, who’s a Printer, had recently started making, with the help of a contact, various door numbers, clocks and advertising items for craft fairs etc using laser cut steel plate. I thought this would be a good medium to use and wanted it without paint but with the thought that somewhere down the line, and if I got bored with it, I could dip the sheets in a salt solution and give it a rust-ic look .
.
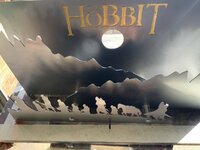
I sent him various online Hobbit themed pics and soon we hit on a scenario. The mountain range, with Hobbit characters moving towards them, were appealing. Add ‘The Hobbit’ title in the correct font, somewhere to bring in the ubiquitous gold ring and before you could say “Precioussss” we had a suitable design. I knew it had to be 3D as there was no way I was going to engrave the plates to try and get detail. Simple but effective was my aim.


After a couple of emails back and forth we had an initial design which was put onto vinyl. This was attached to scrap cardboard and a rough layout made up with LED’s entwined through it to test out the aesthetics.

After a couple of minor changes, and a serendipitous find of a ‘Hobbit’ gold ring on eBay, I gave the thumbs up to order the steel plate.


I’d given the Printer a dimension of 2’ (600mm wide) and the depth would be determined by how far I wanted to space each piece. The head is 10” (250mm) deep so I had plenty to play with . The base plate to the rear stand up piece would be 6” (150mm) deep.

Fortuitously he had a length of 20mm dia. solid acrylic that looked like a glass rod. This was an ideal medium for spacing the pieces, alternatives being copper tube and washers or nothing in between but a coach bolt right through with a nut and washer in front and behind every plate to hold it rigid. The dimensions of the acrylic rod helped to stiffen the assembly up so as a finished article it could be picked up as one unit with no tendency to slip or slide.
The first, rough, builds identified a couple of problems. The ‘HOBBIT’ font, and the hole for the ‘Hobbit’ gold ring , were great but you could see right through them - obviously. My games room has a faux brick wall effect, which is acceptable, but it would be a distraction. Fortunately my Printer Guy had access to dozens of coloured sheets and a gold leaf effect fitted the bill perfectly.

Once that was in place the acrylic clear tube was cut into 2” sections as spacers, and drilled down the centre to take the coach bolts. The whole piece was assembled and then the only ‘Heath Robinson’ bit (if you don’t include the LED’s) was getting a black aerosol can lid, hanging the Hobbit ring inside it and glueing the lid to the back of the hole. It was the perfect fit as it was only a mm or two bigger than the cut hole. If I had thought of it earlier I may have had the hole cut to take a lid but then you would have seen the edge from the front and it may still have needed glueing to stop it popping out.


Initial design had the back panel angled back at 10 degrees off vertical to stop it falling forwards and a substantial piece behind it to act as a support piece. However, once built, it was obvious that the other three pieces, suitably spaced apart, would stop it falling forwards but the problems identified were two fold.
1: there was too much overhang as I’d decided not to have the foreground ‘character’ piece in line with the front of the head so pushed it back 2”.
2: as a player who likes to get ‘involved’ in the game playmy exertions, and the forces of the shaker motor, made the topper walk forward
Health warning alert..... this thing weighs about 4kg!! therefore any pleasure of seeing it would soon be dispelled if it took out the glass and most of the playfield when it fell off.
Back to the drawing board and a couple of hours cutting a line with a grinding wheel under the extended back piece in order to bend it down to just past 90 degrees. It’s worth mentioning that I haven’t got a ‘workshop’ as such, just a domestic garage. A piece of 4” x 4” wood had a channel cut in it to grip the edge so I could apply force along the whole sheet and bend it into position. That worked well.


With the ring in position and the back piece bent over, it was time to lay out the LED’s. They needed to be placed to throw a decent moody light but not be visible when you walked into the room or played the game. Initially I had used the set of LED’s that came with the original acrylic topper but I felt it looked more like a nativity scene (see 4 pics above) than an arduous trek through the mountains so a new set were purchased from Amazon. These had a remote control and many variations of light effects, plus it used decent 3m backing adhesive so it was a relatively easy task to attach them.

When it went into position some heavy duty 3M sticky pads were put on the back of the head but they aren’t really needed. The piece I bent as an overhang stops forward movement and the 3 pieces in front of the back plate stop it falling forward. It’s been throughly shake tested and doesn’t move a millimetre. I’d consider it as passing muster.

Now they’re up and working I think they look pretty good. Obviously it’s a matter of taste, and as usual in these forums, there will be haters and lovers (especially the “OMG it’s going to fall off” Brigade ) .
) .
Regardless of observations, I like the final effect, and it’s on my machine, so “hoc est arbitrium” as the Roman Pinball player would say


Video here of it lit;
https://share.icloud.com/photos/0zRY45n6KkLRzZv-wFouXIjfQ#Great_Doddington
I’ve already thought about a 3D design as a Topper for my JP. It won’t have an interaction with the machine but it also won’t have a £500 interaction with my frickin’ bank balance either! WTF?
I’d like to do the JP in acrylic but it would need engraving to capture detail and, similar to the pinball acrylic sheet designs available on eBay, it would need the light being thrown up or down the face and I don’t have the knowledge for that. If anyone on here does, and wants to share ideas, please message me.
Apologies for the long thread but I know some members like the detail and I’ve tried to add everything relevant about my project. Thank you for sticking with it.
My pal, who’s a Printer, had recently started making, with the help of a contact, various door numbers, clocks and advertising items for craft fairs etc using laser cut steel plate. I thought this would be a good medium to use and wanted it without paint but with the thought that somewhere down the line, and if I got bored with it, I could dip the sheets in a salt solution and give it a rust-ic look
.I sent him various online Hobbit themed pics and soon we hit on a scenario. The mountain range, with Hobbit characters moving towards them, were appealing. Add ‘The Hobbit’ title in the correct font, somewhere to bring in the ubiquitous gold ring and before you could say “Precioussss” we had a suitable design. I knew it had to be 3D as there was no way I was going to engrave the plates to try and get detail. Simple but effective was my aim.
After a couple of emails back and forth we had an initial design which was put onto vinyl. This was attached to scrap cardboard and a rough layout made up with LED’s entwined through it to test out the aesthetics.
After a couple of minor changes, and a serendipitous find of a ‘Hobbit’ gold ring on eBay, I gave the thumbs up to order the steel plate.
I’d given the Printer a dimension of 2’ (600mm wide) and the depth would be determined by how far I wanted to space each piece. The head is 10” (250mm) deep so I had plenty to play with . The base plate to the rear stand up piece would be 6” (150mm) deep.
Fortuitously he had a length of 20mm dia. solid acrylic that looked like a glass rod. This was an ideal medium for spacing the pieces, alternatives being copper tube and washers or nothing in between but a coach bolt right through with a nut and washer in front and behind every plate to hold it rigid. The dimensions of the acrylic rod helped to stiffen the assembly up so as a finished article it could be picked up as one unit with no tendency to slip or slide.
The first, rough, builds identified a couple of problems. The ‘HOBBIT’ font, and the hole for the ‘Hobbit’ gold ring , were great but you could see right through them - obviously. My games room has a faux brick wall effect, which is acceptable, but it would be a distraction. Fortunately my Printer Guy had access to dozens of coloured sheets and a gold leaf effect fitted the bill perfectly.
Once that was in place the acrylic clear tube was cut into 2” sections as spacers, and drilled down the centre to take the coach bolts. The whole piece was assembled and then the only ‘Heath Robinson’ bit (if you don’t include the LED’s) was getting a black aerosol can lid, hanging the Hobbit ring inside it and glueing the lid to the back of the hole. It was the perfect fit as it was only a mm or two bigger than the cut hole. If I had thought of it earlier I may have had the hole cut to take a lid but then you would have seen the edge from the front and it may still have needed glueing to stop it popping out.
Initial design had the back panel angled back at 10 degrees off vertical to stop it falling forwards and a substantial piece behind it to act as a support piece. However, once built, it was obvious that the other three pieces, suitably spaced apart, would stop it falling forwards but the problems identified were two fold.
1: there was too much overhang as I’d decided not to have the foreground ‘character’ piece in line with the front of the head so pushed it back 2”.
2: as a player who likes to get ‘involved’ in the game play
my exertions, and the forces of the shaker motor, made the topper walk forwardHealth warning alert..... this thing weighs about 4kg!! therefore any pleasure of seeing it would soon be dispelled if it took out the glass and most of the playfield when it fell off.
Back to the drawing board and a couple of hours cutting a line with a grinding wheel under the extended back piece in order to bend it down to just past 90 degrees. It’s worth mentioning that I haven’t got a ‘workshop’ as such, just a domestic garage. A piece of 4” x 4” wood had a channel cut in it to grip the edge so I could apply force along the whole sheet and bend it into position. That worked well.
With the ring in position and the back piece bent over, it was time to lay out the LED’s. They needed to be placed to throw a decent moody light but not be visible when you walked into the room or played the game. Initially I had used the set of LED’s that came with the original acrylic topper but I felt it looked more like a nativity scene (see 4 pics above) than an arduous trek through the mountains so a new set were purchased from Amazon. These had a remote control and many variations of light effects, plus it used decent 3m backing adhesive so it was a relatively easy task to attach them.
When it went into position some heavy duty 3M sticky pads were put on the back of the head but they aren’t really needed. The piece I bent as an overhang stops forward movement and the 3 pieces in front of the back plate stop it falling forward. It’s been throughly shake tested and doesn’t move a millimetre. I’d consider it as passing muster.
Now they’re up and working I think they look pretty good. Obviously it’s a matter of taste, and as usual in these forums, there will be haters and lovers (especially the “OMG it’s going to fall off” Brigade
) .Regardless of observations, I like the final effect, and it’s on my machine, so “hoc est arbitrium” as the Roman Pinball player would say
Video here of it lit;
https://share.icloud.com/photos/0zRY45n6KkLRzZv-wFouXIjfQ#Great_Doddington
I’ve already thought about a 3D design as a Topper for my JP. It won’t have an interaction with the machine but it also won’t have a £500 interaction with my frickin’ bank balance either! WTF?
I’d like to do the JP in acrylic but it would need engraving to capture detail and, similar to the pinball acrylic sheet designs available on eBay, it would need the light being thrown up or down the face and I don’t have the knowledge for that. If anyone on here does, and wants to share ideas, please message me.
Apologies for the long thread but I know some members like the detail and I’ve tried to add everything relevant about my project. Thank you for sticking with it.