Thanks, not sure why I kept being shown only expensive or educational uses.
Pinball info
You are using an out of date browser. It may not display this or other websites correctly.
You should upgrade or use an alternative browser.
You should upgrade or use an alternative browser.
3D Printed items
- Thread starter Wayne J
- Start date
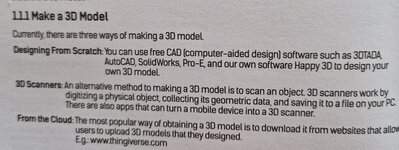
FreeCAD is also good if the parts aren't too complicated (modifying features in the history tree can be troublesome sometimes, in my experience), I guess it sits somewhere between Tinkercad and Fusion 360Now I have been running the machine for 5 days solid, printing awesome things from Thingiverse, I realise I want to design things for myself. What 3D software do folks use to create the initial self designed model?
I sort of read the manual, to the point where it worked and I rushed off and it hasn't stopped since.
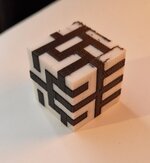
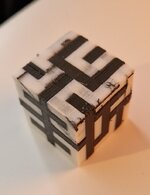
First multicoloured print.
Variable results on each side - may be due to using different PLA brands, which melt slightly differently. Could be different nozzles heated slightly differently. Could be due to mislevelling. Quite frankly I haven't a clue.
The bleeding of colours was mainly on the base - will sand it down and see what it's like inside.
One thing I did notice is how much purging of waste their was, for such a small build about 4cm cubed.
Attachments
-
 20230412_161020.jpg88.4 KB · Views: 5
 -
 20230412_161024.jpg93.6 KB · Views: 4
 -
 20230412_161027.jpg66 KB · Views: 4
 -
 20230412_161030.jpg83.7 KB · Views: 4
 -
 20230412_161033.jpg63 KB · Views: 4
 -
 20230412_161036.jpg67 KB · Views: 4
 -
 20230412_161042.jpg82.6 KB · Views: 5
 -
 20230412_161049.jpg67.1 KB · Views: 6
What are people doing with the waste material?
Even successful prints have a raft and my attempts to reduce that waste led to more waste, absolutely nothing printed together.

PLA is technically biodegradable but probably over a long period of time.
I was thinking of buying a shredder : https://www.sustainabledesign.studio/store/p/shreddermini
And then melting it back down and forming more filament: https://www.ebay.co.uk/itm/134026107184?
Has anyone else gone this route?
The model should have looked like this and did work the second print, with a raft and supports, just need to tidy him up.

Even successful prints have a raft and my attempts to reduce that waste led to more waste, absolutely nothing printed together.
PLA is technically biodegradable but probably over a long period of time.
I was thinking of buying a shredder : https://www.sustainabledesign.studio/store/p/shreddermini
And then melting it back down and forming more filament: https://www.ebay.co.uk/itm/134026107184?
Has anyone else gone this route?
The model should have looked like this and did work the second print, with a raft and supports, just need to tidy him up.
Funnily enough I had a failed spaghetti print yesterday on my Creator Pro (which I still haven't managed to get dialled in with the dual extruder yet)What are people doing with the waste material?
Even successful prints have a raft and my attempts to reduce that waste led to more waste, absolutely nothing printed together.
View attachment 200051
PLA is technically biodegradable but probably over a long period of time.
I was thinking of buying a shredder : https://www.sustainabledesign.studio/store/p/shreddermini
And then melting it back down and forming more filament: https://www.ebay.co.uk/itm/134026107184?
Has anyone else gone this route?
The model should have looked like this and did work the second print, with a raft and supports, just need to tidy him up.
View attachment 200053
I've previously just thrown it in the recycling and been done with it - but I think I'm going to throw this heap of spaghetti in the compost and see what happens.
Once you get the hang of printing the amount of wastage should be negligible - and at over £700 for the 2 items you've listed that is A LOT of waste filament saved to break even (at least 35kg).
I'd also be doubtful as to how accurate the diameter of the filament produced would be, thus making further prints more likely to fail.
Unless you only use waste filament of the same colour, you're going to end up with a non-uniform brown colour of the produced filament (similar to when you mixed up all your plasticine as a kid)
We worked out how much filament we could buy for the same money and realised we are not doing it for cost. It would be part of a message to my daughter about about science, how melting it down and reforming it plays a part in waste management. But again, a very expensive message.
I thought about just grinding it down and then seeing how it decomposes too.
Brown is apparently fine. The other thought was how much length the recycled filament will create, it may be too short to do anything meaningful at this point. Or we use the equipment so rarely that it is money tied up with no regular use.
So far, we have had only a few significant failures, all have been learning experiences as we broaden our understanding of how it works.
Some folks have had success recycling and creating new filament:
Another option is to melt down the dead bits and make.. er.. stuff and things")
I've thought about the former but never gotten around to it.
You will likely also end up with shortish lengths of filament that are not quite long enough to do much with - but you can join them (apparently - tried it briefly and had no success)
Another option is to melt down the dead bits and make.. er.. stuff and things
I've thought about the former but never gotten around to it.
You will likely also end up with shortish lengths of filament that are not quite long enough to do much with - but you can join them (apparently - tried it briefly and had no success)
With some colours in PLA the print sticks tight to the raft and removing it can damage the print. Black is my nemesis, which is a shame as my favourite colour but I then had a similar issue with a red from a different brand.
Reading up, some folks say 1) skip the raft, some say 2) lower the bed temp, 3) raise the extruder temperature.
1) Skipping the raft meant it didn’t stick long. Is this a skill worth practicing?
2) Lowering the bed appeared to be better, until adhesion broke on an identical print and ruined it.
3) Raising extruder temp made no difference until the product was too hot.
Any tips from the experts.
I use a raft if there isnt a lot of the print touching the bed.With some colours in PLA the print sticks tight to the raft and removing it can damage the print. Black is my nemesis, which is a shame as my favourite colour but I then had a similar issue with a red from a different brand.
Reading up, some folks say 1) skip the raft, some say 2) lower the bed temp, 3) raise the extruder temperature.
1) Skipping the raft meant it didn’t stick long. Is this a skill worth practicing?
2) Lowering the bed appeared to be better, until adhesion broke on an identical print and ruined it.
3) Raising extruder temp made no difference until the product was too hot.
Any tips from the experts.
I still sometimes add a brim if there is - I sometimes get warping and a brim helps with this.
There are settings in Simplfy 3d that let you adjust the raft to make it easier to get it off - not sure what they are in other slicers but im sure they will exist
As a fellow Adventurer owner, I found that ensuring that you check your levels every couple of prints makes a great difference.With some colours in PLA the print sticks tight to the raft and removing it can damage the print. Black is my nemesis, which is a shame as my favourite colour but I then had a similar issue with a red from a different brand.
Reading up, some folks say 1) skip the raft, some say 2) lower the bed temp, 3) raise the extruder temperature.
1) Skipping the raft meant it didn’t stick long. Is this a skill worth practicing?
2) Lowering the bed appeared to be better, until adhesion broke on an identical print and ruined it.
3) Raising extruder temp made no difference until the product was too hot.
Any tips from the experts.
I set it so that the paper between the nozzle and bed just grips, then go one increment up. That seems to give me the best results for both adhesion and removal of the print.
If you get lifting/warping of the print lower the nozzle 1 increment.
I've never noticed a great deal of difference when changing the bed temperature - but if you're printing in PLA keep the door open. If printing in ABS keep the door shut.
The manufacturer of the PLA makes a difference, but can only be found out by trial and error.
I guess that different colours have similar different properties, due heat absorption/radiation being different, but again experiment a little - and keep notes.
Cleaning the print bed with an alcohol wipe also seems to make a huge difference. I have used a wallpaper scraper to clean the bed of all residue, but found that it reduced the 'bumpiness'
 of the bed resulting in reduced adhesion. it also caused a few divots, which transferred over to the print, so proceed with caution.
You can save different configurations in the slicing settings (and name them differently) so you don't have to keep changing each setting manually.
Raft settings are easy to change in the slicing menu, but I've had difficulty removing the raft from the print on a lot of occasions with default settings, so rarely use a raft.
Last edited:
My first "real" resin print.

Mostly OK, but there are some lines (both wavy and concentric) in the bottom 1/2 of the print.


I can sand these out im sure but Im gonna need to get the bottom of why !?
Mostly OK, but there are some lines (both wavy and concentric) in the bottom 1/2 of the print.
I can sand these out im sure but Im gonna need to get the bottom of why !?
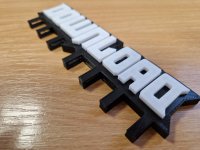
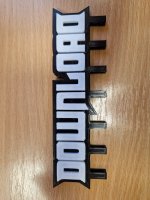
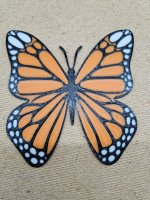
My first ever commissioned 'designed from scratch' print.
GF has got her sons Download tickets for Xmas (following on from the fact they enjoyed last year so much) and wanted something physical to give them to open, rather than just an email confirmation of the tickets.
This is to attach each years wristbands to.
Nothing overly complicated but I'm happy with how it's turned out for the first print - just need to dial in the print settings rather than draft settings.
Attachments

6hrs in - 50 to go!
View attachment 239034
Fingers crossed its completed by the time I get back from PBR Sunday night and hasn't failed at some point.
It does look slick!
The challenging part is yet to comeIt does look slick!


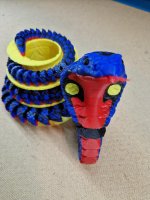
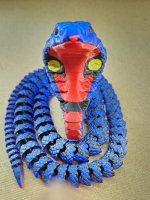
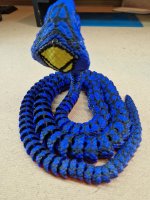
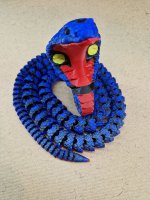
IIRC - 1921 individual colour changes (over 500g purged filament)
All done with no supports at all.
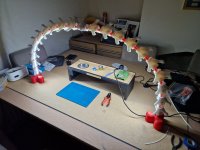
Had a failure due to purged filament not clearing the poop chute - body done at least, head should be done by tomorrowThe challenging part is yet to come
View attachment 239035
IIRC - 1921 individual colour changes (over 500g purged filament)
All done with no supports at all.

Dont even go there. Wayne is showing off these lovely designs, and I'm currently battling with my Prusa I3 Mk3 as it refuses to put a first layer down decently at the moment
New nozzle, PTFE tube and LM8UU bearings to be installed later in the hope it will fix things... it HAS done a good number of thousands of hours...
New nozzle, PTFE tube and LM8UU bearings to be installed later in the hope it will fix things... it HAS done a good number of thousands of hours...
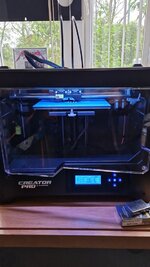
I finally got my CRX-Pro printing again. Still don't like it.. and struggling to resist getting a Creality K1 or Bambu P1. (Anyone want a CRX-Pro cheap )
)Finally finished.
Biggest issue is the poop chute filling up and blocking, causing the print to pause until chute is cleared.
Twice I actually knocked the print off the bed doing this through my own clumsiness. (In fairness one of them was at 4am while still half asleep). Rather than restart from scratch , I chose to start a new print from the layer the print had got to then glue them together.
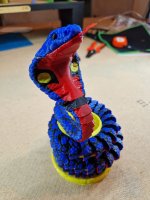
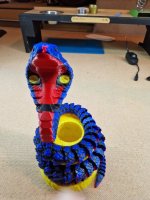
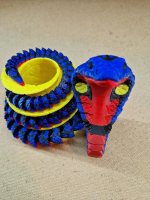
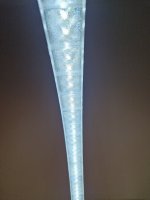
The articulation between the 'ribs' is amazing and so free it's almost like a rope
Biggest issue is the poop chute filling up and blocking, causing the print to pause until chute is cleared.
Twice I actually knocked the print off the bed doing this through my own clumsiness. (In fairness one of them was at 4am while still half asleep). Rather than restart from scratch , I chose to start a new print from the layer the print had got to then glue them together.
The articulation between the 'ribs' is amazing and so free it's almost like a rope
Attachments
-
 20231207_155121.jpg142.8 KB · Views: 41
 -
 20231207_155046.jpg100.2 KB · Views: 37
 -
 20231207_155039.jpg117.8 KB · Views: 37
 -
 20231207_154407.jpg128.2 KB · Views: 30
 -
 20231207_154339.jpg107.9 KB · Views: 33
 -
 20231207_154007.jpg136.2 KB · Views: 30
 -
 20231207_153953.jpg122.8 KB · Views: 27
 -
 20231207_153927.jpg156.3 KB · Views: 36
Yeah stop it, I'm trying not to buy this damn thing. Here I am struggling with my robin reliant printerFinally finished.
Biggest issue is the poop chute filling up and blocking, causing the print to pause until chute is cleared.
Twice I actually knocked the print off the bed doing this through my own clumsiness. (In fairness one of them was at 4am while still half asleep). Rather than restart from scratch , I chose to start a new print from the layer the print had got to then glue them together.
The articulation between the 'ribs' is amazing and so free it's almost like a rope
Do it, fraction of the cost of a pinball!Yeah stop it, I'm trying not to buy this damn thing. Here I am struggling with my robin reliant printer
Currently printing some non-cosmetic stuff just to use up all of the very low stocked reels. AMS should auto change to next spool once is empty
I know I'm starting to sound like a broken record, but the quality of the prints from the Bambu is amazing.
Working on a new project, which if it comes off I hope everyone will impressed with and want to
Working on a new project, which if it comes off I hope everyone will impressed with and want to
Attachments
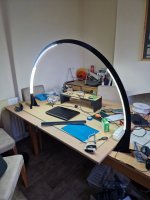

My Bambu (not the old bamboo as seen in Chitty Chitty Bang Bang) arrived Thur. It was a good plan I think

D
Deleted member 5505
I'll take a TMNT replica topper when one of you with fancy pants bamboo's starts making them.
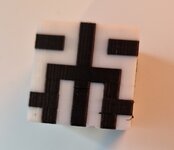
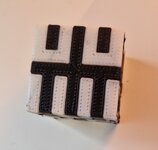
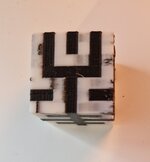
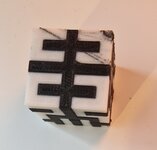
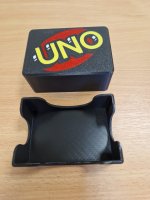
knocked these socket surrounds up a while back. Printed one in white on my old printer and didn't get around to painting the lettering. With me (not very) ole bambu I don't need to

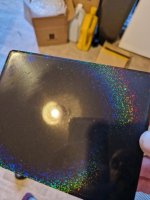
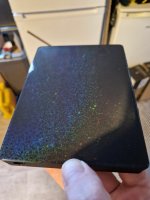
Not Bambu specific, but bought a Juupine 3d holographic build plate. (Can be bought for most printers)
You can see it in action here (although in chocolate rather than PLA) at about the 25min mark, along with the science behind it.

 www.bbc.co.uk
Spoiler alert - it's just refraction
You can see it in action here (although in chocolate rather than PLA) at about the 25min mark, along with the science behind it.
The Secret Genius of Modern Life - Series 2: 1. Passport
Hannah gains access to a site where staff work to make the British passport secure.
Spoiler alert - it's just refraction