What's new
Pinball info

Register a free account today to become a member! Once signed in, you'll be able to participate on this site by adding your own topics and posts, as well as connect with other members through your own private inbox!

Complete The Flylands of Magic

s000m

Site Supporter
Joined
Apr 12, 2021
Messages
3,352
Location
Swindon
Alias
Scott
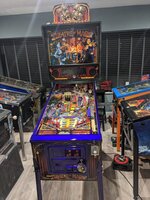
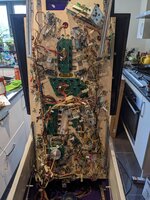
So I'm at the final stages with one of the ToM's i'm working on. I had hoped to have both complete together but long delays over shipping have meant I really need to ship this one out (space issues).

Started this project back in January.

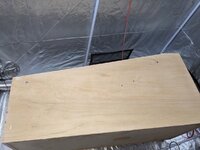
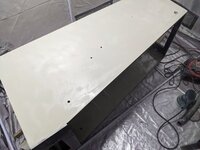
Wife had enough of me 'decorating the kitchen with aerosol paint spray and saw dust so I bought a 'grow room'. Likely on some government list now!

FB_IMG_1675026779077.jpg

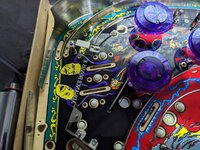
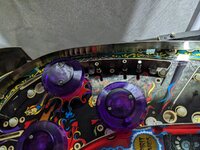
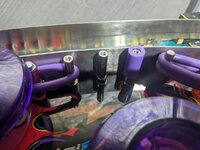
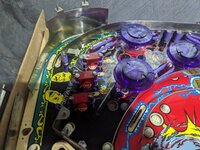
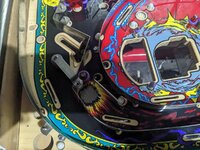
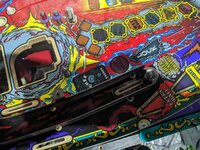
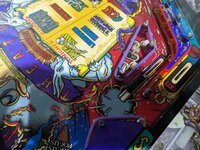
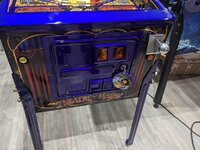
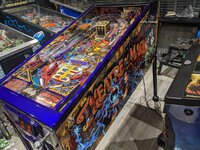
Both ToM's were a bit chewed up around the edges with missing corners and dents and scrapes. Flyland Designs just released a new set of Decals when I started and honestly think the old decals look low res and bland.

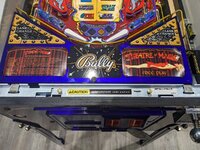
Covinced the owner of the ToM to go with the set and punced through an order on 2 sets complete with Translite and Art blades on one and Mirror blades and Translite with the other.

PXL_20230124_125839830.jpg

PXL_20230124_125842594.jpg

PXL_20230124_125844407.jpg

PXL_20230124_125847996.jpg

PXL_20230124_125855387.jpg

PXL_20230124_125907547.jpg

PXL_20230124_185830221.jpg

PXL_20230213_215906781.jpg

PXL_20230213_220639362.jpg

PXL_20230213_220640975.jpg

PXL_20230213_220643294.jpg
 
Taking both cabinets back to bare wood and completing the restore process has become a 'norm' for me at this point. However my God the glue on this one was extra pungent, even with resproator masks the fumes still poured through. Lost wife points for ponging the house out.

PXL_20230124_193119476.jpg

PXL_20230124_194813237.jpg

PXL_20230124_211744157.jpg

PXL_20230124_211748974.jpg

PXL_20230124_211754154.jpg
 
Reparing went well though each cab had its own level of damage to over come.

PXL_20230125_164631910.jpg

PXL_20230125_171841323.jpg

PXL_20230125_171843680.jpg

PXL_20230125_182813468.jpg

PXL_20230207_223425752.jpg

PXL_20230209_192604322.jpg

PXL_20230209_192615739.jpg

PXL_20230209_192842218.jpg

PXL_20230209_215905071.jpg

PXL_20230212_155312630.jpg

PXL_20230212_155319206.jpg
 

Attachments

  • PXL_20230125_210815782.jpg
    PXL_20230125_210815782.jpg
    146.1 KB · Views: 1
Each cabinet got multiple layers of 'putty' paint a type of automotive paint. More pungent than the glue I was taking off earlier ><

More wife points lost

IMG-20230126-WA0003.jpeg

IMG-20230126-WA0016.jpeg

PXL_20230127_193349435.jpg

PXL_20230131_214253612.jpg

PXL_20230201_143443920.jpg

PXL_20230210_133143334.jpg

PXL_20230210_133147090.jpg

PXL_20230210_175453001.jpg
 

Attachments

  • PXL_20230209_221054478.jpg
    PXL_20230209_221054478.jpg
    136.3 KB · Views: 2
I was pushed (encouraged) to go with an interior restore for his cab. I ended up liking it so much I did mine the same ><

Took 4 bloody coats to get it to look right on each. Mask filters needed to be changed twice as it was stopping me from breathing. Once everything was right I set about installing new earth braid. I had pictures of me pulling out all the old braids but honestly I'm like 600+ pictures on this project and trying to find everything is a bit of a mare.

PXL_20230126_171230459.jpg

PXL_20230126_224210244.jpg

PXL_20230126_224216570.jpg

PXL_20230126_225816080.jpg

PXL_20230205_133435492.jpg

PXL_20230205_134000890.jpg

PXL_20230205_191933400.jpg

PXL_20230205_191942637.jpg

PXL_20230205_191949426.jpg

PXL_20230205_195831563.jpg

PXL_20230205_195833776.jpg

PXL_20230205_204344929.jpg

PXL_20230205_210106464.jpg

PXL_20230205_210206892.jpg

PXL_20230205_215448506.jpg

PXL_20230210_182008027.jpg

PXL_20230211_101601585.jpg

PXL_20230211_195231276.jpg

PXL_20230212_153114127.jpg

PXL_20230212_153124305.jpg

PXL_20230212_153135040.jpg

PXL_20230212_183219924.jpg

PXL_20230212_183226534.jpg

PXL_20230213_182026778.jpg

PXL_20230214_230814040.jpg
 

Attachments

  • PXL_20230205_191946111.jpg
    PXL_20230205_191946111.jpg
    92.1 KB · Views: 0
Both machines got new leg plates, his one had a nut holding one bolt, the original housing had just completly come off the weld! No wonder the leg felt shaky!

PXL_20230205_210310402.jpg

PXL_20230214_230820952.jpg
 
Left the transformer out on both as I needed to wait for the decals to arrive (easier to move without the weight), the decals took about 4 weeks in production and a further 1 - 2 weeks in shipping. Caused some mighty delays but was worth it.

I did in the mean time progress one of the playfields on one machine.

PXL_20230309_112645553.jpg

PXL_20230309_112718113.jpg

PXL_20230310_130643738.jpg

PXL_20230310_133857211.jpg

PXL_20230310_144251437.jpg

PXL_20230310_190048020.jpg

PXL_20230310_190053513.jpg

PXL_20230310_190101347.jpg

PXL_20230310_191144397.jpg

PXL_20230310_191155727.jpg

PXL_20230310_212829932.jpg

PXL_20230310_213243347.jpg

PXL_20230310_213942532.jpg

PXL_20230310_213950923.jpg

PXL_20230310_213955045.jpg
 
Both machines are full restores so its a playfield swap to perform also.

Went with a purple theme on one. The other playfield I'm still assembling at the moment.

Did I mention I hate installing wire guides?

PXL_20230216_205255034.jpg

PXL_20230218_104800312.jpg

PXL_20230218_113230570.jpg

PXL_20230218_151314311.jpg

PXL_20230219_202002758.jpg

PXL_20230220_182129683.jpg

PXL_20230220_183354795.jpg

PXL_20230220_185050360.jpg

PXL_20230220_202621437.jpg

PXL_20230221_204615063.jpg

PXL_20230221_221346205.jpg

PXL_20230221_221351545.jpg

PXL_20230221_221351545.jpg

PXL_20230221_221353677.jpg

PXL_20230221_221359186.jpg

PXL_20230221_221407444.jpg

PXL_20230222_205258729.jpg

PXL_20230222_205306054.jpg

PXL_20230222_205310254.jpg

PXL_20230222_205314090.jpg

PXL_20230222_205318825.jpg
 

Attachments

  • PXL_20230222_205324304.jpg
    PXL_20230222_205324304.jpg
    193.8 KB · Views: 2
  • PXL_20230222_205321692.jpg
    PXL_20230222_205321692.jpg
    214.2 KB · Views: 2
  • PXL_20230225_100538688.jpg
    PXL_20230225_100538688.jpg
    129.4 KB · Views: 2
  • PXL_20230225_104709220.jpg
    PXL_20230225_104709220.jpg
    167.2 KB · Views: 2
  • PXL_20230225_122918850.jpg
    PXL_20230225_122918850.jpg
    219.3 KB · Views: 2
  • PXL_20230225_122920751.jpg
    PXL_20230225_122920751.jpg
    215.2 KB · Views: 2
  • PXL_20230225_122922626.jpg
    PXL_20230225_122922626.jpg
    206.7 KB · Views: 2
  • PXL_20230225_122924370.jpg
    PXL_20230225_122924370.jpg
    251.5 KB · Views: 3
  • PXL_20230225_122926351.jpg
    PXL_20230225_122926351.jpg
    242.3 KB · Views: 3
  • PXL_20230225_122945666.jpg
    PXL_20230225_122945666.jpg
    242.6 KB · Views: 3
I switched out all the existing bulbs (mixture of incadescent and I think Super flux with a full comet kit including LED OCD board.

All metal ramps, legs hinges and even the coin door got the powder coat treatment.

I'll save my shots of the other powder coats when the second pin is finished.

PXL_20230203_115919753.jpg

PXL_20230203_122318855.jpg

PXL_20230203_122324140.jpg

PXL_20230203_122327041.jpg

PXL_20230210_164234790.jpg

PXL_20230210_164241830.jpg

PXL_20230210_164246990.jpg

PXL_20230210_164517501.jpg

PXL_20230210_164837133.jpg

PXL_20230210_164838919.jpg

PXL_20230210_165050339.jpg

PXL_20230210_165052496.jpg

PXL_20230210_165226183.jpg

PXL_20230210_165450876.jpg

PXL_20230210_165453794.jpg

PXL_20230210_165534017.jpg

PXL_20230213_000844182.jpg

PXL_20230213_001539298.jpg

PXL_20230323_124943812.jpg

PXL_20230323_124947674.jpg

PXL_20230323_124950258.jpg

PXL_20230323_205316535.jpg

PXL_20230323_210009480.jpg

PXL_20230323_210011814.jpg
 
There's so many more pictures but I'll skip some of the stages and get to the juicy stuff. That's one 90% complete (just need to complete some adjustments and still waiting on the translite,

Stay tuned for the second!

PXL_20230324_194346837.jpg

PXL_20230324_194349129.jpg

PXL_20230324_215247318.jpg

PXL_20230324_215703507.jpg

PXL_20230324_221738465.jpg

PXL_20230324_224712175.jpg

PXL_20230325_135245565.jpg

PXL_20230325_135254603.jpg

PXL_20230325_135257960.jpg

PXL_20230325_135303587.jpg

PXL_20230325_135308045.jpg

PXL_20230325_154457629.jpg

PXL_20230325_162209914.jpg

PXL_20230325_162702427.jpg


PXL_20230326_090148688.jpg

PXL_20230326_091242414.jpg

PXL_20230326_091555489.jpg

PXL_20230326_093715776.jpg

PXL_20230326_093724531.jpg

PXL_20230326_093733817.jpg

PXL_20230326_093739308.jpg

PXL_20230326_093750096.jpg

PXL_20230326_093755640.jpg

PXL_20230326_093759448.jpg

PXL_20230326_120607140.jpg
 

Attachments

  • PXL_20230326_120617012.jpg
    PXL_20230326_120617012.jpg
    244.2 KB · Views: 4
  • PXL_20230326_223519722.jpg
    PXL_20230326_223519722.jpg
    173.9 KB · Views: 3
  • PXL_20230326_223524590.jpg
    PXL_20230326_223524590.jpg
    196.8 KB · Views: 2
  • PXL_20230326_223531173.jpg
    PXL_20230326_223531173.jpg
    296.2 KB · Views: 3
  • PXL_20230325_162705290.jpg
    PXL_20230325_162705290.jpg
    177.8 KB · Views: 4
This looks absolutely awesome!!! That artwork is spectacular! Magic!
Thanks Simon, was a lot of work:


- New Plastics including rivet work to attach spinners or lamp holders
- Pinsound Plus + Speaker Kit
- Flyland Decal Set (apparently I'm one of the first to apply them!)
- New Playfield
- Official Licensed Topper by Pedretti
- New Star Posts
- Titan Rubber Set
- Full LED Comet Set + LED OCD Board
- New Leg plates
- New Hinges
- New Legs
- New Side rails
- Custom Powder coat from Prismatic Powders
- New Coin Door
- Various Mods including Sorceress Mod, Tiger Saw mod (yet to fit), Mirror Mod, Magic Wand mod.
- Powder coated Gold sparkle Ramps + Magnet casing
- Powder coated Coin door, hinges, side rails and legs with primatic powders illusion purple + clear kit from the US
- New Apron Decals and Magnet Holder Decal
- Rebuilt Pop Bumpers
-New Flipper Rebuild
- Cabinet Braid
- New Lockdown bar receiver
- Replaced Nylon nuts and Wood Screws with new (100+)
- Custom Shooter Rod
- Purple Pop caps and Transparent skirts and body
- Replaced all coil sleeves
- Everything else tumbled and/or ultrasonic cleaned
- 4 Coat application and sanding to interior cabinet
- Rebuilt cabinet corners edges and removed heavy gouges
- 4 Coat application and sanding to exterior cabinet and backbox
- Mirror Blades
- Opto Interruptor in milled metal over plastic

I can't remember what else but lots of small things like additinal spacers, earth braid, insulation etc.

This was a lot of work and hit over £4k alone in materials!
 
Last edited:
Unfortunately the tiger saw mod was busted. I noticed loose wires coming off the motor.

😖

PXL_20230324_121008805.jpg

Speaking to the modder, I took a bit of a gamble on a close match motor as the exact match can only be sourced in China

PXL_20230324_133126971.jpg

The motor arrived today.

Small bit of soldering and insulation and it was good to go!

PXL_20230330_125917799.jpg

PXL_20230330_130129656.jpg
 
Used to make my own ToM tigersaw mod. Used a real saw blade on a couple :)
A pal of mine did a PCB design (you will prob find this circuit on a home made PCB in quite a few ToMs we both owned) - which did not connect to a paralleled switch on the captive board.

Also made one that raised and lowered into the playfield as the original did.
Sadly in the early 2000s we did not have mini processor boards that could of handled the operation required to do a decent kit.

That tigersaw mod looks great. The motor is a bit small for my liking.

It's just spinning a light weight acrylic blade.
It runs silent which is great.

The original raised and lowered? That's pretty cool.

I'm eyeing up the mirror mod for my ToM.
It's made by the same guys that did the TZ backboard.
 
@s000m - yes I talked about it with John Popaduik before his name was poop. I did not have an issue with him, he was always friendly via email/facebook and he sent me some proto pics.
Great pinball desinger - RUBBISH BUSINESS MAN.
Have you had a World Cup Soccer yet ? Can not stand football but love the game. Totan is too close to ToM and CV. For many years ToM/CV alternated as my favourite game. I think I have owned a dozen ToMs and prob 8 CVs over the years.

Just looked up the mirror mod. I do not think the videos will do it justice.

Of course you have to do it on yours!
 
Since the first is 99% done, I've begun finishing mine.

That is close. Can you take photo of the lift assembly when complete so I can see the parts I'm missing? I guess missing coil stop and whatever that release collar is. I might have print the lid assembly.

1680343245233.png
 
Been at it all day today.

GI, Switches and coils all back on and mounted.

@dave I took some more pictures. Hopefully that helps.

PXL_20230331_201748733.jpg

PXL_20230331_205619924.jpg

PXL_20230401_115706625.jpg

PXL_20230401_115708664.jpg

PXL_20230401_121243113.jpg

PXL_20230401_121245039.jpg

PXL_20230401_121701971.jpg

PXL_20230401_121704956.jpg

PXL_20230401_124151275.jpg

PXL_20230401_143048044.jpg

PXL_20230401_143054786.jpg
 
Getting the trunk off this one was a royal bitch.

The nuts had seized, lots of rust to fight through.

PXL_20230401_184209960.jpg

PXL_20230401_192651084.jpg
 
Bagged up all the plastics and removed the ramps.

PXL_20230401_194845672.jpg

PXL_20230401_200730594.jpg

PXL_20230401_201110827.jpg

PXL_20230401_201917912.jpg

PXL_20230401_201917912.jpg

PXL_20230401_202155535.jpg

PXL_20230401_202157893.jpg
 
Perfect, thankyou very much. It's crowded there with a trough as well.
 
Lots more progress, all the wire forms installed, toyed around with the star post colours and installed the black wood supports.

Cleaned up the trunk, a lot of today was spent polishing and rust removal.

PXL_20230402_141150749.jpg

PXL_20230402_151429653.jpg

PXL_20230402_180916350.jpg

PXL_20230402_211025922.jpg
 
Back
Top Bottom