What's new
Pinball info

Register a free account today to become a member! Once signed in, you'll be able to participate on this site by adding your own topics and posts, as well as connect with other members through your own private inbox!

So I've been making toppers.

s000m

Site Supporter
Joined
Apr 12, 2021
Messages
3,354
Location
Swindon
Alias
Scott
This project has been on and off since about May.

Its taken some time due to finding the right people and skills to bring them all together.

Luckily I have great friends who helped bring these closer to reality.

I was asked to make my own toppers for games which either lacked one or didn't have any current good ones availiable to purchase.

The required toppers were for:

  • Roadshow
  • Creature From The Black Lagoon
The first step was building a base for the toppers to work from. This needed to be thick enough to host potential motors and LED strips, but not too thick so it doesn't look like a breeze block.

We went through several designs and settled on this.

PXL_20231024_124603789.jpg

Creating holes and recesses took some planning and thought as light positions needed to be considered and how they would fit into the overall design.

PXL_20230509_103205363.jpg

Each topper platform was filled, sanded and primed and then coated black.

PXL_20231023_180616755.jpg

PXL_20231024_110616629.jpg


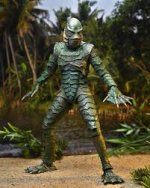
This ended up being the final Creech design.

PXL_20231025_094902521.jpg

For creature I wanted it to be like the Cave where you are searching for the Creature to save the damsal in distress.

It would have cave elements and water effect using resin based material used in minature painting.

Cave elements were 3D printed.

PXL_20230415_150100917.jpg

For the creature I wanted a bobbing motion to show him coming out of the water, initially I wanted a servo motor but that would add a lot of cost to the BOM. I'm working to a budget and with all the elements in play its difficult to get everything you want.

IMG-20230419-WA0010.jpg

IMG-20230419-WA0018~2.jpg

Designing and building the fixing for him was a royal pain. I had to work with my mate to figure out a CAM based solution.
It went through quite a bit fo trial and error.

The below design works well as I designed it in a jar shaped groove so it effectively had a lid to hold creech, along with mount points to attach into the wood.

PXL_20230428_103958129.jpg

Next up was dry fitting everything to see how it would all fit together.

PXL_20230419_191343845.jpg


PXL_20230719_212346709.jpg

I got Holly to work on the painting to realise the vision!

PXL_20231026_142534404.jpg

PXL_20231026_174442711.jpg

The next step will be to add the resin water and motor from underneath.

I've been sure to seal the holes for the RGB strips so we don't get any unexpected mess.

PXL_20231027_081350269.jpg


I'll update this post later with the Roadshow topper progress as well as the electronics used to monitor the switches within the back box. Cheers for reading!
 
Good work. And this shows that these take time, skill and equipment to build. Hence, they cost a bit of money.
Are you making a run of them or just doing one for yourself?
 
I’d say the colour of the water and beach are off on shade and colour

He’s from the lagoon not the beach

NECA always nail it for colour palettes, they will also give you great ideas on dressing the scenes

Looks great though over all though. If your looking to produce and sell these I’d nail the small details and they will fly out

Massive potential here
 

Attachments

  • IMG_4910.jpeg
    IMG_4910.jpeg
    38.2 KB · Views: 29
I’d say the colour of the water and beach are off on shade and colour

He’s from the lagoon not the beach

NECA always nail it for colour palettes, they will also give you great ideas on dressing the scenes

Looks great though over all though. If your looking to produce and sell these I’d nail the small details and they will fly out

Massive potential here
Yup, the final colour will look darker as stated before we need to add the water effect in.
 
Good work. And this shows that these take time, skill and equipment to build. Hence, they cost a bit of money.
Are you making a run of them or just doing one for yourself?
These were built to order for someone. Its pretty expensive to make just the one off. Mainly due to the development costs and trial and error. I'm pretty much making nothing on these once I've paid people in the chain for their contributions. I'll see if people like the finished products first and maybe I'll make up to say 5. That all depends on demand. For now I'll await feedback on these two and take it from there.
 
The Road Show was always going to be more trickey electronics wise over the creech. I had to figure out with @Ragnar1057 what would be best to monitor in the game. Do we look for switches or coils for instance. What would activate the topper.

I knew from the start that:

  • I needed a crane or ideally a Bull Dozer and it would ideally move.
  • Beacons would be required to simulate construction work
  • Potential for a backdrop if the BOM permitted

We based the platform off the creech template but with amendments to the design for cutouts for the beacons and different placement of RGB strips.

I gave Holly a bit of creative freedom on this one she settled on a work site theme for the landscape details.

We added various channels underneath for the topper as I knew it was going to have a lot of wiring.

PXL_20231102_201826747.jpg


I initially sourced a crane, but felt a bull dozer would ultimately be better. I also sourced tractor beacons which work quite well.

PXL_20231025_121412049 (1).jpg

@Ragnar1057 provided the electronics, we settled on switch monitoring. I'll show this off more once I've sorted out the wire lengths.

PXL_20231102_095740044.jpg


I'm still in talks with col over a potential backdrop but its going to cost extra to sort. The plan was/is for a city landscape.

To clarify on this topper the Bulldozer goes up and down on its scoop, reacting to game logic. It actually was a fully functional toy that could move like a traditional RC Toy, but its been hacked to suit our needs. Thanks again for @Ragnar1057 for all the hard work.

The beacons also tie into the game logic with the RGB strips just running off 12v power.

This is all thanks to the simple switch board that has been developed that fits into the MPU board without any soldering or permenant change to the game.

The main aim here was to make something slightly complex yet simple to install. I believe we've achieved that.

PXL_20231102_203319571.jpg

Its not entiely finished yet we still have some final touches to do top side. Once I've sorted out the wire lengths I'll put up a video with it on a RoadShow machine so you can see the final design.
 
These were built to order for someone. Its pretty expensive to make just the one off. Mainly due to the development costs and trial and error. I'm pretty much making nothing on these once I've paid people in the chain for their contributions. I'll see if people like the finished products first and maybe I'll make up to say 5. That all depends on demand. For now I'll await feedback on these two and take it from there.

Be good if you could roll them out, lots of US guys would be interested I reckon

As you said cost is in the R&D... Production would be cheaper as you ironed out the details with these
 
So the road show topper is now finished, just got to test it all and make sure its working as intended on the Roadshow game (don't currently own one so just testing on the switches in another game).

Creech we've applied the resin, its taking literal days to cure due to the amount of 'real water' used. Today I tested the lights which are now forever buried, thankfully they still work!

PXL_20231108_132747812.jpg

WhatsApp Image 2023-11-09 at 13.58.30_dbd2af84.jpg

Its going to need another few days to get solid then I can pull back the supports and I should have a formed edge from the real water/resin.
 
Incredible work Scott! I’d put a deposit down on one if this wasn’t one mine already !
 
I forgot to record a video of the creech topper.

The creech bobs up and down. It's tied back the lamp/motor in the game. So when the creech projects, the topper motor kicks in.

PXL_20231125_140701629.jpg

PXL_20231125_140656331.jpg

PXL_20231125_140650526.jpg

PXL_20231125_131833816.jpg

PXL_20231125_131829097.jpg

Ideally I need to revisit this design so the motor is housed in the rear, with a greater degree of movement and a further recession of the creech.

Overall it came out good!
 
Back
Top Bottom