What's new
Pinball info

Register a free account today to become a member! Once signed in, you'll be able to participate on this site by adding your own topics and posts, as well as connect with other members through your own private inbox!

Complete SImple and quick rotisserie

newdos

Site Supporter
Joined
Jan 14, 2013
Messages
3,129
Location
Hartlepool
Alias
Newdos
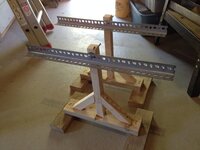
As I have been progressing with my WH20 shop log quite a few people have asked about the rotisserie I made, so here are a few pics and some dimensions to give you an idea.

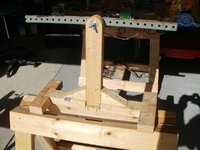
Here is the completed article and obviously you need 2 of these - one for each end!!
P8030555.JPG

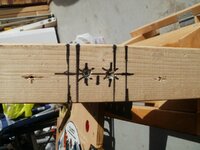
The upright is 15" long and is half set into the bottom cross member which is 18" long. 2 4" screws go through the bottom cross member into the vertical from underneath. see pic
P8030562.JPG

The 2 short stabilising cross memebrs are 9" long are again the main cross member is half cut into these and 2 4" screws securing these to it. Remember all joins are glued with PVA as well.
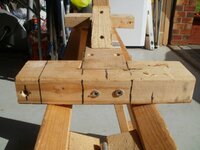
P8030561.JPG

The 2 triangular supports are just off cuts each one being screwed and glued to the upright and cross member.
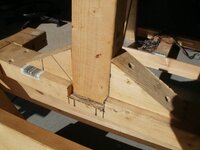
P8030560.JPG

Woodworking wise that's it - simples!!!!

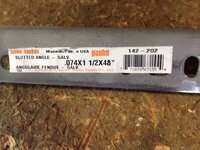
The angle iron across the top to support the playfield is 23 1/2" long and you should use the type with slots and holes in t as it makes bolting the playfield to it a lot easier for lining up holes etc. see pic below. I have to fit this to my supports yet when this playfield comes off it
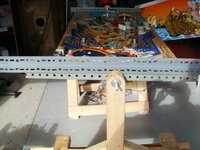
P8030563.JPG

This piece is just laid on the top of mine so you can see the difference.

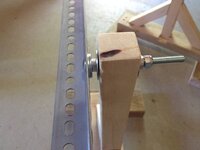
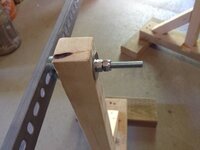
Here is a couple of pics to show the bolt details - coach bolt through the dexion, washer, and a nut tightened on, large washer (bigger the better as it stops it pulling into the timber), through upright, another large washer and then a nut, followed by a nylock nut.
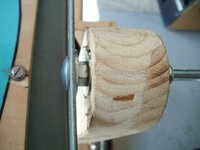
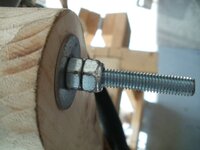
P8030558.JPG

P8030559.JPG

Tighten it all up with the nut before the nylock until you have it as stiff as you need it then lock it with the nylock nut. I fit the playfield to it just by lining existing holes up with the slots in the dexion and playfield, and then I bolt it to it with 4BA nuts, bolts and washers

And that's it folks simples!!!!!

Only mod I would suggest is to put a piece of copper pipe, or similar, through the upright top hole then when the bolt is tightened fully up it wont keep compressing the timber and causing you to have to re-tighten it periodically as I have to now.

All the timber used is 3"x2" PSE

Any questions feel free to ask

Cheers Kev
 
Forgot to mention at the sizes I stated it will do standard and widebody playfields.

Cheers Kev
 
Nice write up, thanks Kev. I've got all the bits (or similar) knocking around here and there, other than the Dexion, so I'm going to knock-up something very similar for basically zero cost!

What I like most about this design though is that when not needed, just remove the Dexian and bolt, and everything is pretty flat to just slip under here or down the back of there out of the way.
Thanks nedreud - even without taking the dexion off it flat packs!!! just turn it vertical and it nearly vanishes!!!!

Cheers Kev
 
haha!!! you serious man its a piece of **** to make!!!!

Tenner then? ;) Nah, think I'll give it a go, nice simple design, cheers for popping it up. I gave up looking for all the right bits for the black pipe rotisserie design!
 
Ooh, that's clever @RudeDogg1! Where did you get the swivel clamp thingy from and how much?

I've been rummaging around my workshop and I can't find any Dexion! Will have look through my neighbours junk pile next else I may have to succumb to a trip to B&Q :eek:
 
Ooh, that's clever @RudeDogg1! Where did you get the swivel clamp thingy from and how much?

I've been rummaging around my workshop and I can't find any Dexion! Will have look through my neighbours junk pile next else I may have to succumb to a trip to B&Q :eek:
Its cheap at Wickes if you have one
 
Used to have a FOCUS 2 minutes up the road but I think they went bust as it's now a RANGE. Still handy for bits and bobs, but they won't have Dexion. Got a Wickes and B&Q nearby but both are 15 minute drive so seems a bit excessive just for a bit of metal.

I may have to improvise to create The Simpler And Quicker Rotisserie ;)
 
Used to have a FOCUS 2 minutes up the road but I think they went bust as it's now a RANGE. Still handy for bits and bobs, but they won't have Dexion. Got a Wickes and B&Q nearby but both are 15 minute drive so seems a bit excessive just for a bit of metal.

I'm still digging through the Wickes and B&Q sites to find anything like Dexion, I'm sure it's there somewhere. I've got a Wickes 5 mins away and B&Q 20, that's the easy part! :) Might give 'em a bell or just resort to eBay (where there are loads of options). Edit: Bingo.

Would love to know where you nabbed the angled clamp from too @RudeDogg1 , that looks perfect and I've been meaning to nab a pair of saw horses anyway. Edit: Bingo #2!

(Yes, I'm ****ing away my early lunch break by trying to cobble together the extra-easy rotisserie option! :))
 
Last edited:
They are Stanley swivel or flexible clamps has a ball joint that is lock able and can be moved in pretty much any angle I got them from amazon which was cheaper than eBay for about £17 each. They are very sturdy cast metal
 
Nice one! Quick tip for anyone nabbing pricier stuff from Amazon - check the price history and setup a price drop alert on http://uk.camelcamelcamel.com/

Amazon prices fluctuate like crazy on some items, so with a bit of patience you can save a decent amount (best I've managed so far is 80 quid saved on some computer hardware!)
 
Finally found somewhere that had the slotted angle iron, so I've just put together a "Canadian Edition" of this quick rotisserie. :)

For any other canucks reading this, here's the short-list for parts. Home Depot carries everything you'll need (at least, ours did).
  • 1x Slotted Angle Iron, 1 1/2" x 48"
  • 2x 5/16" x 4" carriage bolts (after building it I realized 3" bolts would've worked just as well)
  • 4x 3/8" flat washers
  • 4x 5/16" fender washers
  • 4x 5/16" hex nuts
  • 2x 5/16" nylon insert lock nuts
Wood-wise, it was just some scrap 2"x2" and 2"x4" that already had kicking around in the shop. Vertical supports are 16" long, and the 2x4 on the base is also 16". Rather than the nice notch cuts that newdos did for the end braces, I just glued+screwed the them on.

Took me longer to find somewhere that carried the Slotted Angle Iron than it did to put this all together. Turns out that Home Depot carries it, but its *not* searchable on their website (if you search for "slotted angle iron" or "angle iron" you won't find it, but they do carry it; its in the same aisle as the nuts+bolts).

Kudos to newdos for the plans!IMG_6401.JPG IMG_6402.JPG IMG_6403.JPG IMG_6400.JPG
 
I take it that Bally/Williams tables already have holes cut into the playfield for mounting on the angle iron?

So far as I can see on my R&B, Data East tables don't have such holes so if I want to use a rotisserie I either have to accept putting holes into the playfield myself or use a number of clamps to hold it in place?
 
I don't believe they do but I've not messed with a B/W properly yet either. From what I've seen in pics people just use cable ties through whatever holes are near the top/bottom of the board to secure it to the angle iron, or just turn it carefully.
 
Finally found somewhere that had the slotted angle iron, so I've just put together a "Canadian Edition" of this quick rotisserie. :)

For any other canucks reading this, here's the short-list for parts. Home Depot carries everything you'll need (at least, ours did).
  • 1x Slotted Angle Iron, 1 1/2" x 48"
  • 2x 5/16" x 4" carriage bolts (after building it I realized 3" bolts would've worked just as well)
  • 4x 3/8" flat washers
  • 4x 5/16" fender washers
  • 4x 5/16" hex nuts
  • 2x 5/16" nylon insert lock nuts
Wood-wise, it was just some scrap 2"x2" and 2"x4" that already had kicking around in the shop. Vertical supports are 16" long, and the 2x4 on the base is also 16". Rather than the nice notch cuts that newdos did for the end braces, I just glued+screwed the them on.

Took me longer to find somewhere that carried the Slotted Angle Iron than it did to put this all together. Turns out that Home Depot carries it, but its *not* searchable on their website (if you search for "slotted angle iron" or "angle iron" you won't find it, but they do carry it; its in the same aisle as the nuts+bolts).

Kudos to newdos for the plans!View attachment 9178 View attachment 9179 View attachment 9180 View attachment 9181
great job man, puts mine out of scrap timber to shame !!!!!

Cheers Kev
 
great job man, puts mine out of scrap timber to shame !!!!!

No way... yours was the inspiration behind my Canadian Edition; without seeing what you had done I wouldn't even have gone there. I give you kudos for having such a simple build; waaayyy easier than all those "black pipe" rotisseries.

I think the only thing I did different, was that I sanded the dirt/crap off of the wood before putting it all together; those were all bits of scrap that we had kicking around in the shop. :eek:

Father in-law did some framing last year at his place and had a huge bit of "ends" sitting out in his yard. He was just going to throw it all out, but I swooped in one day and loaded up a few bins full of it all and brought it home. Ya never know when something like that will come in handy. ;)
Exactly Graham - never know when a scrap of timber can come in handy!!!

Look forward to some pics once you have a plyfield on it !!!

Cheers Kev
 
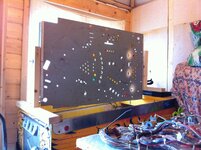
Had a spare hour (and I mean 1 hour) whilst the family was out to quickly knock up my own rotisserie. My main problem is lack of space: I've no garage and no room indoors for pinball. The summerhouse is only 8-foot square and I've got 2 pins and a cocktail video game in here! It's also my home office.

Solution? Mount the rotisserie on the main cabinet!

Just 4 bits of wood, 4 big screws for the main joints, 2 bolts, 4 washers, 6 nuts and two bits of aluminium angle I pulled off an old green house that was dumped over the back of my garden fence.

image.jpg

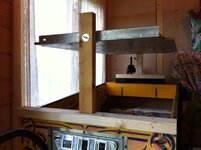
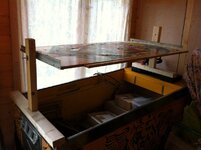
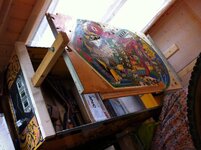
Bits of wood have been sized to sit on the cabinet and I'm using a clamp to hold it in place (will add a couple more when I find them...). Holes drilled in the uprights to compensate for the slope. Obviously I can't use it anywhere else but perfect for the job in hand.

image.jpg

image.jpg

image.jpg

image.jpg

image.jpg

Again, more kudos to @newdos for the original inspiration! I think this is about as budget, cheap and nasty as it gets!!!
 
That's proper cunning @Nedreud , nice work!

I've got all the bits for @RudeDogg1 's design now (ToolStation do a nice metal saw horse pair for 30 quid), now I just need a spare evening to put it together and strip the back of this pf finally.
 
Had a spare hour (and I mean 1 hour) whilst the family was out to quickly knock up my own rotisserie. My main problem is lack of space: I've no garage and no room indoors for pinball. The summerhouse is only 8-foot square and I've got 2 pins and a cocktail video game in here! It's also my home office.

Solution? Mount the rotisserie on the main cabinet!

Just 4 bits of wood, 4 big screws for the main joints, 2 bolts, 4 washers, 6 nuts and two bits of aluminium angle I pulled off an old green house that was dumped over the back of my garden fence.

View attachment 9208

Bits of wood have been sized to sit on the cabinet and I'm using a clamp to hold it in place (will add a couple more when I find them...). Holes drilled in the uprights to compensate for the slope. Obviously I can't use it anywhere else but perfect for the job in hand.

View attachment 9209

View attachment 9210

View attachment 9211

View attachment 9212

View attachment 9213

Again, more kudos to @newdos for the original inspiration! I think this is about as budget, cheap and nasty as it gets!!!
Love it man that's quality and pure ingenuity !!!!

Cheers Kev
 
Awesome work everyone :)

Someone make me one of these, I totally need a rotisserie with all the playfields I have pending work on:rofl:
 
Awesome work everyone :)

Someone make me one of these, I totally need a rotisserie with all the playfields I have pending work on:rofl:
C'mon, Luke! If you can fix pinballs you can knock up one of these! Sure, some of 'em have got fancier woodwork than others but at the bare minimum the only tools you needs are a saw, drill and screwdriver. I didn't even bother recessing my joints or bracing them, just a simple butt joint with two 100mm screws. More than tough enough to hold up a playfield. If you wanted it really tough you could squeeze in some PVA wood glue but then you wouldn't be able to take it apart when you're done.
 
Back
Top Bottom