What's new
Pinball info

Register a free account today to become a member! Once signed in, you'll be able to participate on this site by adding your own topics and posts, as well as connect with other members through your own private inbox!

Repairing scoop wear before Cliffy installation

David_Vi

Site Supporter
Joined
Sep 3, 2019
Messages
3,634
Location
Sudbury
Alias
DaveTheTrain
I've been putting this off on a few of our games.
DEJP came with cliffys which deformed quickly and made the shots near impossible. Turned out the previous owner installed them without repairing the damage first.

Roadshow has a little wear that I can live with but will fix it I feel confident...

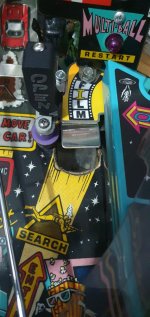
But Creech, that really needs some work, it probably requires Cliffys extended version.

I've discovered quickwood putty is a common product used. It sounds relatively easy to work with, however my main concern is how do you get it to the right dimensions and do the top of the playfield wear without damaging the playfield around it (assuming you have to sand the putty once it's set?).
Also what tools do you use to apply it and get a decent finish?


I was hoping to find a video to see someone repairing damage, see what tools they use and how they address my concerns but no matter what I search on YouTube I just find people fitting cliffys without any existing damage.
 
Also, what's the shipping like from Cliffy these days?
 
Only really worked with the 2part filler for scoops, have some pictures from my CSI, its survived a load of games since with only a bit of wear without a Cliffy, although if I was doing it again I would probably use fibreglass resin as its so close to the flipper it really gets bashed about.

Quickwood is like a 2 part putty isn't it? I would work in stages, no need to do the whole thing in one go, concentrate on getting the top surface flat, as that's going to be the most visible, press it down with something smooth so its flush with the playfield, shouldn't really need any sanding near the artwork then. Once that's dried build up the shape of the sides, if you need to sand B&Q do a load of curved/flat wood you could wrap some sand paper around to help get the right shape.
 
I would put masking tape around the scoop hole to make a wall, and then just pour in some two part resin to the level of the playfield and smooth it with a lolly stick. It will set really hard and no need to sand if you stick a cliffy over it once it has set.
 
Here's the damage on Creech. When writing the post at work yesterday in my head the wear was a lot worse!

I need to measure to see if it requires the extended cliffy
 

Attachments

  • 20240220_130119.jpg
    20240220_130119.jpg
    93 KB · Views: 62
Yep 2 part car filer is what i used to repair the safehouse scoop on dirty harry a while back. worked great. Cant remember the brand off hand but it was light grey colour so perfect for painting over.
 
If you ask me it doesn't look too bad. I'd just bung a Cliffy on it and be done with it!

It'll distort in no time. I had to remove the cliffy from the creech at the pinball office recently because it was stopping the ball from falling into the subway. The wear underneath hadn't been repaired.

Either way I have lots of holes I can repair. JPs are much worse, but that's 3 cliffys worth of work 😄
 
Years ago I used chemical metal on mine , shored the hole up with plastic packers flush to the top of the playfield , even put some paint on it before I fitted a cliffy ,unfortunately don’t have a before pic IMG_1650.pngIMG_1651.png
 
All the protectors arrived!
20240229_191333.jpg

From what I understand kwikwood is quite workable. However I'm not finding much information about how people get the correct shape and how much to use.
I have seen some people apply it to the protector and smush it into place. But how do you know you've got enough and not too much?

Is it something that you can add to?
 
kwikwood is just a two part epoxy filler same as ronseal wood filler or most car body repair stuff. i’d fill then sand to shape it perfectly - the squish method is a shortcut method which might work but those fillers can be stiff to work with.
 
kwikwood is just a two part epoxy filler same as ronseal wood filler or most car body repair stuff. i’d fill then sand to shape it perfectly - the squish method is a shortcut method which might work but those fillers can be stiff to work with.
Are you 100% sure on this Alan? I had a different brand of a similar product, but similar in that you use your fingers to rub it together - I found it very different to two part car body filler. The consistency was different, it was different to mould to shapes, different sanding and the final product had a different finish.

Perhaps Kwikwood is different to the brand I used though, But typical 2 part car body filler was nothing like what I had.
 
In videos I've seen of kwikwood putty used on furnture or woodwork it seems to have a similar consistency to plasticine or a firmer play doh.

I can't see how people sand it considering it sits flush against the playfield, it must be difficult to sand it without destroying the artwork around it?
 
Not actually carried out this repair but I'd try Milliput, has approx 10-15mins workable time, easy to mould and strong and accepts paint.

Leave it overnight to cure and remove any excess with a Dremel and some sandpaper, finish with wet and dry to get a smooth finish.
 
I'm sceptical about some of these wood repair products, to me they're all the same - 2 part epoxy mixtures. I have found the car repair products to give a tougher and smoother finish.

In terms of working time - you can extend the working time of any of these products by using less hardener.

@David_Vi - you should be able to get a pretty smooth finish first time with careful application, so probably dont need to sand near the artwork. If you do need to sand next to artwork, protect the artwork with some sort of tape.
 
I can't see how people sand it considering it sits flush against the playfield, it must be difficult to sand it without destroying the artwork around it?
That epoxy putty is difficult to sand as it sets very hard - it will take longer, you are more likely to damage the surrounding area and the end result will be inferior.

It takes ages to set whereas car body filler is set in 5-15 mins.

The result will not be as good as a 2 part car body filler (e.g. you will see a line between the existing wood and the filler. This is a characteristic of the product - one of the reasons that it is not used in professional joinery, whereas car body filler is.

This product is what you need: here

That product is incredibly easy to sand (by hand - you really do not want to be using a product that needs a Dremel to shape it) to any contour that you need.
 
I can't see how people sand it considering it sits flush against the playfield, it must be difficult to sand it without destroying the artwork around it?
Use tape around the artwork as you block sand it flush you'll not destroy the art.
 
I fear you might be overthinking this a bit. you should be able to get a smooth/flat enough edge for the cliffy to sit on without sanding at all.

My issue with putty type products is sure they dry hard, but the bond between the product and the wood is probably the most important bit and it feels like they wont squish into all the tiny little wood fibres like something with a more liquid consistency would.

Filler is sort of the same consistency as margarine and has an applicator like a credit card its sort of skimmed into place, its not like super glue, if you go over onto the artwork just wipe off with some naphtha or something, do you have an old bit of painted wood kicking around? old shelf or something..... maybe worth drilling a 2 inch hole in one and practicing making the hole smaller with filler, I'm sure after that you will be filling scoops no problem, its really not too bad.
 
Yeah probably overthinking, but I like to be over prepared...then rush the job and f it up 🤣

Good idea to have a go on some old wood, I'll probably do that just to get a feel for it.

Road show first as it's leaving me in a week!
 
Did a DESW for a friend recently and found the Ronseal high-performance filler easy to work with and sand to shape. Hand-finished with a few layers of acrylic varnish as I had to do a few paint touch-ups. May not be up to everyone's standards but looks almost perfect from a player's position.
Scoop 1 repair.jpg
 
Really easy to work with, it does feel slightly like plasticine or clay.


20240301_162646.jpg20240301_130904.jpg20240301_162635.jpg

Dogballs damage isn't bad but as I'm putting a protector on I'd rather it not have any damage that could later deform the protector.


JPs are awful so I'll get round to those when I have time to remove anything in the way.
 
A straight edge and small block of wood made the repairs really easy, I only needed to sand a few areas closer to the underside of the playfield where the kwik wood would be in the way of the protectors inner edges.

JP was the most annoying, not because of the amount of holes, wear or playfield disassembly but the fact I had to move the bunker and control room assembly back a few millimetres or the ball would get stuck leaving the bunker.

Looking forward to doing Creech when it comes back from loan 😄

20240302_165442.jpg20240302_170252.jpg20240303_144422.jpg20240302_165132.jpg20240302_165130.jpg20240303_144419.jpg
 
Back
Top Bottom