What's new
Pinball info

Register a free account today to become a member! Once signed in, you'll be able to participate on this site by adding your own topics and posts, as well as connect with other members through your own private inbox!

Complete Let's turn this old boiler into a shiny happy Whirlwind

Mfresh

Site Supporter
Joined
Oct 7, 2012
Messages
2,215
Location
Marlow on Thames, Bucks
Alias
Paul
So after pestering everyone on the forum who has a Whirldwind, I finally hit gold when @stumblor agreed to sell me the old beater he had in his possesion. The machine was fully working apart from the lift ramp which didn't move and was pretty much falling off, and the fan in the topper. The right hand upper flipper was also not capable of sending the ball up the ramp opposite.

Other than that, it showed promise. The playfield was a bit beat up and had lifting mylar, worn inserts etc. The cabinet and backbox also looked like someone's XL Bully had taken a few chunks out of it.

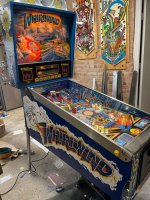
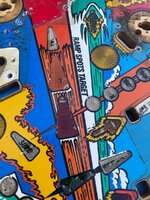
Here's some of the playfield:

IMG_4225.JPG IMG_4231.JPG

Seen worse.

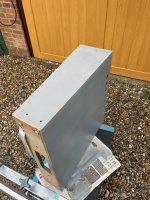
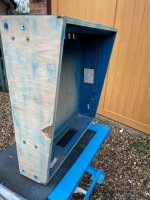
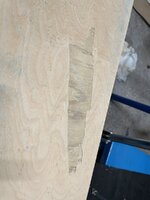
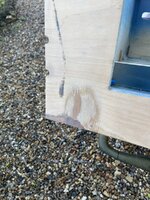
And here's some of the cabinet and backbox with a few of the bites taken out:
IMG_5301.JPGIMG_5299.JPG

Also, there were two extra holes in the front of the cabinet, one with a keyhole in it, and one for no apparent reason

IMG_5298.JPGIMG_6343.JPG

Davey very kindly included ramps, including a new lift ramp, and various other new parts, as part of the deal.

So, the plan is to strip the playfield and install a hardtop, strip and repair the cabinet and backbox, fix any mechs, targets and switches etc and replace if necesary, and then rebuild the pop bumpers and flippers. Then repaint inside the cab and backbox, redecal , reassemble with new ramps and plastics, and replace any other hardware that needs it, like the fan case.

The flippers are currently a mix of Sys 11 and WPC ones, so I will make them all Sys 11 s that they are consistent. And the bumpers will be a bit of a hassle as the game as two sets of three, so six in total. Oh well. Here goes.
 

Attachments

  • IMG_5715.JPG
    IMG_5715.JPG
    205.1 KB · Views: 15
About a week ago I finished stripping the playfield, which was relatively straightforward, and the on Wednesday I stripped the cab, and hung the wiring up on the bike rack.

IMG_6384.JPG IMG_6296.JPG


The only setback was getting the siderails off. I think I got a bit to impatient with breaking the glue, and when I pulled off the left had rail I managed to bring a patch of wood with it. So yet another bit mark.
IMG_6393.JPG

And yesterday I got the cab sanded down to the bare wood, and started in the repairs: resin for the edges, and two part filler for the rest. I also filled the two holes on the front of the cab with resin, and then once that was set I topped it off with filler, which is easier to sand.

The bottom left of the cab has come out quite well but needs a bit more attention
IMG_6410.JPGIMG_6414.JPG


and the scar from where I pulled the rail off and the extra holes look ok but will need another fill and sand.

IMG_6412.JPGIMG_6413.JPG
 

Attachments

  • IMG_6408.JPG
    IMG_6408.JPG
    90 KB · Views: 6
  • IMG_6414.JPG
    IMG_6414.JPG
    152.3 KB · Views: 5
Watching with interest as I didn't know you could get a hardtop for WW and the playfield on mine is a bit rough :thumbs:
 
Once task for today was sticking a load of the parts into rust killer to get the rust off, ready to put in the polisher once the stuff I put in last Sunday are finished. I give it a week, so last Sunday's stuff will come out tomorrow, and the derusted stuff will replace it.

There's not a huge amount of rust, just the usual cabinet suspects:
IMG_6301.JPG IMG_6342.JPG

Also, someone seems to have put vaseline, soy sauce and marmite into the trough kicker and the lift ramp mech, so I cleaned them in the ultrasonic cleaner, and reassembled. I'll polish them up later and replace the cable tie with a hair clipm, and clean or replace the coil wrapper.

I'm quite impressed at how well it worked. But...

These ultrasonic cleaners are weird. I bought one on Amazon which didn't work, and sent it back. They send another one which was also dead on arrival and sent it back. The third one worked, and cleaned these mechs up a treat. Then I decided to put the cable guides in the the machine and it blew up, took out the house electrics, and is now completely dead. Ba!
IMG_5786.JPGIMG_6079.JPG IMG_6415.JPG

The good news is that my friend who used to sell candlesticks (?!) has got a Draper 25L ultrasonic machine, virtually brand new, that he doesn't want so he is giving it to me when I go and visit him in Devon in a couple of weeks time. Could be interesting for cleaning bigger parts than was possible in the broken 3L machine...
 
  • Like
Reactions: DRD
So that's where I am up to today. While I am filling and sanding the cab over the next few days I have to do the hardtop on the playfield.
IMG_6402.JPG

It's stripped and ready to go, but it has mylar on most of it. So I have to pull the mylar and then either strip the glue, which I hate doing, or just sand it all off. I think I'm going to need a few more 80 grit disks for that job and probably just sand the wretched glue off.
 
Hey matey - just one other heads up also - If you have a look at the very rear drop target (that was ever so nicely donated by @replicas), it'll have a 3D printed bracket attached to it that I made. This is due to the fact that the original WW one is super hard to come by, so we used a similar one and converted it to hold the opto board.

1699709148073.png

^^ This one, with the diverter coil removed.

The bracket I made that holds the opto board was done before I had a 3D printer here, so the screw fittings (the 6 screws that join the two pieces together) aren't perfect. If it becomes an issue, give me a shout I can can print off some better ones from here that are more solid.

1699709229482.png
 
Hey matey - just one other heads up also - If you have a look at the very rear drop target (that was ever so nicely donated by @replicas), it'll have a 3D printed bracket attached to it that I made. This is due to the fact that the original WW one is super hard to come by, so we used a similar one and converted it to hold the opto board.

Hey, I did notice there was something unusual about that bracket when I removed it. And that it was held on with monster big screws. It's didn't look original but it looked so good that I figured it was a repro part. Didn't realise it was custom made!
 
Hey, I did notice there was something unusual about that bracket when I removed it. And that it was held on with monster big screws. It's didn't look original but it looked so good that I figured it was a repro part. Didn't realise it was custom made!

Could be better though! 🥸
 
So I had a spare hour this afternoon so I got the bottom of the playfield taped up to prevent as much sawdust as possible from falling through when I sand the playfield in preparation for the hardtop.

IMG_6416.jpg IMG_6419.jpg


I also whipped the mylar off. I just used a heat gun on medium setting and pulled it of in about five minutes. It didn't take any paint off with it but it did take off plenty of insert decals. But that doesn't matter as they are going to be sanded off anyway.

IMG_6418.jpg

Then I decided to just sand the glue off with the paint, and in 15 minutes I had half of the paint off, along with the glue. Good progress!

IMG_6422.jpg
 

Attachments

  • IMG_6421.jpg
    IMG_6421.jpg
    180 KB · Views: 16
Great stuff Paul. I’m interested to see what product you use for the cab edges. I’ll be doing my corvette cab soon. I have a two part wood filler but not sure what’s best.
 
Great stuff Paul. I’m interested to see what product you use for the cab edges. I’ll be doing my corvette cab soon. I have a two part wood filler but not sure what’s best.
I just bought a 5L bottle of hobby resin off eBay. Comes with a separate bottle of hardener. Then on Amazon I bought a load of little plastic 30 or 50 ml containers, which come with mixing sticks. And a bag of syringes. You need to mix a little pot of 25ml of resin with 0.5ml of hardener (measures using the syringe) each time you do some filling, and any leftover I let harden in the container over night and then chuck it..

Basically for edges you just make a wall at the edge of the cabinet using masking tape and then pour in some resin mix. It hardens really quickly, and once hardened you can sand the hell out of it without it breaking like filler tends to do at edges. You can also fill really deep gouges in one go.

IMG_6425_Original.jpeg
I use two part filler for areas not close to edges as it’s quicker to sand it..
 
All the yanks tend to use a product called Bondo, which is not available over here, but is essentially just the common name for any polyester auto filler. ie

1699805468387.png

Apparently this works great because it's flexible, easy to sand, and you don't notice any joins between the filler and the wood - something that is incredibly hard to achieve with standard wood fillers.
 
I've used this before on arcade machines pretty good once no corners are involved as it'll snap right off with a bang, fibre glass resin probably better for that job.. There is another version in a blue tin with flakes of metal thats stronger (can't remember the number)
 
I noticed that one of the big round inserts on the middle of the playfield is cracked and cupped, so I decided to remove it and either sand it or replace it. I've never knocked an insert out before so I was a bit nervous about it. But I got the trusty old heat gun out, set it on medium, and after heating both sides on and off for about 5 minutes the glue suddenly softened and I managed to push it out quite easily with the help of a big socket spanner tapped with a small hammer.

insert3.JPGinsert2.JPG

I think it's pretty clear that that even if I sand it flat, it won't fix the cracks that go all the way through, so I have ordered a new one. It will be interesting to see if one new one stands out a mile compared to the older ones which have probably faded a bit. The surfaces of the ones in the picture on the right above are pretty rough due to sanding with 40 grit, but these should get miles better once they are sanded to 2000 and polished with Novus 1.

Next job is to get LEDs ordered. I will go with warm white for the GI, and probably colour matched LEDs for the inserts. But I have half a mind to put warm white throughout and let the inserts provide the colour. What does everyone else do?

I have used Comets in the past, but to be honest I think they are overrated. I am ordering from Dave instead - much cheaper and great quality I think.
 
Lovely shiny posts and other playfield metalwork after a week in the tumbler!

IMG_6426.jpeg


Now for a week tumbling the cabinet parts. It’s nice to go to bed knowing the tumbler is beavering away nonstop polishing so I don’t have to…
 
Been busy with other stuff today but did manage to finish sanding the playfield in preparation for a hardtop
IMG_6437.JPG

I also spent some time cleaning up the shooter lane. It was pretty mucky before, and much better after a bit of sanding
IMG_6436.JPG IMG_6442.JPG

I find a bit of sandpaper wrapped around a paint pen fits just nicely in the shooter lane. Sanded from 40 up to 2000 for a nice smooth finish, and then I will give it multiple layers of wax to protect the part that doesn't sit beneath the hardtop.

IMG_6438.JPG
 
Waiting for the rain to stop I thought I’d replace the slingshot switches which are pretty worn. A nice easy job right? WRONG!

Despite getting the switches as per the Whirlwind manual, it turns out that two of the four on the machine are back to front - they are mounted facing the opposite way to their pair, so the big leaf is where the little leaf is, and vice versa.

IMG_6427_Original.jpeg
So cue about an hour of hammering the rivets out, reversing the leafs and side tabs, and hammering home back together again. It’s amazing how a little soldering job can turn into an hour of bashing and cursing!
 
Been busy since Tuesday preparing the cab for decals and the playfield for the hardtop. Also, a big box of parts arrived from BestofPinball, including scoop protectors, pops, flipper rebuild kits, drop targets, and various playfield decals like spinner decals.

IMG_6454.jpg

I also polished the playfield inserts to an inch of their lives with Novus 2 and then Novus 1, and cleaned the underneaths with windex and cotton bugs so that they let as much light through as possible. Those cotton buds get really grubby.

IMG_6462.jpg IMG_6472.jpg

Next I alarmed the postman greatly when he found me in the front garden sanding the cabinet

IMG_6473.jpg

Anyway, the cabinet is sanded to 2000 grit mirror finish and primed inside ready for some blue paint, and a bit of black paint added to the edges outside. That bare board on the bottom of the cabined really sucks up primer - I got through three cans just giving it a light coating.

IMG_6493.jpgIMG_6488.jpg

Finally, it's Sunday, so a load of parts came out of the tumbler after a week of tumbling, and the next lot went in to be tumbled til next Sunday.

IMG_6494.jpg

Next up is painting the inside of the cab and then the exciting part - putting the decals on! And hopefully my package from Planetary will arrive next week with the insert that I need to install before I can put the hardtop on too. I feel progress is really being made, although I haven't even started on the back box which is in a right old state...
 
Last edited:
Busy week this one, with a bit if a decal disaster thrown in.

Firstly I replaced the flipper switches, and rebuilt all the flippers with Sys11 parts - so conical springs on the coil plungers rather than attached to the assembly.

IMG_6497.jpg

Then it was time to build the diy standup targets from Pinball Center

IMG_6511.jpg

I got stung for customs fees on my package from Planetary, but at least I got the new insert, plus another yellow one which was chipped and so got replaced

IMG_6537.jpg IMG_6538.jpg

Then I finished spraying the inside of the cab with blue, and was ready for decalling. Sooooo, lets start with the front of the cab. I got out the decals that I bought from Pinball Center back in June, and discover...

IMG_6521.jpg

that they are completly the wrong size. Looks like someone printed them out 130% of the correct proportions so they are way too big. Now I've normally had really good decals from Pinball Center, but these are garbage. So I returned them and ordered some "next gen" ones from Mr Pinball in Australia. They should be here mid December, but that's brought the cabinet work to an abrupt end for now...

This weekend I went to Somerset to see a friend of mine who is emigrating to New Zealand, and has a brand new Draper 27L ultrasonic cleaner he decided he didn't want, so I came home with £800 worth of ultrasonics. Nice.

IMG_6539.jpg

Decided finally to give the new machine a spin on a light board. Here's the results - pretty impressive.

IMG_6541.jpg IMG_6543.jpg

And finally.... with the new inserts glued I was ready to blast the playfield with compressed air, give it a wipe down with a tack cloth, and get the hard top on. Looks amazing!

hard.JPG

So now I have to decide whether to work on cleaning all the parts and repopulating the playfield, or getting on to restoring the backbox. Probably a bit of both next week.
 
Well the new decals finally arrived from Australia. Next gen, supposedly. They are not bad, but not quite the pale blue of the original. But what the hell - I actually like this slightly darker blue better. So on they went:

IMG_6781.jpg IMG_6832.jpg

Next up, stripping the backbox, ready for resin repairs. Always a quick job

IMG_6725.jpgIMG_6846.jpg

Then there's that day spent rebuilding all the multilevel plastics assemblys and moving all the switches etc to the new ramps, and getting the rivets out of old plastics. I'll be trying out a new rivetting setup on this machine.

IMG_6609.jpgIMG_6642.jpg

I got some apron decals from the states, so they have been put on

IMG_6595.jpgIMG_6853.jpg IMG_6854.jpg

Also new drop targets for the drop assemblies
IMG_6684.jpg

So while I am waiting for a nice day to sand the backbox its on with the reassmbly of the playfield. WW has six pop bumpers, so it took about a day to rebuild all of them, replace the switch stacks, gap the switches, and get them all ready for action.

So here's what I want to know. The pop bumpers yokes consist of two parts - a metal piece and a brown bakelite piece. Every single one of the metal yokes was broken - basically snapped in two. The pieces fell out when I disasembled the pop bumpers. But the bakelite bits were all intact. So what's the point of the metal bits anyway. It doesn't seem to matter much if they are broken, as the pops were working before?


IMG_6965.jpg

The tumbler has been running non stop for the past 6 weeks, and the last batch is in, so soon it will be time to get everything back together again...
 

Attachments

  • IMG_6651.jpg
    IMG_6651.jpg
    284.7 KB · Views: 18
  • IMG_6828.jpg
    IMG_6828.jpg
    188.5 KB · Views: 17
  • IMG_6628.jpg
    IMG_6628.jpg
    184.8 KB · Views: 20
  • IMG_6783.jpg
    IMG_6783.jpg
    178.9 KB · Views: 17
Looks absolutely superb.

What is the process for refurbing the apron pls ? Did you sand it down and repaint ?

Note to pinball designers - please use black as the main cab colour. It makes it so much easier when folk are colour matching in 30 years time
 
Yeah looking spot on, luckily Rustoleum does a colour blue that's really close to the blue of the next gen decals.
Shame about the first lot you ordered, the first set I got were a bit crappy, but that sizing is unforgivable, that's waaaay off, worth the wait for the new set.
 
Looks absolutely superb.

What is the process for refurbing the apron pls ? Did you sand it down and repaint ?

Note to pinball designers - please use black as the main cab colour. It makes it so much easier when folk are colour matching in 30 years time
Normally I sand down to metal and give a couple of layers of primer before painting. This time I just painted over as there was no rust and it was in reasonable shape. Then apply the decals with lashings of window cleaner so you have plenty of chances to align them just right.
 
This looks amazing! I'm thinking about putting a hardtop of mine or not, did you experience any issue when applying it or when putting everything together?

One question on this picture:
img_6965-jpg.240721


All 3 targets are dark red, isn't it supposed to be the one on the right that should be red and the 2 others should be yellow?
 
This looks amazing! I'm thinking about putting a hardtop of mine or not, did you experience any issue when applying it or when putting everything together?

One question on this picture:


All 3 targets are dark red, isn't it supposed to be the one on the right that should be red and the 2 others should be yellow?
Personally I think hardtops are great. They are super easy to apply and you can't really go wrong if you take the time to line it up right and then clamp it on position before removing the backing and sticking it down. It can't crease becuase it is pretty stiff so you can easily put it on by yourself.

Usually some of the holes are not exactly in the right place but you can make them slightly bigger to align with the holes in the playfield beneath using a soldering iron. Be sure to get a solder tip just for this because it ends up with plastic residue on it and is then no good for proper soldering. And very ocassionally a hole is missing, so you have to feel where the hole is in the playfield beneath and then use the soldering iron to make a hole in the hard top. It sounds complicated but it is really simple.

Re the targets, I've seen photos of different machines with different coloured targets. The photos on IPDB show two red and one yellow. Personally I don't believe that they targets are "supposed to be" any particular colour. It's my machine and I'll jolly well choose whatever colours I want to have. If I ever sell the machine then it's easy enough for the new owner to change to whatever colours take their fancy.
 
Thanks for the feedback and the tips really appreciate

Re the targets, I've seen photos of different machines with different coloured targets. The photos on IPDB show two red and one yellow. Personally I don't believe that they targets are "supposed to be" any particular colour. It's my machine and I'll jolly well choose whatever colours I want to have. If I ever sell the machine then it's easy enough for the new owner to change to whatever colours take their fancy.

I asked the question because i just ordered the parts and was wondering if i took the right colours as the original that's about it :)
 
very impressive, I had to double take that you sanded down the playfield, not seen this way before. just wow, great work.
 
It's been a while since the last update, but I've put togther the playfield with new ramps and starposts, and polished parts.

I also treated the spinning discs to new decals, which look swish, got a new bass speaker from Keef, and had a bit of fun cutting up a bumper cap.

IMG_7105.jpgIMG_7071.jpg

IMG_6989.jpgIMG_6991.jpg

I also got new slingshot plungers as one was mushroomed (though bizarely the other wasn't)
IMG_6996.jpg

And a little more painting - first the coin door and frame in black

IMG_7008.jpgIMG_7009.jpg

Then the backbox insert board in white. I've never painted an insert board before, but I wanted it to be nice and white to reflect the light from the bulbs (sticking to incandescent in the backbox, as LEDs always seen to cast halos around themselves through the translite.) I've always wondered how to protect the bulb holders without removing them. I figured I would bung kitchen roll into them, and then I saw a video on YouTube by some American chappie who recommends putting old bulbs into the holders and painting the board and bulbs and then chucking the bulbs.

Anyway, both methods seem to work equally well, and I am pretty pleased with the results:
IMG_7139.jpgIMG_7153.jpg

So, as I said, got the playfield in the cab. Can you see what went wrong?

IMG_7086.JPG

Easy enoough to put right, so we now have this:

IMG_7142.jpg

Meanwhile the backbox has all been patched up and primed - never bothered priming before decalling, but I thought I would try it, as per @s000m 's method, and then painted it up, and got the decals on today. Always exciting, decal day is!


IMG_5302.JPGIMG_7152.jpg

So, now I have to rebuild the backbox, stick it on, and we are done! Nearly there....
 

Attachments

  • IMG_7129.jpg
    IMG_7129.jpg
    146.3 KB · Views: 4
  • IMG_6846.jpg
    IMG_6846.jpg
    135.6 KB · Views: 3
Well I have finally got the Whirlwind back together again, and I have to say I have never done up such a fussy machine that needed so much fettling and fine tuning to get it ship shape! Lots of switches needed replacing, including in the pesky left hand ball lock lane. And standups which didn't work, which I traced to a broken wire. And fan that didn't blow, which was just a matter of reflowing the solder on the control board. And getting the lift ramp to work properly, and the scoop to eject etc etc etc!

But the main thing is that @stumblor's old Whirlwind is back baby, finally fully working and looking a million plus, right up close - too close in fact - to @DRD's old Earthshaker. You may spot a missing plastic, a subway toll decal and a broken hex post which I am waiting to swap over if you look very hard...

Here's a bit of Whirlwind porn to enjoy....

IMG_7635.jpg

IMG_7666.jpg

IMG_7672.jpg

IMG_7607.jpg

IMG_7611.jpgIMG_7663.jpg
IMG_7673.jpg

IMG_7615.jpg

IMG_7603.jpg

Thanks for reading, come by and come by and play it any time.

Next up are Paragon, Dolly Parton, and EATPM, although I haven't decided in which order yet....
 

Attachments

  • IMG_7511.jpg
    IMG_7511.jpg
    183.8 KB · Views: 5
Back
Top Bottom