What's new
Pinball info

Register a free account today to become a member! Once signed in, you'll be able to participate on this site by adding your own topics and posts, as well as connect with other members through your own private inbox!

In Progress Firepower

Andy_B

Registered
Joined
Oct 12, 2014
Messages
508
Location
Worksop, Notts, UK
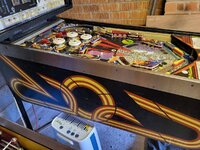
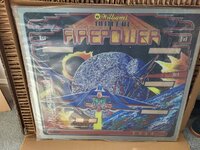
After some encouragement from a group member I've decided to post my Firepower shop log.
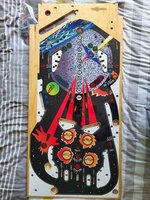
This is my second Firepower restore - the first was a fifty quid wreck I bought from Pete Matthews nearly 20 years ago. I fitted one of the first repro playfields from CPR. Needless to say I payed more for this project than I sold the restored one for 😁

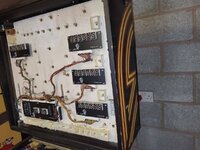
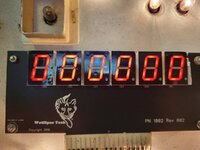
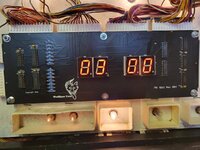
I've already done a few bits- circuit boards through dishwasher- fixed speech issue and built and fitted Wolffpac displays.


20220512_174410.jpg
 

Attachments

  • 20220512_174410.jpg
    20220512_174410.jpg
    243 KB · Views: 23
  • 20220512_174208.jpg
    20220512_174208.jpg
    232.4 KB · Views: 25
  • 20220512_174203.jpg
    20220512_174203.jpg
    200.4 KB · Views: 25
  • 20220512_174217.jpg
    20220512_174217.jpg
    164.6 KB · Views: 24
  • 20220512_174226.jpg
    20220512_174226.jpg
    160.8 KB · Views: 22
  • 20220512_174153.jpg
    20220512_174153.jpg
    209.6 KB · Views: 20
  • 20220512_174157.jpg
    20220512_174157.jpg
    213.8 KB · Views: 21
  • 20220512_174455.jpg
    20220512_174455.jpg
    159.5 KB · Views: 23
  • 20220512_174208.jpg
    20220512_174208.jpg
    232.4 KB · Views: 20
  • 20220512_174203.jpg
    20220512_174203.jpg
    200.4 KB · Views: 19
  • 20220512_174157.jpg
    20220512_174157.jpg
    213.8 KB · Views: 21
  • 20220512_174153.jpg
    20220512_174153.jpg
    209.6 KB · Views: 18
  • 20220512_174226.jpg
    20220512_174226.jpg
    160.8 KB · Views: 18
  • 20220512_174217.jpg
    20220512_174217.jpg
    164.6 KB · Views: 16
I've already had some vinyl cab decals printed locally from the .svg artwork on www.firepowerpinball.com which only cost me £40.
I'm not sure whether to go for the stencils though for authenticity.
I have had previous nightmares with stencils though.....
 

Attachments

  • 20190219_135120.jpg
    20190219_135120.jpg
    78.5 KB · Views: 11
Last edited:
Tried to get a picture of the new red displays but they don't photograph very well.
It looks fine with the hooman eye😀

Unfortunately players 2 and 4 displays take a bit of wiggling for all the segments to light. Need the unobtainium crimp pins...
I'm going to bang the display wiring harnesses through the dishwasher, as they are quite grubby, and re-assess afterwards.
 

Attachments

  • 20220515_130941.jpg
    20220515_130941.jpg
    103.6 KB · Views: 8
  • 20220515_131150.jpg
    20220515_131150.jpg
    238.6 KB · Views: 7
  • 20220512_174040.jpg
    20220512_174040.jpg
    95.7 KB · Views: 7
  • 20220512_174031.jpg
    20220512_174031.jpg
    150.6 KB · Views: 8
All the under pf mechs have been removed, stripped and tumbled, flippers currently being done.

I have also decided to renew all the stand up target faces so have ground the rivets out and completely stripped them down ready for the metal parts to go in the tumbler.

I have noticed, like many Williams pins from this era, that one of the switch contacts on every switch has been fitted the wrong way. Every. Single. One.
 

Attachments

  • 20220526_083618.jpg
    20220526_083618.jpg
    133.7 KB · Views: 14
  • 20220526_083650.jpg
    20220526_083650.jpg
    133.7 KB · Views: 8
  • 20220527_121440.jpg
    20220527_121440.jpg
    160.3 KB · Views: 13
  • Contacts1.jpg
    Contacts1.jpg
    97.9 KB · Views: 16
  • P1010082EDIT.jpg
    P1010082EDIT.jpg
    120.6 KB · Views: 17
I've already had some vinyl cab decals printed locally from the .svg artwork on www.firepowerpinball.com which only cost me £40.
I'm not sure whether to go for the stencils though for authenticity.
I have had previous nightmares with stencils though.....
Looks like the primer wasn't sanded enough or de-greased prior the black layer. Stencils done on wrong type of vinyl could be partially responsible for this too.
 
They were Pinball Pimp stencils which I believe are good quality.
I think the issue was it was too cold when I did the spraying - it always seems to be winter when I get round to cabs :)
 
Yes. The stencils were fine then. Temperature would be definitely a problem. 20c is an absolute minimum. Obviously surface must be no colder than that too.
I would be also very careful with using can primers and paints. Had few nasty surprises when used spray can primer and then tried to apply proper 2k paint on top of it.
 
i’ve had “winter issues” with stenciling too. it takes weeks for the paint to dry properly rather than days. also need to heat the stencil gently with a hairdryer to remove it more easily when it’s cold, otherwise it can bring off the paint underneath.
 
It was probably less than 10 degrees when I made the attempt. Tried warming the surface of the cab with a heat gun and also warming the spray can but alas....:)
Unfortunatley I don't have a spray set up, I was using Plastikote Multi-Purpose Enamel rattle cans - and admittedly some random ToolStation primer.
Not really good then. I wouldn't touch the cab or playfield without compressor and gun. You can try mixed 2k spray cans (they need to be used in 2-3 days) but it's not really cost effective. Better invest in (at least) 100L compressor and gun.
 
I have noticed, like many Williams pins from this era, that one of the switch contacts on every switch has been fitted the wrong way. Every. Single. One.

At the risk of sounding like a 'works, dunnit?' level owner/tech, that may be intentional, if every switch was assembled that way. Perhaps large contact, small contact is better for the switch matrix of a solid state game. One example I recall is Getaway; at first flipper button switches were showing occasional lack of continuity, where two large contacts were used. Changing to large and small (and abandoning the 'double action' caper) improved matters.
 
Not really good then. I wouldn't touch the cab or playfield without compressor and gun. You can try mixed 2k spray cans (they need to be used in 2-3 days) but it's not really cost effective. Better invest in (at least) 100L compressor and gun.
Probably gonna stick with decals then.
 
At the risk of sounding like a 'works, dunnit?' level owner/tech, that may be intentional, if every switch was assembled that way. Perhaps large contact, small contact is better for the switch matrix of a solid state game. One example I recall is Getaway; at first flipper button switches were showing occasional lack of continuity, where two large contacts were used. Changing to large and small (and abandoning the 'double action' caper) improved matters.
I sort of half agree that the machine has lasted 40 years in this state and has probably worked fine throughout that time.

I can't agree that it was a deliberate decision at Williams though.

The two main issues are

1) it annoys the crap out of me
2) What would I do with these? :)
 

Attachments

  • 20220613_110919.jpg
    20220613_110919.jpg
    143.2 KB · Views: 10
Upper and lower pf stripped.

Stand up targets have been tumbled and come up nice. Trying to source 1/8" x 5/8" semi tubular rivets. Richard at Sapphire Products kindly sent me samples of 15 mm long rivets but they are that bit too small. I could go the 3mm bolt and nut but that would be a last resort.

The upper pf posts and fasteners have come up really well in the tumbler. No corrosion on any of the parts and any marks or blemishes have polished out, certainly in the visible pieces.
I use a 8/16 walnut media and Autosol. I recently concluded that one dollop (sorry can't remember the SI unit) of Autosol is sufficient for many tumbles (?). I used to add more Autosol for every tumble but found it tends to leave dusty crap in the media that sticks to the parts and sort of defeats the object. Media lasts longer too.
Same for the under pf mechs.

Pics of shiny things in plastic bins below.
 

Attachments

  • 20220529_221543.jpg
    20220529_221543.jpg
    112.8 KB · Views: 6
  • 20220603_102819.jpg
    20220603_102819.jpg
    115.5 KB · Views: 6
  • 20220613_113507.jpg
    20220613_113507.jpg
    171.5 KB · Views: 6
Two surprise additions. Or should that be subtractions?🙂
 

Attachments

  • 20220614_141454.jpg
    20220614_141454.jpg
    79.6 KB · Views: 12
  • 20220614_141441.jpg
    20220614_141441.jpg
    80.2 KB · Views: 12
Not trying to be cryptic with that last post. The new pf has an extra hole presumably for another GI lamp.
Its under the flipper guide.
 
Holidays are over so back on it 😃
Stand up targets re-built with new faces. The semi-tubular rivests have split slightly where they roll over. Not sure if that is my poor technique or they were a bit too long. The marks on the brackets are from when I Dremelled the old rivets out.
 

Attachments

  • 16624504044231920205941326441620.jpg
    16624504044231920205941326441620.jpg
    140.5 KB · Views: 4
Last edited:
Cab and head have been re-decalled. Had an issue with one of the cab side panels.
The clear laminate top layer had lifted from the artwork. It only revealed itself as I came to finish fitting that particular decal, at the end of the roll. I thought it may have flattened out but alas...!
I argued the toss with the supplier but, despite me storing the decals exactly as they were supplied, it turned out to be my fault all along!!!
It only cost me a tenner for a replacement whcih I suppose is a drop in the ocean compared to the money I have already invested :)
What I didn't pick up on until I got my replacement was the poor quality of the black. Print heads are clearly visible. Might have been able to get a free replacement in that case.
Replacement was fine though.
 

Attachments

  • 20220824_092348.jpg
    20220824_092348.jpg
    82.5 KB · Views: 5
  • 20220903_113733.jpg
    20220903_113733.jpg
    96.7 KB · Views: 5
New legs, leg protectors, bolts and levellers too.....
 

Attachments

  • 20220904_114442.jpg
    20220904_114442.jpg
    200.4 KB · Views: 10
  • 20220904_114451.jpg
    20220904_114451.jpg
    167.2 KB · Views: 10
  • 20220904_114458.jpg
    20220904_114458.jpg
    198.1 KB · Views: 9
  • 20220804_092231.jpg
    20220804_092231.jpg
    82 KB · Views: 8
  • 20220804_092248.jpg
    20220804_092248.jpg
    85.1 KB · Views: 9
Back
Top Bottom