What's new

In Progress Cyclone Shop Log

Mark

Registered
Joined
Jul 22, 2011
Messages
362
Location
Midlands (near Wolverhampton)
Hi guys, I've just picked up my Cyclone and thought I would do a "shop log" to keep track of what I've done, and hopefully get a bit of help for where I get stuck!

Compared to some, this will be a "mini" shop log as most of the work has already been done, however although I've had a coupleof System 11 games before, this is the first one where I have actually gone "under the hood" to try and make it better.

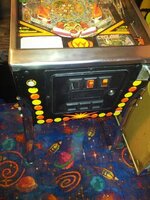
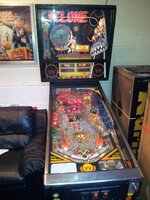
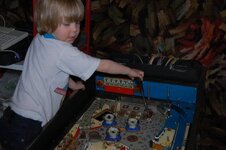
I have only been home an hour so here are some quick pics of the machine as I got it home. As you can see, it actually looks good! The main things I need to do are;

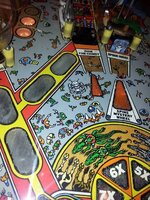
1) sort out the inserts as the insert decals are badly worn. I'm hoping this wont be too much of a problem as the surrounding playfield looks fine!
2) sort out the 3 player and 4 player displays. They are totally blank at the moment and don't even try to start. Not sure where to start as I've not had any experience with this type of display before!
3) backbox lock is missing. Not a big problem but I would like to replace it if at all possible. It looks like a previous owner has damaged the lock surround to get into it, so I may need to repair that too.
4) I would like to get it coin op - it has space for 3 mechanical mechs, and the first think I would like to do is get the right "buttons" with 10p, 50p, £1 etc. Anyone know where I could get these?20131110_151948.jpg 20131110_152009.jpg
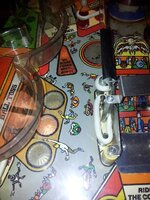
Otherwise, after a quick game everything seems to work as it should and I'm really enjoying the game!

Will report back and post some more pics when I've had a chance to have a proper look, however here are a few pictures (with glass on) to show you the machine as it is now.

If anyone knows how best to address the above problems, or anything else I should check or do, please feel free to get in touch.

Thanks in advance! Mark
 
Right, had a bit of time after the kids went to bed so had a few more goes - great game, and unlike most newer pins, I actually understand how the scores relate to the game! Love the call outs too - very old school, but great fun!

Anyway, back to the jobs. I thought I would try and work out if the non working displays (Player 3 and Player 4) were due to a display fault, or a driver fault. I thought, rather simplisticly, that I could simply swap the connectors from the top displays to the bottom, but when I had a quick look it seems all 4 displays are on a single PCB. There are some connectors at the though though. Could anyone tell me the best way to identify if the actual displays are faulty so I can rule that out - maybe swapping a connector, but I would need to know which ones as I don't want to do anything to blow up the working displays :)

Thanks in advance, Mark
 
Hi Sarge, no - not tried reseating the connectors yet but that is good advice, I will give that a try tonight!

No, there is no glow or flicker at all on the blank displays :( Any idea if I could swap any connectors around to see if the bottom diplays work so I can see if it is an input/driver problem, or dead displays? If they are dead I will try and get some more, but would like to be 100% first as I guess they will not be cheap.

Cheers, Mark
 
I don't think you can swap any connectors around as all the displays are on the one board. They all share the same voltage input so seeing that 2 work you don't have a voltage issue.

Do you have anyone local with a similar era Sys 11 game you could try it in ?

I reckon they are dead though if there is no sign of a glow at all. It is not uncommon for these displays to gas out. If you decide to replace then its worth biting the bullet and replacing the whole lot with a PinLED replacement - by the time you source and buy 2 new glasses and then do all the soldering/resoldering its a no brainer.
 
With both player 3 and 4 displays out it sounds to me like you're missing part of the circuit rather than the displays being faulty. Time to get the manual and meter out to see what power levels you have and if they're suitably earthed....
 
A quick look at the manual says 90 volts on pins 6 and 34 and -100 volts on pins 7 and 31. These are different pins than those from the displays for player 1 and 2 (90v on pins 7 and 35, -100v on pins 6 and 34).
 
Hi guys, I didnt have a lot of time last night but I did manage to re-seat the connectors to the displays and check the fuses. There was nothing obviously wrong, and in fact the conectors looked immaculate with no damage, burning, etc.
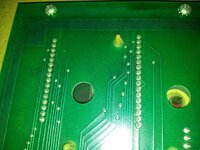
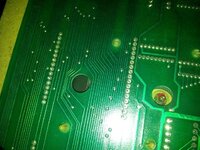
Unfortunately I didnt have time to check the voltages, however I *did* notice something which may be relevant. Behind each display is a round hole on the back of the PCB, and behind the glass, poking up through the hole, is what I believe is called a glass "nipple". Now, on the two working top displays, this is present. However, on the lower non working displays it is not - and there is no sign there has ever been one. Could this mean the bottom displays have never worked, or should this "nipple" only be present on behind the top displays? I realise I am not explaining this, so here are a couple of pics:

20131111_221825.jpg 20131111_221818.jpg

If I can establish that the displays are definitely faulty and need replacing, I will put this issue on the back burner for now. I have seen I can get a replacement for about £139, however my pinball fund is severely depleted at the moment so that will have to wait.

So, do the above pics proove the actual displays are at fault, or am I barking up the wrong tree?

If this is an issue for the back burner, I will start contemplating removing the inserts to clean them before applying the new insert decals. Has anyone had any experience of this, or recommendations how best to go about it?

Thanks in advance,

Mark
 
Yep, destroyed nipples will kill displays. :( Well spotted though. I think your best bet would be to ask on here for working used displays or keep an eye out on ebay for some...
 
Thanks Moonraker, I thought as much.

What is odd though is that the lower displays have no nipples at all, and no sign there has ever been one! So, not sure if it has been destroyed or it was never there in the first place.

Good idea re getting a used display if possible. I will keep an eye out, but may resort to buying new if I have to.

Cheers, Mark
 
Also explains why you have different voltages on different pins if they are different displays...
 
Thanks Moonraker/Grizz, so the missing nipples might not be the problem, thats good!

I am not going out tonight so once the kids are in bed, I will get my DMM out and have a proper look. Will check the voltages and see how they compare with what should be expected.

I've just had aquick look at the manual now, but am a little confused (I usually stay out of the backbox unless I'm changing batteries or replacing fuses).

From looking at the manual I see on the POWER SUPPLY board conector 3J5 is display power, so I guess I could check this.
Should I also measure anything on the CPU BOARD?

Finally, I guess the best place to start is on the actual DISPLAY BOARD itself - you mention the following:
"A quick look at the manual says 90 volts on pins 6 and 34 and -100 volts on pins 7 and 31. These are different pins than those from the displays for player 1 and 2 (90v on pins 7 and 35, -100v on pins 6 and 34)".

I've had a look at the manual and am not 100% sure which pins you mean - are they on the actual display board itself?

Thanks again, really appreciate the help and if I can get this going without spending on a new display, I will be very happy!
Best regards,

Mark
 
Page 47 of the manual or if veiwing in Adoble reader pages 53 & 54 of 66 of the pdf version from ipdb.

Connector J2 is the supply on to the board and you know that's ok as you've supplies to player 1 and 2 displays (J2 pin 1 is -100v and pin 3 is the 90v).

With the board disconnected and out of the game I'd continunity test (set meter to buzz) pins 6 and 34 on player 3 and 4 with pins 7 and 35 on player 1 and 2 displays. The test pins 7 and 31 on player 3 and 4 with pins 6 and 34 on player 1 and 2. That should check all the power traces. Any no connection then the meter won't buzz and you have found your fault.

I wouldn't measure the voltages with the game switched on as the above continunity test should be sufficient and a lot safer!
 
Hi Moonraker, sorry for not replying sooner - been busy - but tonight when the kids were in bed I had a bit of time and checked the continuity you suggested. The first thing I noticed after removing the display board was that it was in excellent condition, there were no signs of anything burned, damaged, or previous repairs etc.

Right, on to my findings...

1. Check continuity between 6 and 34 on player 3. TESTS OK.
2. Check continuity between 6 and 34 on player 4. TESTS OK.
3. Check continuity between 7 and 35 on player 1. NOT OK (but 7-34 tests ok?)
4. Check continuity between 7 and 35 on player 2. NOT OK (but 7-34 tests ok?)
5. Check continuity between 7 and 31 on player 3. TESTS OK.
6. Check continuity between 7 and 31 on player 4. TESTS OK.
7. Check continuity between 6 and 34 on player 1. NOT OK (but 7-34 tests ok?)
8. Check continuity between 6 and 34 on player 2. NOT OK (but 7-34 tests ok?)

Sorry for the long drawn out way I have explained the above but I wanted to try and keep it simple otherwise I would confuse myself :)

So, some thing tests ok as you expected, and some didn't (but the next pin tested ok in these instances).

Is the above enough to determine whether the display board is faulty, or if it could be something before the board, such as a cable or PCB in the backbox?

Very grateful for your help so far!

Best regards, Mark
 
Um, you'll need to start again... :oops:

Out of the game and with no power on the board.

Put one end of your probe on J2 pin 1 (the -100v circuit) now put the other probe on pin 6 of display 1, then pin 34 of display 1, then pin 6 of display 2, then pin 34 of display 2, then pin 7 of display 3, then pin 31 of display 3, then pin 7 of display 4, then pin 31 of display 4.

Next put black probe on J2 pin 1 (the 90v circuit) now put the red probe on pin 7 of display 1, then pin 35 of display 1, then pin 7 of display 2, then pin 35 of display 2, then pin 6 of display 3, then pin 34 of display 3, then pin 6 of display 4, then pin 34 of display 4.
 
Oops, sorr, I misunerstood the original request. Right, will get it out tonight and check everything suggested.

I understand now - so we are checking power is getting to the right place :)

Thanks again - will try later and let you know how I get on.

Cheers,

Mark
 
Sorry to be a little late to this thread - too busy to read the forum regularly...anyway...
This used to be my machine - I rescued it from "dead" a few years ago & did the full shop out on it (including taking the mylar off & therefore the decals on the inserts...sorry!).

As for the displays, I do believe they are both completely dead - my reason for this follows on from tests/advice I took from the Yahoo forum (Yahoo Groups)
I had been on the lookout for the bottom 2 displays for ages when I sold it (some did come up on eBay that were "untested" & I wasn't willing to risk too much on them & got outbid, only to find the person that bought them had them working! Grrr!)

Anyway - I kept a complete log (pictures & descriptions) of the entire tear-down & rebuild - over 500 pictures in total (& a 170 step written list of the rebuild)...so if you ever need to know where anything goes on it just give me a shout :)

Regards,
Dan.
 
Just had a quick look & all the old junk off Cyclone I'd thrown in a bag as I tore it down (God knows why I don't throw this **** away)...anyway, I have 2 of the coin mechs (there wasn't a 3rd in there when I got it)
You're welcome to them - send me your address & I'll post them off to you

(& if for some reason you also want a bag of cracked flipper bats, shot coil sleeves & broken rubbers etc you can have them too! :p:confused:)

Small Engineer.JPG

Regards,
Dan.
 
Hi Dan, thanks for getting in touch, and thanks for letting me know your findings re; the display. The machine is in lovely condition now thanks to your hard work, and plays beautifully! It is a nice chance not to buy a machine and be presented with loads of jobs to do to get it playable :)

Right Moonraker/all, in light of Dan having checked various things with the display, it sounds like it is definitely a dead display rather than anything else. I have seen I can buy a replacement from pinballdisplays for £139 so it is not the end of the world, but I think I will park this issue for the time being.

So, my next job will be the insert decals. I can buy a set from PH, however I do not want to put them on top of the original decals as I don't think it will look very good. Really, I think I need to remove the insert from the playfield, rub on wet sandpaper to clean off the gunk, polish with novus, and glue back in place. When it is back in the playfield and nice and shiny, I will put the new decal on.

First question, does this sound like a good idea? Second question, what is the best way to remove the insert? I've seen you can heat on top and bottom with hot air gun or hair dryer and gently tap out with a mallet - is this the best way?

Third question - assuming I can get them out without breaking them, what is the best way to clean and polish? Is rubbing on sandpaper the best way?

And lastly - how do you go about gluing them back in the playfield and making sure they are level etc?

I've not done this before, and as it is my first time I would like to take my time and try and make a really good job of it. Everything else is so nice I think getting the insert decals done will make it pretty much perfect as far as I'm concerned. If I do this successfully, I will treat the machine to that new display PCB :)

Thanks to everyone for the help so far, particularly Moonraker for the help re the displays.

Cheers, Mark
 
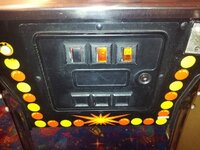
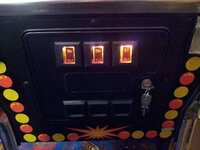
Hi guys, quick update. Thanks to mark9 on the forum, I now have working coin mechs and slot inserts. I know some people don't bother for home use, but I like stuff to be coin operated where possible and now have 10p, 20p, and £1 mechanisms in place along with their appropriate slot insert. Here is a before and after slot of the coin door:

Before.jpg After.jpg

Much better, I'm very pleased with the result! Unfortunately as the bottom displays do not work I don't think I will be able to set it to coin op as I assume some of the detail will be on the bottom displays, but I can deal with that later :).

Also, I've been thinking about the inserts. Removing the insert to clean and replace does involve an element of risk as I could end up breaking the insert and being unable to get a replacement.

So, does anyone know if I could clean the insert from the top, while still installed in the playfield? I know I would need to be very careful of the surrounding area, but with the right equipment and a steady hand, I think it might be possible. Does anyone know if a dremmel type device with the right attachment would clean an insert sufficiently?

Now I know the work Dan put into this, I want to keep up the good work on the last few finishing touches :)

Cheers, and thanks again mark9!

Mark
 
Hi guy,

Right, I've ordered he inert decals so hopefully they should be here shortl. Initiall I was wondering if Icould clean and polish the inserts without removing them, but having thought about it I dont think that will be possible.

So, I've had a look on Youtube and have found videos of people removing inserts by heating with a hot air gun (could I use a hairdryer?). They heat the top, then heat the bottom, then tap out with a nut driver and a mallet. It looked surprisingly easy, but before I try has anyone else tried this and is there anything I need to watch out for?

I realise that if I break one I will probably not be able to get a replacement, so any advice on how best to do this would be much appreciated.

*if* I can make a good job of the inserts, I've promised myself a new display unit too, as this will be the icing on the cake of an already beautiful machine.

Thanks in advance,
Mark
 
Back
Top Bottom