What's new
Pinball info

Register a free account today to become a member! Once signed in, you'll be able to participate on this site by adding your own topics and posts, as well as connect with other members through your own private inbox!

Complete Bally Viking.

new forest pinball

Site Supporter
Joined
Oct 27, 2015
Messages
1,847
Location
brockenhurst hampshire
Alias
Keef.
After a completely unsuccessful “pinballinfo wanted ad.” I, to my amazement found this one unloved in the south of France.
All I know about the machine is that it was owned by a collector/ restorer who purchased it in 2007 and put it into storage waiting for repairs, but he never got around to it. He didn’t speak English and my french is rusty to say the least.......
One of my favourite Bally s.s. games from 1980. Only ever played it a handful of times at Gorleston-on-sea in the early eighties. No ideas how they got one as Bally never imported Viking to England. Designed by Jim Patla (he also designed Centaur, Elvira and the party monsters, Kiss, Mata Hari, Rolling Stones and Space Invaders amongst others. But all for Bally). With only 2600 units produced.
Planning a full minty restoration on this. Cabinet, Playfield, etc.......
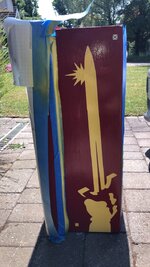
Here’s what it looks like.... notice the level of paint fade!😲
When it arrived off the back of a truck driven by a gentleman from Belgium.......
D92A8A41-65BB-4A70-B4ED-2FCEAF594F2C.jpeg

First thing I wanted to do was to get the metal trim and coin door off for polishing, as I have polishing work to do on a Vector, Flash Gordon and a Paragon so seemed sensible to do it all at once.......
Here’s what it looks like as is........ Playfield is double mylared so pretty good..... backglass is excellent 😎 See what you think of her?
Very excited about this one👊🏼B4AB7C12-79B7-4D86-9052-AA352B0ADFE5.jpegA718D72A-90A1-4436-8EB7-5C1D6E7C78CC.jpeg329FFE30-3164-42F1-8DA1-732A0368A350.jpeg0E602F1D-3A91-4078-9F8E-7850A083F989.jpegDC85F10F-A035-494F-BD07-325269C15345.jpegA0ACF469-35CB-427B-B09F-367CB22D3ACD.jpeg43075FB7-D911-4E00-BF54-AFB9625322B3.jpegC04E541A-AB18-414F-B218-3CEC15AA5C1A.jpeg96886CF0-C911-431B-8707-13FE0ACBFAA7.jpegBDC3E3C6-1628-4CB1-AC79-8E72763DF8ED.jpeg4776D9DB-CF52-4698-82AA-DD14205E1DDF.jpeg
Cabinet pretty solid inside and outside....
479A33DB-6F4B-47B9-963E-508CDBC68EB5.jpeg

Coin door looking very tired indeed!.......

8F07E32B-1422-4FE1-BF06-94FCF2A22EF4.jpeg

Possibly shooter assembly beyond rust treatment?......

68A73BA9-F950-4F5F-B518-83EA8C37200F.jpeg

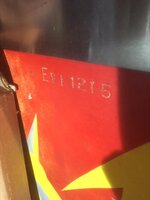
Check out the original paint with the side rails removed!.....

1BCB9975-7A55-4622-A391-B8DCCC171991.jpeg

Viking is a six digit game , we intend to do a seven digit conversion on this one!😎

AC965E1F-F9DC-402B-8DF1-AFA54C95D3CB.jpeg

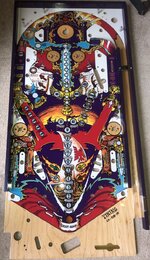
Here’s the new CPR Playfield, usual rollovers full of clearcoat!🤬

1BD717A7-CC82-41BD-96BF-C658CB62CAA2.jpeg
 
This game looks amazing! Right up my street too. What a stunner it'll be!
I would like to play it when it works please 😄

The shooter assembly isn't any worse than the one on our Centaur, it cleaned up okay but still is pitted/scratched all over from where the rust ate away at it. But I understand you can't get these anymore except sending them away to get plated?
 
Stripped and ready for sanding…….😎
@stevebm1 you are right, not supposed to have a centre post or white drop targets, they must of been replaced when reds were not available (?)…some light weight player must of added the post😆…..
A few observations from stripping it down.
1) matching serial numbers. (Noooice!).
2) The backbox is hinged and all four hinge parts are there! (Most u usual).
3) The backbox lamp board has a textured white polymer coating. (Not noticed this before, but means it should clean up well. Probably part of a bally employee’s old kitchen cupboards 🤣).
Anyway here’s some pics. Best get on and order a set of Jeff “the pimp’s” stencils. If anyone wants in on the order let me know…….👊🏼6615BBB1-528E-4D6B-A86F-7813374F38D1.jpeg84DC9447-F463-45D1-892E-C0C492864E86.jpeg9B810402-468D-4F4D-8E15-0C715B9E8F95.jpeg5B1DCDE1-555C-46AF-BF68-685D895AF553.jpeg
 
just opened my viking up as I had a flicky display that needed the connector reseating,@new forest pinball are you sure that's the right backboard for the machine?,mine is laid out different as below:

vik.jpeg
 
🤣……
Yeah sorry folks viking is the one at the back!
just opened my viking up as I had a flicky display that needed the connector reseating,@new forest pinball are you sure that's the right backboard for the machine?,mine is laid out different as below:

View attachment 199460
@stevebm1 this is our viking. Interesting that ours has the old style wood control lamp shroud not plastic like yours. Out of interest what is the serial number on your viking. Here’s some pictures actually of viking rather than paragon, for all the eagle eyed viewers.
Not sure if you can make out the vinyl type coating on the rear in the pictures?.0053939F-8C7A-4B19-BA61-435482E1D904.jpeg43F59C8A-E588-4036-98B7-63FC1CDAA167.jpeg88C581DE-CB19-422C-81E5-CA9B8439457B.jpeg
 
mine is EVI 1215 ,so I guess in theory it was made earlier down the production line than yours
 

Attachments

  • evik.jpeg
    evik.jpeg
    59.7 KB · Views: 3
Progress on ye olde viking has been progressing steadily, but just no time for loging it!😞
Cabinets and backboxs primered thanks to my tech………C70749FE-28FB-4B51-9335-737F13D85600.jpeg
Bit of a time lapse….and lots of paint later………657A3EAB-1126-40EE-9D0E-09AA5014D9E8.jpeg
Taa-daa! Cabinet near completion. Front to do…..
IMG_7345.jpeg

Backbox at 50%……..63F5271A-7B1B-47BE-AB12-B8ECDA6C71AF.jpeg

Coindoor rebuilt……..
IMG_7324.jpeg
Will try and post more regularly……
Apologies Keef…..👊🏼
 

Attachments

  • 8078D8A4-5324-4920-BFBD-BD8B5CD636A6.jpeg
    8078D8A4-5324-4920-BFBD-BD8B5CD636A6.jpeg
    117.1 KB · Views: 5
Well it’s a start!
1). Cabinet married with the backbox.
2). Pcbs installed ready for a seven digit score conversion and Need to replace the backbox instructional cards.....
3) side rails fixed....
and that’s about it so far.... slow progress but progress none the less......🙂
518E7DCE-06C7-4F63-8725-2A10EDAF2A80.jpegFACD331B-3CB6-4492-B792-D9B7CDF52F22.jpegDEDDCA96-CC13-440F-B20F-5EF635607D7A.jpeg

Here’s the new Playfield with the siderails in deep purple. Followed by a few pictures of the original Playfield.
D8B37F4B-02B1-4E06-894D-673F254C478F.jpeg6B2FD079-F6A6-43AD-A43B-8C9CC8D7B54C.jpegF76B12B6-C1E5-413A-93C4-7AABA38FDFAC.jpeg
 

Attachments

  • F228191A-50C1-42DD-A64C-24ADB7A4192E.jpeg
    F228191A-50C1-42DD-A64C-24ADB7A4192E.jpeg
    155 KB · Views: 2
Just a few small jobs done today. Re-fit of wireforms and t-nuts.
T-nuts. - we always use new t-nuts as it’s a right pain to remove the old ones and invariably the odd leg or two bend or snap.
This p/f had mostly #6 and 4 #10’s. Note with cpr you may have to shallow drill the t-nut holes (reverse side of p/f) as depending on where you purchase your t-nut from the external diameter’s do vary. Fortunately cpr drill for the smaller size Size! 😅........
53A0E03B-E956-4A7E-AEC7-B0E1AF204ADE.jpeg7663ABF0-31D6-439A-9999-FD2121E82E87.jpeg
Wireforms. - With the wireforms we use this car trim tool to remove them from the original Playfield, it makes a real easy job of it.
The hole fits snuggly around it and the plastic tabs on the rear of the tool avoid any Playfield damages.
D697BCA9-7A6E-4771-8D22-4ADD9A373707.jpegF0BE1FD2-1BE7-4BC4-9404-1B48AD894937.jpeg

Then using a small amount of metal polish give all the guiderails a quick polish, including the top Playfield guide. They are all stainless steel so come up lovely. When re-fitting the smaller wire forms be sure to just knock in one side at a time. To avoid what I call “Playfield kickback” (this is when the opposite end of the wireforms bounce on the playfield and scratch it.) just place a thick cloth under the opposite side knock it in, then you can line up the other side easily with no damage......
Like this.......907840E7-C02A-4727-8142-0BEBC90559D3.jpeg
Here they are fitted including the upper ball rail guide..... noice.......
DA2BD20E-F14C-4441-9E3E-4DAF04823413.jpeg8560CBEA-C07E-4AB4-838A-8B1D17648269.jpeg

Next up is re-fitting star rollovers in a cpr Playfield as they fill them with clearcoat! 🤦🏽‍♂️😲 ciao fer now... Keef....
 
CPR star rollovers Installation suggestion.

After you have left your cpr Playfield to cure. (We recommend a minimum of 90 days out of its box). You can install your freshly painted side rails as this keeps the playfield nice and flat. Whilst you are waiting if you want.
Be sure to carry out this procedure after the clearcoat has cured.

Now here’s the thing cpr quote the following: “New clearcoats have a habit of “bulging” over the ends of *some* of the star tip slots in the rollovers. This subtle “bulge” makes the white nylon star not snap-in properly because a tip or two won’t plunge.” this in our experience is a very understated positive viewpoint indeed! We find that all the rollovers never fit and it’s not just because of the tips! The whole insert is full of clear.
Cpr then go on to recommend the use of a dental pick to remove the clear from the tips. If you decide to follow this advice please be extremely careful and patient as it’s soooo easy to slip out of the tips and put a nice long scratch on your new Playfield.

So how do we do it. Let’s take a look at it........
0BF4CD01-3F27-4AF2-A567-4AEFB79697D4.jpeg
So here’s what it looks like full of clear coat you can even see a deposit of it near the central fitting. Clear coat needs to be carefully removed from the top centre, all 20 star sides and the centre fitting. What’s good about the tool we use is that at the same time as removing the sides of the rollover insert it also clears the tips with no risk of scratching the playfield surface. These are the two tools we employ.....
47B3AA99-F2AB-403B-8A2D-1E3F7E21F5F2.jpeg
A very small round file. And these fantastic double sided metal super thin strong edge manicure/nail files they fit in the slot perfectly. (Probably the sort of thing @VeeMonroe uses to keep her nails so beautiful? 😍)..... they come in packs of five which is handy as to make light work of things we recommend using one per insert.

Insert the file in each star point and lightly and gradually file off the clear coat, the file fits in easily. Like this. Try and keep the file level with the insert so that you achieve an even removal. Like this......
C01B9CDB-2650-47F8-AA0E-EF39FFC6D5AD.jpeg

Take it slow as you don’t need to remove that much. Regularly test for correct fitment, best to do this from the top as it’s very easy to break off one of the tabs on the back of the insert if you push it right in to test so best doing it from the front like this....
2DF892FF-F1AA-4D5D-9F03-BDDB4154B795.jpeg

Rock it from left to right and front to back , checking that every star point moves freely. One you are happy with that file lightly the central hole. (Be careful not to file the lower fitting or the insert will push up out of the playfield! And you don’t want that🤓 like this......
EB47A4D5-1EEB-4EE5-A23C-4C43BA8A4C87.jpeg
Sometimes we have found that the insert sits a bit proud of the top of the playfield, if that’s the case then you can remove any remaining clearcoat deposits from the central part of the insert with a sharp pick like this......
9D26CF0B-E31C-433A-BF8E-666BFE344CD2.jpeg
Once you are confident of a great fit, the insert should move up and down freely. When the switch is fitted underneath the playfield it will keep the star insert in the upright position..... pop it in and give it a few up and down movements it should move freely....... the finished article... hopefully some use to any p/f swappers out there.......EEDCD40B-B9D4-46AA-91CA-0F535108B6A4.jpeg
 
Ok so first up, a bit thank you to Gary @Gary Flower for sending me a NOS Bally Viking manual, it’s absolutely awesome compared to my old beaten n worn workshops copy that I guess Gary spotted whilst reading this thread. Anyways thanks again Gary! Here she is 😍........
6C246DA7-C5E7-4DF9-8E83-941BD3537F31.jpeg

So we got started on the new playfield G.I. And insert lights. To avoid crusty lamp holders (where this Viking had been in long term storage pretty much 100% of the lamp holders were crusty n rusty!). We use new lamp holders and the most excellent
“BigAlsicles” courtesy of our very own @AlanJ led bars for inserts they are fabulous! And save you an arm and a leg in lamp holders 😎
There was a fair few on Viking, so after all the holes are pre-drilled with a short drill bit to avoid going straight thru the p/f
Mount them in a similar position to the original lamp holders like this......
E4AB4ADD-1635-45E6-90D6-A9175FE88183.jpeg
Also above you can see the new g.i. Holders stapled in place. Then you can run the new strings. Mirror the old Playfield here and don’t try anything clever! Some of you more eagle 🦅. Eyed viewers may of noticed that some of the g.i. Lamps from the lower p/f guides are missing (?) this is intentional as we are trailing illuminating these from above with a double set of comet quad led post illumination leds in place of the single centre lamp. Let’s see how it looks ?..........
Below the string is in place and soldered. Also the BigAlsicles have been tinned in readiness for the control wire.
B9D68900-35CC-4379-BA6D-49807777F64C.jpegE651819C-6341-4015-90FA-D50B041CFB82.jpeg
Now here’s a thing. The single sided red Bally logo lane guides are, as far as I know completely unobtainium. So what we intend to do is convert six, yes six! Double sided guides to single sided, using a Stanley knife, folded cloth and some emery cloth. Here’s the guides.....
E9205B43-91DE-42DC-808B-27F68AE6F481.jpeg
Cut off one side on a chunk of wood or a folded cloth, I use cloth as I find it’s less slippy, and reduces movement. Like this...F784704B-C79B-4832-B0C3-9180ECFE8419.jpeg

Sand the cut side even like this....
22D94F41-FCCC-45EB-B8B7-C520C1069E74.jpeg

And here you go six single sided guides..... phew 😅........
DE5B3ECD-6AC0-428D-AC66-05F81D48A0B9.jpeg

Now on a new Playfield The devils in the details. So when you unscrew all the switches on the old Playfield take the back panels off and refurb them like this. (You can spray them any colour you fancy💥) here they are all removed.....
9461938E-AF08-4064-89B0-B27890F25C77.jpeg
Pop the blinking devils in evaporust for a few hours ...
FA2E9530-DDA5-415D-A216-5B00AF6C8A68.jpeg
Give em a rinse.....
D7D2701B-3C85-4E61-86CA-FF6BE53CEB82.jpeg

Then spray them twice.....
E9C3837F-3DA1-431E-A139-CBC2508E75F2.jpeg

And here you go... noice.....6A153852-5286-434F-8068-07583A1B0CDF.jpeg

Then the spinner. We find it best to remove all the paint and leave it naked for the new decals. (Naked spinner arms cause less friction for maximum rips!). Do it like this. Take your old spinner and put it in a bag o paint remover. Leave for about 3 / 4 hours is normally enough, like this.....3C4968FD-B032-462F-AA5A-678AB32553B0.jpeg
CFD19063-C797-4105-81D9-DA8C4EBAC7AF.jpeg

Here it is after 3 hours...
44AB88A5-9EBC-480F-B39A-B6C2295CB4A0.jpeg
Then with wire wool give it a nice scrub up and rinse with water...109C31C5-48A5-4E48-B1A8-093E9FB3CA02.jpeg

Being careful to put the decals on the right side and the right way up. Double check for this if like Viking it has a dual graphic on the spinner. And here it is...... that’s all for now folks, thanks for reading......
FD0F349C-BFD2-40B0-9B47-DB1D292DC831.jpeg7AD29FFE-3B31-414F-B670-3EF5803A1CE7.jpeg
 
Last edited:
New features and vectors.

great work,but the more I read this thread,the crappier my worn out Viking looks:(
Thanks Steve. Appreciate the feedback. Got a pretty nice p/f for you here...😉
I'll buy it! 😉
Craig, you got not chance! I must of nagged Steve so many times over the years to sell me his Viking and he never once even came close, to caving in. (It was almost like he was nag proof?)......
Looks good 👍👍
Cheers Doug, positive comments are what inspires us all to keep restoring and think of new mod ideas.

Anyway back on topic. Vectors and new features. Well you may ask what’s this all about?
Well in every Bally manual you have a most useful and excellent vector chart. This shows you and explains clearly in words what direction the designer intended the ball to travel out of any saucers, lanes, tubes etc... It really is helpful as an example I was watching a Viking stream by Tom at fox city last week and I noticed that quite often the ball went sdtm from the top saucer on the Viking they were streaming and I thought that sucks because I really wanna be ripping that spinner into the saucer. A quick look at the vector charts revealed the truth! Here it is. (This is equally as important as flipper aligning in our opinions). Take a look. This is how we will set up this Viking as per the vector drawing. 😍D4C04562-BF73-4D9F-B1D7-E79D9610573D.jpeg

Also in the manual under feature operation you get informed if one of the game features is new to the game. This also I find interesting although perhaps to some a bit geeky 🤓. There appears to be three new features in Viking according to the manual as follows.... 1) Timed spinner features. 2) 1-2-3 in order drop target feature. 3) Bi-directional saucer/kicker. Never realised this always thought it was Flash Gordon! Here you go.....
BB554450-C8D4-47EC-ABC6-CFCE07DC9746.jpeg

Been busy doing site visits mainly this week so not a lot of progress. But we did refit the screws for the pop bumper mechs.
They need to be hammered out from the old Playfield and hammered into the new Playfield. Simply just give them a good bang out of the old. Clean the heads up a bit with a sanding block or similar as they do go very black and or rusty like this......
CEBDC143-01A8-450E-BB24-C36D08FC6488.jpeg

If you’re not a great shot with the hammer and fear bashing a big dent in your nice new playfield is a possibility them just stick a bit of Velcro on your hammer like this, then you can bash with confidence....
FBA3CB0D-7858-47CF-B188-30826484E37B.jpeg

The part that holds the pop bumper body’s in place we lightly spray paint as they are fiddly to clean and if you tumble they get bunged up with media which no ones got the time for.....
3EA86DA2-6A32-42DD-82F1-DA77ACAB45BE.jpeg

The cpr pre drilled holes for the bumper body screws are normally a very good tight fit. Just hammer them in.......
DCEB6EB4-ED29-469F-9AE5-06CD3015DB73.jpeg
Ciao fer now.........
 
Back
Top Bottom