That's a very interesting documentary. Not tried these before and see, like regular plates, that they are made for different filament types. Is bed adhesion and/or warping any different/worse as I'm currently getting excellent results on my Mk4 using eSun PLA SL?
You are using an out of date browser. It may not display this or other websites correctly.
You should upgrade or use an alternative browser.
You should upgrade or use an alternative browser.
3D Printed items
- Thread starter Wayne J
- Start date
Adhesion is definitely less than from a standard textured plate, and I've found I need a brim to stop warping - but that could also be due to the model printed (similar to my bolt/ball carriers).That's a very interesting documentary. Not tried these before and see, like regular plates, that they are made for different filament types. Is bed adhesion and/or warping any different/worse as I'm currently getting excellent results on my Mk4 using eSun PLA SL?
Not sure how applying glue would impact on the holographic effect.
The fact that it can only work on the face on the bed, kind of limits its usefulness. Add in that grease from fingers also removes the effect means that its probably little more than a novelty .
On the plus side, the finer textured plate (than the Bambu original) on the other side works great. At only a tenner its worth it overall
Thanks. I'd expect glue to likely level out the surface and reduce the ability to transfer the micro indentations to the print, but only a test will find out for sure. Not a problem for me as oddly enough I've never needed to use glue sticks, hair spray and the like. Agree it seems a good novelty for the price and a feature advantage of filament over resin!Adhesion is definitely less than from a standard textured plate, and I've found I need a brim to stop warping - but that could also be due to the model printed (similar to my bolt/ball carriers).
Not sure how applying glue would impact on the holographic effect.
The fact that it can only work on the face on the bed, kind of limits its usefulness. Add in that grease from fingers also removes the effect means that its probably little more than a novelty .
On the plus side, the finer textured plate (than the Bambu original) on the other side works great. At only a tenner its worth it overall
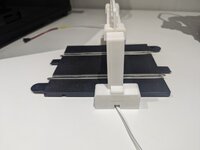
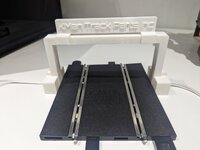
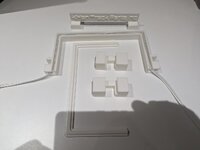
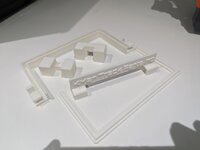
Made this prototype for a bit of design engineering practice. If you're familiar with Slot Car/Scalextric tracks, then you'll know that to overcome the effect of voltage drop on long tracks it's necessary to effectively shorten the path by running intermediate cables linking the tracks. Depending on layout, these often need to run under tracks which is a bit of a nuisance as space is very tight. This adds a feature to the circuit and is a neat way to route the cable across tracks.
Attachments
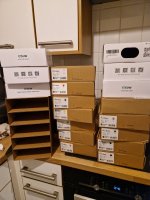
Yup, that definitely exceeds the weekly safety limit for filament unit consumption ")
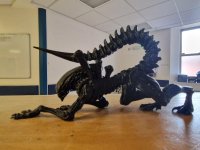
This has been BY FAR the most challenging print I have managed to succeed with.
I tried printing it on my Flashforge, but just couldn't get the supports to detach successfully.
I then tried again with the dual headed Creator Pro. After the first attempt when I got the soluble PVA and the Black PLA the wrong way round - so the supports printed in PLA and the model was soluble I tried again but it really didn't come out well.
Finally after getting my P1P Bambu I thought I'd give it another try. However after slicing it with full PVA support and model in Black PLA on highest quality settings it was showing as a 48hr print costing over £60 for a 25cm model!
I sliced again using 2nd best quality but instead using the soluble PVA, just as the interface between support and model. This came out at a 30hr print at only £25. The issue I had, despite drying the PVA in my dryer for over 8hrs was that it was still a little tacky and causing the AMS to not feed correctly, stopping the print. After 2 failed attempts like this I re-dried the PVA and gave it another go.
This time success although I had to manually loosen the PVA by spinning the spool every couple of hours, turning it in to over 40hrs printing anyway.
It might be a bit small to work as a topper (but there is a version to print larger and assemble together) , but it could be attached to the side of the backbox, so it looks likes it's climbing up the wall.
I tried printing it on my Flashforge, but just couldn't get the supports to detach successfully.
I then tried again with the dual headed Creator Pro. After the first attempt when I got the soluble PVA and the Black PLA the wrong way round - so the supports printed in PLA and the model was soluble
I tried again but it really didn't come out well.Finally after getting my P1P Bambu I thought I'd give it another try. However after slicing it with full PVA support and model in Black PLA on highest quality settings it was showing as a 48hr print costing over £60 for a 25cm model!
I sliced again using 2nd best quality but instead using the soluble PVA, just as the interface between support and model. This came out at a 30hr print at only £25. The issue I had, despite drying the PVA in my dryer for over 8hrs was that it was still a little tacky and causing the AMS to not feed correctly, stopping the print. After 2 failed attempts like this I re-dried the PVA and gave it another go.
This time success
although I had to manually loosen the PVA by spinning the spool every couple of hours, turning it in to over 40hrs printing anyway.It might be a bit small to work as a topper (but there is a version to print larger and assemble together) , but it could be attached to the side of the backbox, so it looks likes it's climbing up the wall.