What's new
Pinball info

Register a free account today to become a member! Once signed in, you'll be able to participate on this site by adding your own topics and posts, as well as connect with other members through your own private inbox!

Williams flintstones D19 always on ,20 & 21 always off (MPU LEDS)

cr5000462

Site Supporter
Joined
Apr 25, 2020
Messages
627
Location
Wrexham
Troubleshooting a Flintstones (its been years since I've done this so bare with), powers up, one beep and nothing else, so no lights on the playfield, no GI, etc etc.

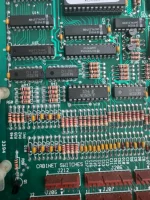
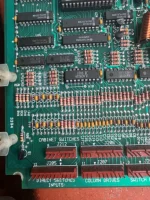
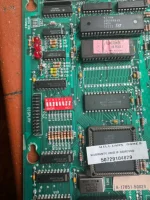
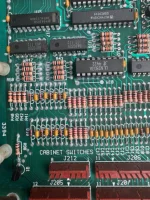
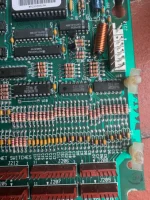
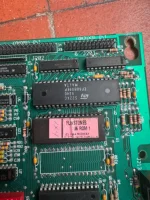
The following board lights on the MPU are as follows :
D19 is always on.
D20 is always off
and d21 is always off.

All other Led lights are on constantly on all the other boards.

I have read the following :

"D19/LED201 (blanking): at power-on should be ON for about 3 seconds (1 second on WPC-95), and then turn off and stay off. When D19/LED201 is on, the blanking circuit is disabled (and will not allow any coils to be energized).
D20/LED203 (diagnostic): After D19/LED201 turns off, D20/LED203 should stay flashing permanently while the game is turned on. This indicates the CPU is "running".
D21/LED202 (+5vdc): this LED should ALWAYS be on. It indicates the CPU has +5 volts DC power.
D21/LED202 should *always* be on, as this indicated there is +5 volts at the CPU board. The board will never run without +5 volts!"

Am I correct in thinking that by changing the board for a new one, it still wouldn't work as there is no 5v? Any advice.

Thanks
 
Do you have 5v on your power driver board? (Check the LED's)....

I cant remember now if flintstones uses WPC89 or WPC95 driver board... if WPC89 driver board then check LED4 (Tp2)... If WPC95 i think it's LED101...
 
Do you have 5v on your power driver board? (Check the LED's)....

I cant remember now if flintstones uses WPC89 or WPC95 driver board... if WPC89 driver board then check LED4 (Tp2)... If WPC95 i think it's LED101...


HI Paul,

Yes the 5V LED is constantly on on the PDB.
 
Sounds like you need to trace where you are loosing the 5v to the MPU, not massively familiar with the boardset without looking at a manual but I would start with the connectors and making sure that the 5v is actually getting to the MPU.

On CPU board - J210 Grey cables on pin 4 and 5 are the 5v from the Power driver board (J114 pins 3 and 4 on the Power Driver Board)
 
Last edited:
It may be an issue with a fault in one of the other boards bringing down the 5v to lower than the cpu board needs to run. So you should disconnect the power to other boards in the backbox leaving just the large power driver board and cpu connected and disconnect the 2 ribbon cables at the top of the cpu board and then see if it the cpu board boots up OK.
 
Sounds like you need to trace where you are loosing the 5v to the MPU, not massively familiar with the boardset without looking at a manual but I would start with the connectors and making sure that the 5v is actually getting to the MPU.

On CPU board - J210 Grey cables on pin 4 and 5 are the 5v from the Power driver board (J114 pins 3 and 4 on the Power Driver Board)
Could you please give me a quick run through to confirm this
 
With all cables disconnected except j210 on the mpu,
J114, and j101 on the power board
Which I assume isolates just the power to mpu the led fault lights are the same


There appears to be small amount of corrosion on the MPu so I suspect it’s that, not much or what I thought would have initially been the problem
 

Attachments

  • IMG_0003.webp
    IMG_0003.webp
    132.3 KB · Views: 29
  • IMG_0004.webp
    IMG_0004.webp
    121.8 KB · Views: 22
  • IMG_0005.webp
    IMG_0005.webp
    121.6 KB · Views: 19
  • IMG_0006.webp
    IMG_0006.webp
    122.5 KB · Views: 18
  • IMG_0008.webp
    IMG_0008.webp
    130 KB · Views: 18
  • IMG_0009.webp
    IMG_0009.webp
    129.7 KB · Views: 17
  • IMG_0010.webp
    IMG_0010.webp
    116 KB · Views: 16
  • IMG_0011.webp
    IMG_0011.webp
    105.6 KB · Views: 17
  • IMG_0012.webp
    IMG_0012.webp
    118.3 KB · Views: 16
  • IMG_0014.webp
    IMG_0014.webp
    119.8 KB · Views: 16
  • IMG_0015.webp
    IMG_0015.webp
    113.3 KB · Views: 19
  • IMG_0013.webp
    IMG_0013.webp
    125.6 KB · Views: 29
The corrosion in the pics doesn't look too bad. I have seen boards boot with a lot worse. If you gave a dmm you should be checking the 5v and trace it through from power driver to cpu as @Fantazia2 states.

Set dmm to 20v dc setting. Black lead on ground and probe at connectors fantazia2 states.
 
U15, u16 and u17 have certainly seen better days plus a nice bit of green on the leg of R39.

Looks more like water (condensation?) corrosion than battery corrosion, which could have potentially caused short(s)/arching between ic legs and the affected ic's pulling down the 5v line... or blown a 5v (or 5v derived) fuse. Silly question but have the fuses been checked?
 
Sounds like you need to trace where you are loosing the 5v to the MPU, not massively familiar with the boardset without looking at a manual but I would start with the connectors and making sure that the 5v is actually getting to the MPU.

On CPU board - J210 Grey cables on pin 4 and 5 are the 5v from the Power driver board (J114 pins 3 and 4 on the Power Driver Board)
On tp2 on the power board I have 4.97

On j210 and j114 I also have 4.97.

To test this I set my meter at 20v dc. Black onto the earth strap and then the red to test the pins.

So I assume from these results that I am getting the 5v to the MPU and it’s something on the mpu that has gone bad?
 
Looking closely at picture No.13 (showing the program Rom and processor chips), their sockets seem to have some pins looking green. Given that you'd probably need to transfer at least the Rom (U6) and Pic (U22) chips to a different board in any case, you could try removing and re-inserting the socketed 'normal' chips, but not the square Asic/Custom chip. This may cure poor contact, but a proper remedy, replacing the sockets, isn't something to undertake lightly.
 
Back
Top Bottom