What's new
Pinball info

Register a free account today to become a member! Once signed in, you'll be able to participate on this site by adding your own topics and posts, as well as connect with other members through your own private inbox!

Williams CPU repair

ronnie63

Site Supporter
Joined
Jun 8, 2015
Messages
2,215
Location
Scotland
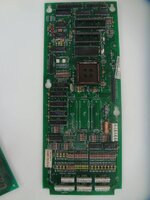
Thought I would post this, got 2 acid damaged wms cpu boards from Keith (new Forrest Pinball) Cheers Keeth!

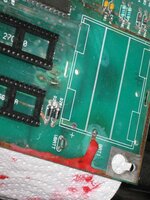
I picked what looked the least damaged but upon removing U16 LM339 most of the tracks were damaged! So I put that one to the side for now!

On to the worst looking one! Surprisingly only one track was broken under U16 but I also had to remove U20 as it was furry! these chips are cheap below the battery so I will replace those 2 and possibly another LM399 along with some of the resistors. I intend to buy some solder resist to cover the cleaned tracks, it's expensive stuff! about 4 quid for a small syringe! I have plenty cpu chips spare I might also remove the ram and fit nvram whilst I'm at it.

The only expensive bit is the PLCC chip they seem to be about 40 quid! Everyone who gets shot of damaged boards take these out along with the cpu, so someone MUST have a stash of these?

This will be kept as a spare I suppose, I'm not in need of it at the moment.DSC05756.JPGDSC05757.JPG
 
On another note I had another cpu board that was in my popeye when I bought it, It had minor green below the batteries and as the batteries were dud and green none of the door switches would work to press escape etc.

I had a quick check of that also and found one open track to U16 pin 1 . U16 is related to the non matrix switches so hoping that's all that's wrong with that cpu in which case I will have 2 spares
 
I intend to buy some solder resist to cover the cleaned tracks, it's expensive stuff! about 4 quid for a small syringe!
If it's that UV-cure solder mask stuff, then you really don't need much at all, once it cures it's rock solid even very thin. The best way to apply it over a small area is to take some transparency film and squash down a bead of the stuff, then cure the mask through the film. One syringe goes a LONG way and it's cheap for the price. It's also a fantastic way to make tiny jumper wires that are (relatively) easy to solder - tin one side of your wire and attach with soldering iron, then drop on some UV solder mask, cure it fully, then you'll be able to solder the other side of the jumper wire where you want it to go without de-soldering the other side. Solder-mask the freshly-attached other side and hey presto, broken trace repair in a nutshell.


In the bad news though, nope, nobody has a stash of those custom Williams ASIC PLCC chips! There's less of those spare than there should be as those chips have been replaced when damaged, or needlessly replaced during bad fault diagnosis...

Thanks I bought this one https://www.ebay.co.uk/itm/Mechanic...var=562234127342&_trksid=p2060353.m2749.l2649

Thinking it would come with a needle! So it can not be applied with a small art brush? What about the ic holes having solder mask on them does not seem good to me?

Thanks Ronnie
 
Thinking it would come with a needle! So it can not be applied with a small art brush? What about the ic holes having solder mask on them does not seem good to me?
The ones I got came with needle attachments but they didn't come with plungers, which sucked.

Regarding IC holes, if you are going to do a huge board area like that and you don't want to cover up pads or IC holes, just get your permanent marker out and scribble over them on the transparency film. Masking them off from the UV light means they won't cure and that the covered parts will wash right off
Same no plunger either.

Right thanks that helps just don't want to make a pigs ear of it! I guess daylight will cure the stuff? Transparency film is that special stuff or can I use laminating pouches?

I would rather paint it on if that was possible?

Thanks Ronnie
 
Same no plunger either.

Right thanks that helps just don't want to make a pigs ear of it! I guess daylight will cure the stuff? Transparency film is that special stuff or can I use laminating pouches?

I would rather paint it on if that was possible?

Thanks Ronnie
Daylight would do it yeah, at the cost of potentially having bugs etc. land on it.

Transparency film (basically just the stuff that we all used to endure shown to us on overhead projectors at school) lets UV light through and is slippery enough to fully detach when the soldermask is fully cured - and you can draw on it to mask off areas - other than that it's not special in any way. Laminating pouches might work, just give it a go on a test area or a scrap board, you'll find out easily.

You CAN paint it on but you'll have to sacrifice the nice, uniform appearance that you would get by flattening out a bead. It will go on and cure on like blobby crap and there's not much you can do about that - and if you leave it thick it will take a good long time to cure, especially if you're just using daylight - BUT it will work and will cure hard as nails all the same.

Here's a blobbed-on, cured bit of red solder mask I was testing out on a very, very poorly Sega Whitestar board I'm repairing... I'm actually having trouble taking this back off again!

89166
 
I've some repairs to do, covering exposed traces, etc. I was going to give fibreglass resin a go (as I've got some over the garage). Dries tough and that's what the boards are made out of anyway. Not the matting, just the resin. In theory a touch of green gel-coat would tint it about the right colour too...
I wouldn't bother, personally. The solder-mask cures rock solid to the point where you can use it for structural reinforcement. Like I suggested before, I use it as a glue for attaching magnet-wire to the board for trace repair. The colour and partial transparency is also absolutely spot-on if you bead-and-film it. This stuff is the absolute tits.
 
Daylight would do it yeah, at the cost of potentially having bugs etc. land on it.

Transparency film (basically just the stuff that we all used to endure shown to us on overhead projectors at school) lets UV light through and is slippery enough to fully detach when the soldermask is fully cured - and you can draw on it to mask off areas - other than that it's not special in any way. Laminating pouches might work, just give it a go on a test area or a scrap board, you'll find out easily.

You CAN paint it on but you'll have to sacrifice the nice, uniform appearance that you would get by flattening out a bead. It will go on and cure on like blobby crap and there's not much you can do about that - and if you leave it thick it will take a good long time to cure, especially if you're just using daylight - BUT it will work and will cure hard as nails all the same.

Here's a blobbed-on, cured bit of red solder mask I was testing out on a very, very poorly Sega Whitestar board I'm repairing... I'm actually having trouble taking this back off again!

View attachment 89166


Ah Whitestar! I feel your pain, I done one too and it was a pig to get stable I had to replace the 2 ribbon headers and all the caps and resistors below the cpu right to the bottom of the board to get at damaged traces, But I never covered the repairs on that!
 
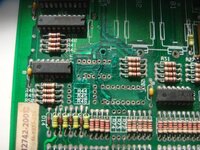
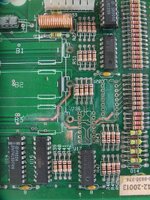
Right so I cleaned up the damaged area with my fiber pencil removed a few suspect resistors! I decided to brush on the mask with a fine art brush! Maybe not as neat as using transparency film but protection is more important to me. I found another open track I repaired them using kynar wire so no jumper wires I hate those! You should be able to make out the repairs in the pic?

DSC05773.JPG
 
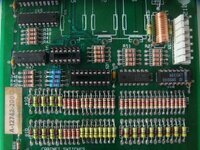
And new with the new sockets and resistors fitted, just waiting on some new LM339's arriving

DSC05778.JPGDSC05778.JPG
 
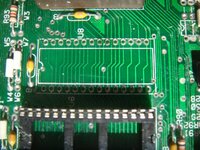
Ram chip removed, waiting on some 28 pin sockets. Plan on fitting nvram or ramtron to all my pins, no more batteries! I already have ramtron in my xfiles and it has been no problem, a cheaper option than nvram

DSC05774.JPG
 
That's actually looking pretty damn good for a brushed-on repair.

Also, top marks for Correct Trace Repairtm with the enamel wire. Great stuff!
 
That's actually looking pretty damn good for a brushed-on repair.

Also, top marks for Correct Trace Repairtm with the enamel wire. Great stuff!

Thanks for your comments, that means a lot to me. Some people may not think it's worth the effort but if this works it will be standing me 30 quid including the Asic chip (thanks Nev)
 
Back
Top Bottom