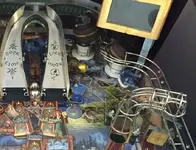
Thought I'd post this here in case any other standard Hobbit owners found it interesting. I picked up a lovely standard Hobbit a few months ago, but there was a couple of things I liked in the other editions that I wanted to add. The first was the axe slingshots, very easy to do, order the left and right slingshot kicker assembly, axes decal set, slighshot plastics, all from pinball life. But I also wanted to add the pop bumper sculptures that are on the non standard editions. The standard edition looks like this :

Non standard, like this :

In theory, also quite easy, you can order the below from pinball life :
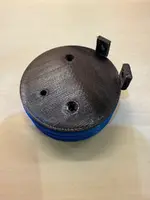
So, off to PinballInfo, 3D printing thread, and enter Kiran @Kman who generously offered his time, materials and kit to help me print something. I sent him the sculptures, the pop bumper assemblies and as many photos as I could to show how they mounted and which way they faced (thx to a couple of people on Pinside for sending me extra shots). He used his 3D magic to create 2 X baseplates for me, getting the sizing right, and the positioning for the holes in the centre and the tabs that hold the sculptures in the right place.
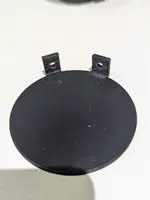
Kiran and I agreed that as standard, there was quite a lot of space between the bumper ring and the mountain plate (caused by the hex spacers), so we thought it might be a nice idea to create a skirt for the bottom to hide that space. Kiran created that in blue, as thats the predominent colour for that area of the playfield. We had a couple of goes at it to get it right, a couple of fails along the way as I underestimated measurements, lots of back and forth in the post, but end result is I know have the barrels sculptures on my Hobbit ! I've got one with the skirt, one without, just to see which I prefer. The empty space isn't that noticeable, but I do like the blue. I might find a local artist to paint some white water to it.

Huge thanks to Kiran for his time, patience, kit and suppliers, and the strength to read several pages of messages from me")
Non standard, like this :
In theory, also quite easy, you can order the below from pinball life :
- The two barrel sculptures (SKU: 32-000025-00 and SKU: 32-000026-00)
- The 'pop bumper ring and rod assembly with hex spacers' (SKU 11-005004-00, although I think you could get away with just ordering the hex spacers to fit on the exiting rod assembly).
So, off to PinballInfo, 3D printing thread, and enter Kiran @Kman who generously offered his time, materials and kit to help me print something. I sent him the sculptures, the pop bumper assemblies and as many photos as I could to show how they mounted and which way they faced (thx to a couple of people on Pinside for sending me extra shots). He used his 3D magic to create 2 X baseplates for me, getting the sizing right, and the positioning for the holes in the centre and the tabs that hold the sculptures in the right place.
Kiran and I agreed that as standard, there was quite a lot of space between the bumper ring and the mountain plate (caused by the hex spacers), so we thought it might be a nice idea to create a skirt for the bottom to hide that space. Kiran created that in blue, as thats the predominent colour for that area of the playfield. We had a couple of goes at it to get it right, a couple of fails along the way as I underestimated measurements, lots of back and forth in the post, but end result is I know have the barrels sculptures on my Hobbit ! I've got one with the skirt, one without, just to see which I prefer. The empty space isn't that noticeable, but I do like the blue. I might find a local artist to paint some white water to it.
Huge thanks to Kiran for his time, patience, kit and suppliers, and the strength to read several pages of messages from me