Transporting a Pinball Machine is not very difficult. But you will need a vehicle that has enough room - a Van, Ute, SUV, Truck, Wagon, or even a trailer (towed behind a car) will be fine.
Thankfully, the head box can be either removed or folded down, and the legs can also be removed. Which makes transporting a pinball much easier!
The average pinball dimensions are: 76cm (30") wide, 190cm to 200cm (76" to 80") tall, and 140cm (56") deep. Folded up it is: 76cm (30") wide, 76cm (30") tall, and 140cm (56") deep.
The average pinball weight is: 113.5 Kg to 136 Kg (250 pounds to 300 pounds).
So, on to how to prepare the pinball for transport...
[h=2]Folding down (or removing) the Head Box[/h]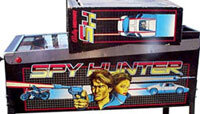
The majority of modern pinballs (made in the last 20 years or so) have a hinge system which allows the head box to be folded down. Different manufacturers approached this in different ways, and these systems have changed over time to make it easier.
The early pinball machines had their head boxes bolted on, using either 2 or 4 bolts. All Electro-Mechanical Pinballs use this system, along with the early Solid State ones.
Later machines have hinges, and use a latching system to keep the head box upright. There may also be 2 bolts inside as added safety, in case the latch is broken or accidently un-latched.
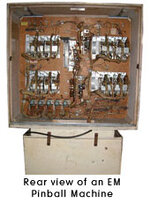
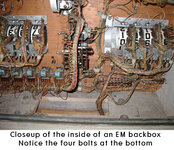
[h=3]Electro-Mechanical Pinballs[/h]For Electro-Mechanical Pinballs, you need to remove the head box rear access panel to gain access to the bolts and plugs inside. Usually this panel has a lock on it to keep it in place, but over time the key may have been lost. Quite often, there is a screw keeping this panel in place.
Once inside, remove the bolts, and unplug the large connectors that have wiring going down into the machine. You may want to label these connectors to put them back in the right spot, but they should be different sizes, making it difficult to plug back incorrectly.
You can now either remove the head box completely, or fold the head box down onto the playfield glass. Make sure you use some foam, heavy cardboard, or blankets to protect the headbox from rubbing on the cabinet. Foam is best, as it will also help keep the back glass in place.
[h=3]Early Solid State Pinballs[/h]
For early Solid State Pinballs, you will need to remove the back glass. There is a lock located on the head box in one of 3 locations - left-hand side at the top, right-hand side at the top, or on top of the head box in the centre.
Once unlocked, remove the back glass by lifting it up using the lift channel (at the bottom of the glass) and then pull it out from the bottom. Put the glass in a safe place, as it will most likely be a painted glass, and very hard to replace.
Then, open up the back box lamp panel by lifting the latch located on either the left-hand side or right-hand side. The panel can now swing out towards you, and give you access to the circuit boards, plugs, and the bolts. (Some Gottlieb pinballs require you to lift up the lamp panel in order to swing it open)
Now that you are inside, you can remove the bolts, and any plugs that have wires going down into the machine. You may want to label these plugs to put them back in the right spot, but they should be different sizes and keyed differently, making it difficult (but not impossible) to plug them back in the wrong spot. You may not need to remove the plugs, as the wiring should be long enough to allow the head box to be folded down. You may need to remove some "P" clips for this to happen though.
At this point, you can lock up the lamp panel and replace the back glass.
You can now either remove the head box completely (if the plugs have been removed), or fold the head box down onto the playfield glass. Make sure you use some foam, heavy cardboard, or blankets to protect the headbox from rubbing on the cabinet. Foam is best, as it will also help keep the back glass in place.
For more detailed pictures and instructions, visit our "Opening a Pinball" page.
[h=3]Modern Solid State Pinballs[/h]
Modern Solid State Pinballs use a couple of ways to keep the head box in place. For Data East, Sega, and Stern pinballs, there is a turnable latch system located at the back of the head box. Using the supplied large allen key, turn the latch 90° counter-clockwise.
For Williams, Bally and Gottlieb, you can easily unlatch the back box at the back of the machine. This is a simple setup and requires no tools.
If you can now fold down the head box onto the cabinet, you're done. Make sure you use some foam, heavy cardboard, or blankets to protect the headbox from rubbing on the cabinet. Foam is best, as it will also help keep the back glass in place.
If you can not fold the head box down, then you need to get inside. There is a lock located at the top of the back glass in the centre. Use the supplied key to unlock, and remove the back glass by lifting it up from the bottom, and then pulling it out from the bottom.
Next, you will need to remove the display panel. You can do this by lifting it up and out. And finally, open the lamp panel. There will be a latch located on either the right-hand or left-hand side. (Some newer Williams and Bally pinballs do not have a seperate lamp panel, it is part of the back glass panel. And later Sega and Stern pinballs use a fluorescent tube for the back glass lighting)
Remove the two bolts, put the back box back together, and fold down the head box onto the cabinet. Make sure you use some foam, heavy cardboard, or blankets to protect the headbox from rubbing on the cabinet. Foam is best, as it will also help keep the back glass in place.
[h=2]Removing the legs[/h]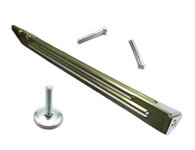
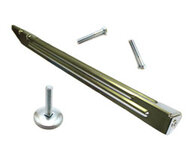
Pinball Machine legs are held in place by 8 bolts. They will be either 5/8 inch or 9/16 inch heads. The modern pinballs have captive nuts or threaded plates inside for the bolts to screw into. These bolts can be removed, and the legs will come off.
But these captive nuts and threaded plates can be damaged, and the use of extra nuts may have been required. If this is the case, you will need to open up the front door of the pinball, slide out the playfield glass, and lift up the playfield.
With the front door (coin door) open, move the lock down bar latch across and remove the lock down bar. Then slide out the playfield glass, and put in a safe place. Next, lift up the playfield by placing your hand where the ball drains, and lift the playfield up.
You should now have access to any nuts that may have been used.
Once any nuts have been removed, replace the playfield glass and lock down bar, and lock the front door.
Be sure to mark or remember which legs are for the front and back, as they will be adjusted differently to suit. Typically, the back legs will have their leg levellers screwed almost all the way down, while the front legs will be screwed all the way up. The back legs are always longer than the front legs (Except for most Sega pinballs - front and back are the same height).
[h=2]Loading the Pinball[/h]You are now ready to transport your pinball machine. Before you load it, make sure you remove the balls so they don't bounce around during transport.
If you are moving the pinball using a Van, SUV, Ute or Wagon, then it may be easier to remove the legs just prior to loading the machine. Grab a friend to help and have one of you supporting the pinball, while the other removes the front legs. Slide the machine in, and then remove the back legs. It is much easier to load the machine front first.
Make sure you strap the pinball in, as you do not want it moving if you have to stop suddenly!
Now that it's all loaded, you can get on your way... Safe travels!!
Thankfully, the head box can be either removed or folded down, and the legs can also be removed. Which makes transporting a pinball much easier!
The average pinball dimensions are: 76cm (30") wide, 190cm to 200cm (76" to 80") tall, and 140cm (56") deep. Folded up it is: 76cm (30") wide, 76cm (30") tall, and 140cm (56") deep.
The average pinball weight is: 113.5 Kg to 136 Kg (250 pounds to 300 pounds).
So, on to how to prepare the pinball for transport...
[h=2]Folding down (or removing) the Head Box[/h]

The majority of modern pinballs (made in the last 20 years or so) have a hinge system which allows the head box to be folded down. Different manufacturers approached this in different ways, and these systems have changed over time to make it easier.
The early pinball machines had their head boxes bolted on, using either 2 or 4 bolts. All Electro-Mechanical Pinballs use this system, along with the early Solid State ones.
Later machines have hinges, and use a latching system to keep the head box upright. There may also be 2 bolts inside as added safety, in case the latch is broken or accidently un-latched.
[h=3]Electro-Mechanical Pinballs[/h]For Electro-Mechanical Pinballs, you need to remove the head box rear access panel to gain access to the bolts and plugs inside. Usually this panel has a lock on it to keep it in place, but over time the key may have been lost. Quite often, there is a screw keeping this panel in place.
Once inside, remove the bolts, and unplug the large connectors that have wiring going down into the machine. You may want to label these connectors to put them back in the right spot, but they should be different sizes, making it difficult to plug back incorrectly.
You can now either remove the head box completely, or fold the head box down onto the playfield glass. Make sure you use some foam, heavy cardboard, or blankets to protect the headbox from rubbing on the cabinet. Foam is best, as it will also help keep the back glass in place.


[h=3]Early Solid State Pinballs[/h]

For early Solid State Pinballs, you will need to remove the back glass. There is a lock located on the head box in one of 3 locations - left-hand side at the top, right-hand side at the top, or on top of the head box in the centre.
Once unlocked, remove the back glass by lifting it up using the lift channel (at the bottom of the glass) and then pull it out from the bottom. Put the glass in a safe place, as it will most likely be a painted glass, and very hard to replace.
Then, open up the back box lamp panel by lifting the latch located on either the left-hand side or right-hand side. The panel can now swing out towards you, and give you access to the circuit boards, plugs, and the bolts. (Some Gottlieb pinballs require you to lift up the lamp panel in order to swing it open)
Now that you are inside, you can remove the bolts, and any plugs that have wires going down into the machine. You may want to label these plugs to put them back in the right spot, but they should be different sizes and keyed differently, making it difficult (but not impossible) to plug them back in the wrong spot. You may not need to remove the plugs, as the wiring should be long enough to allow the head box to be folded down. You may need to remove some "P" clips for this to happen though.
At this point, you can lock up the lamp panel and replace the back glass.
You can now either remove the head box completely (if the plugs have been removed), or fold the head box down onto the playfield glass. Make sure you use some foam, heavy cardboard, or blankets to protect the headbox from rubbing on the cabinet. Foam is best, as it will also help keep the back glass in place.
For more detailed pictures and instructions, visit our "Opening a Pinball" page.
[h=3]Modern Solid State Pinballs[/h]

Modern Solid State Pinballs use a couple of ways to keep the head box in place. For Data East, Sega, and Stern pinballs, there is a turnable latch system located at the back of the head box. Using the supplied large allen key, turn the latch 90° counter-clockwise.
For Williams, Bally and Gottlieb, you can easily unlatch the back box at the back of the machine. This is a simple setup and requires no tools.
If you can now fold down the head box onto the cabinet, you're done. Make sure you use some foam, heavy cardboard, or blankets to protect the headbox from rubbing on the cabinet. Foam is best, as it will also help keep the back glass in place.
If you can not fold the head box down, then you need to get inside. There is a lock located at the top of the back glass in the centre. Use the supplied key to unlock, and remove the back glass by lifting it up from the bottom, and then pulling it out from the bottom.
Next, you will need to remove the display panel. You can do this by lifting it up and out. And finally, open the lamp panel. There will be a latch located on either the right-hand or left-hand side. (Some newer Williams and Bally pinballs do not have a seperate lamp panel, it is part of the back glass panel. And later Sega and Stern pinballs use a fluorescent tube for the back glass lighting)
Remove the two bolts, put the back box back together, and fold down the head box onto the cabinet. Make sure you use some foam, heavy cardboard, or blankets to protect the headbox from rubbing on the cabinet. Foam is best, as it will also help keep the back glass in place.
[h=2]Removing the legs[/h]

Pinball Machine legs are held in place by 8 bolts. They will be either 5/8 inch or 9/16 inch heads. The modern pinballs have captive nuts or threaded plates inside for the bolts to screw into. These bolts can be removed, and the legs will come off.
But these captive nuts and threaded plates can be damaged, and the use of extra nuts may have been required. If this is the case, you will need to open up the front door of the pinball, slide out the playfield glass, and lift up the playfield.
With the front door (coin door) open, move the lock down bar latch across and remove the lock down bar. Then slide out the playfield glass, and put in a safe place. Next, lift up the playfield by placing your hand where the ball drains, and lift the playfield up.
You should now have access to any nuts that may have been used.
Once any nuts have been removed, replace the playfield glass and lock down bar, and lock the front door.
Be sure to mark or remember which legs are for the front and back, as they will be adjusted differently to suit. Typically, the back legs will have their leg levellers screwed almost all the way down, while the front legs will be screwed all the way up. The back legs are always longer than the front legs (Except for most Sega pinballs - front and back are the same height).
[h=2]Loading the Pinball[/h]You are now ready to transport your pinball machine. Before you load it, make sure you remove the balls so they don't bounce around during transport.
If you are moving the pinball using a Van, SUV, Ute or Wagon, then it may be easier to remove the legs just prior to loading the machine. Grab a friend to help and have one of you supporting the pinball, while the other removes the front legs. Slide the machine in, and then remove the back legs. It is much easier to load the machine front first.
Make sure you strap the pinball in, as you do not want it moving if you have to stop suddenly!
Now that it's all loaded, you can get on your way... Safe travels!!

