What's new
Pinball info

Register a free account today to become a member! Once signed in, you'll be able to participate on this site by adding your own topics and posts, as well as connect with other members through your own private inbox!

Complete Taxi for Pavlov!

Mfresh

Site Supporter
Joined
Oct 7, 2012
Messages
2,204
Location
Marlow on Thames, Bucks
Alias
Paul
So at some point early this year I took delivery of a fully functioning but definately player's condition Taxi from @Jsyjamie in Jersey. Jamie originally intended to restore it himself, I believe, so it came supplied with new ramps and a hardtop.

IMG_4062.jpg

As you can see it was pretty dirty, with plenty of mylar patches stuck to the playfield, and the usual insert damage, a few lifted inserts, and some moderate wear to the playfield

IMG_4385.jpg

IMG_4085.jpg

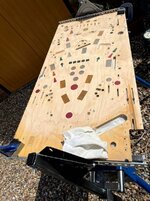
I'd never done a hartop installation before, but basically it involves stripping the playfield, removing the mylar and glue, taking it out of the cabinet, and sanding everything off - all the paintwork, and all the raised portions of the inserts.
 
Last edited:
I decided to take the playfield out first, and start stripping it in the spare bedroom. Progress was quick at first

IMG_4258.jpg

and after struggling with getting all the posts out I figured that it would be a lot easier with a rotisserie so I got a few parts from Amazon and the local forge and was up and running with a cheap and cheerful one for about £100 in total.


IMG_4660.jpg

Next up was getting all the rest off, and then lifting the main mylar sheet that covered all of the middle of the playfield. It took some of the decals off the inserts and was pretty filthy, but since all the artwork was coming off anyway it didn't matter.

IMG_4920.jpg
 
So time to move the new rotisserie outside, and deploy the cheap and cheerful orbital sander I got off Amazon for about £40. I should say before that I spent a long time with adhesive remover getting all the glue off the playfield from the mylar, but in retrospect I wonder if that was a waste of time as I could probably have just sanded it off.

Anyway, on to the sanding. I started with this:

IMG_5188.jpg

which after an hour or so became this

IMG_5189.jpg

and after a few more hours going through 80, 120, 240 and so on up to about 1200 sandpaper, it became this

IMG_5190.jpg

It's quite addictive really sanding the filthy playfield and watching it get cleaner and smoother and shinier, but eventually I had to say enough is enough before I sanded the whole damn thing away to nothing.
The biggest thing I had to watch for was that no matter how finely I sanded the inserts, they were still quite foggy if you hold a light underneath them. But I picked up a tip on YouTube to give them a good rub down with Novus after sanding, and even though the Novus is maybe grittier than 1200 grit it made them much more clear, and much more light came through them after that.

Next up, getting the hard top down...
 

Attachments

  • IMG_5190.jpg
    IMG_5190.jpg
    82.3 KB · Views: 11
Great trick on the inserts I had wondered that myself after sanding (I'm about to redo some fishtales inserts). Will give that a try.
 
I watched quite a lot of videos on YouTube about installing a hard top, and the key seemed to be to make sure that the playfield was dustfree, so blow with a compressor and wipe with a tack cloth, and then line it up right. Basically the adhesive on the hardtop is to strong that once you lay the hardtop on the playfield it wont come off again ever, so you only get one chance at getting it right. I figured the best way was to spend some time aligning the hardtop on the playfield so that the largest holes (for drop targets, the Drac catapult, etc) line up and, most importantly, the decals on the hardtop line up with the inserts, and then clamp one end down hard so that it can't shift.

There are hundreds of small holes on the hardtop for posts and screws and these don't all align perfectly with the holes on the playfield, but that doesn't matter as long as the big holes line and the decals/inserts line up. Then it's a nerve racking matter of removing the backing from the end that isnt clamped to about half way down the playfield, tearing it off, giving a final wipe with a tack cloth and then laying the hardtop onto the playfield and hoping for the best. Once that side is down you can remove the clamps from the other end as the hardtop can no longer become misaligned, and then stick the rest down.

IMG_5224.jpg

What you end up with is a thing of beauty!

finished.jpg


You can see that some of the small holes don't line up, but the solution to that is simple: go over the whole playfield with a soldering iron, and burn new or larger holes in the hardtop that align with the playfield holes. That took about half an hour and made life much easier when it came to repopulating the playfield.

Next up, new decals for the cabinet...
 
Nice one Paul. You know it’s my fave. Best game ever in the whole world ever in The world ever.
Can’t wait to get mine back set up after 2.5 years of being tombstoned
 
So, cabinet. Head off, side rails and all the stuff inside the cab out. Then sanding. Lots of sanding. I decided to go with Radcals, which don't need a perfectly smooth finish, but once you get started its impossible to stop. Thanks to @new forest pinball for pointing me at the right colour yellow paint.

IMG_5300.jpg

IMG_5324.jpg

IMG_5497.jpg

Once the painting was done, and it took about four cans of spray paint, it was time to fill the cabinet up again

IMG_5683.jpg

and then apply the Radcals. Applying Radcals is very easy - basically the same principal as applying a hartop

IMG_5664.jpg
 
Last edited:
I decided that since taxis are yellow and black, it doesn't make much sense to have silver siderails and bolts, so the legs, siderails and coin door went to the powder coaters in High Wycombe to get sprayed black. High Wycombe has everything...

IMG_5591.jpg

It came back... black

IMG_6075.jpg

Plus I invented the Pavlov bolt holder for spraying the ends of bolts black

IMG_5818.jpg
 
Basically we're there now. I've missed quite a lot of stuff out like changing the bulbs, adding leg protectors, trimming the radcals etc etc, and buying a new set of plastics, new pops, new star posts etc and decals for the drop targets, and we now have this:

IMG_5994.jpg

followed by this:

IMG_6076.jpg
 
Last edited:
Once the playfield was populated and in there was a bit of snagging - one of the pops didn't work (it works now, but not in test mode) and the flap didn't rise to allow the Gorbie shot to go into the saucer, but that was fixed with a new spring. Other than that, the machines was fully working and good to be moved back from the garage into Pavlov Towers:
IMG_6386.jpg

IMG_6387.jpg

IMG_6393.jpg

IMG_6390.jpg

Just need to realign that right flipper which has drifted down a bit, but the game is freeking awesome. @Spandangler is not wrong - this is one hell of a game. I can't stop playing it at the moment. You can see quite a few ideas that ended up in Fish Tales a few years later, but I think I perfer Taxi.

Thanks for reading!
 
Looks ace Paul. Always wanted a taxi but all the opportunities I've had was bad timing. Never even played one in the flesh, but given my love of sys 11s I just know I'll love it too.

Giving the flipper shaft a bit of a sand first helps the flipper grabby bit grab more.
 
Last edited:
Awesome job @Mfresh the black powder coating suits it.

I will be starting my Taxi cab refurb soon, how did you find removing the side rails any tips? I've had mixed results removing the later Williams ones.

Thanks
Chris
 
Do you see Diner as a link between Taxi and Fish Tales?
That hadn;t really occured to me. Taxi and Diner are very similar in that you have to collect 5 people or service diners, and then go for a jackpot. But Taxi and Fish Tales both have crossover ramps and you can alternate the ramps to build up to something, which Diner doesn't.
 
Awesome job @Mfresh the black powder coating suits it.

I will be starting my Taxi cab refurb soon, how did you find removing the side rails any tips? I've had mixed results removing the later Williams ones.

Thanks
Chris
Getting the side rails off was pretty easy. Undo one screw (or maybe it was two) holding them on, and then hammer a filler knife under the rail all the way along the side of the cab to break the sticky seal, and the rail drops off. A couple of minutes each side. Good luck with your refurb, and do show us some pix!
 
Excellent work. Glad to see the finished product after picking up the Stranger Things.

I know who to contact for refurb advice!

Scott
 
Back
Top Bottom