Following my ramblings in the speaker lights thread, some people have expressed interest in getting info out of the game. I've found a way that doesn't involve fiddly code injection, and am sharing it in the hope that it's useful to our community.
Legal disclaimer: not endorsed by Stern, you will void your warranty, proceed at your own risk, ymmv, etc.
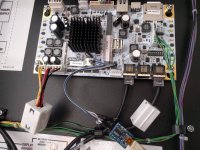
Credit: I have to give credit to the guys at Mission Pinball Framework who have not only done a lot of hard work here, but also written excellent documentation, which definitely saved me some time along the way. This page is the interesting one for our purposes. Note the photo on there shows an older spike boardset -- on mine the CN2 connector is placed closer to the center, next to the main daughtercard connector (see attached photo).
I'll share examples of the menu in the next post in this thread. Please share examples from other titles if you can!
By default the debug menu isn't wired to any console (tty), so it is effectively disabled.
To access it, we need to do 2 things:
Whichever way you choose to go for, you'll need a(nother) USB-to-serial device to interact with the console port. Unless you hook it up to something like a ESP32's UART of course.
Once you've got this, navigate to the 352MB partition (it's the rootfs) and edit this file:
changing both lines to point to
If you went with option 2 above (USB-to-serial device), then make it
Note the version number (2_0_18) may be different, and there may be other spk package versions present. Most likely you want the highest number. If in doubt just edit all the files!
As mentioned I went with option 1, so my file contents are now:
When the game boots, you will get a few warnings on the output (of course) and then nothing.
Press any letter then ENTER -- you should be greeted by the menu's help text. I'll put an example transcript in the next post.
")
Legal disclaimer: not endorsed by Stern, you will void your warranty, proceed at your own risk, ymmv, etc.
Credit: I have to give credit to the guys at Mission Pinball Framework who have not only done a lot of hard work here, but also written excellent documentation, which definitely saved me some time along the way. This page is the interesting one for our purposes. Note the photo on there shows an older spike boardset -- on mine the CN2 connector is placed closer to the center, next to the main daughtercard connector (see attached photo).
Debug menu
Spike game executables have a debug console menu built-in. (NB: I've only tested IMDN and BK3 but I'm pretty sure they all have it. BK3 had more options available, maybe because it was released a year later?)I'll share examples of the menu in the next post in this thread. Please share examples from other titles if you can!
By default the debug menu isn't wired to any console (tty), so it is effectively disabled.
To access it, we need to do 2 things:
- Get a serial port connected to spike CPU.
- Configure the game executable to be wired to this serial port.
Can i haz cereal?
The MPF documentation I linked above explains this in great detail, so I will summarise the 2 options here:- Manly soldering skillz: solder a 3-pin 0.1" header to CN2. Note that the GND pin will sink a *lot* of heat (even my 80W iron needed a while to get things flowing) -- you could also skip that pin and grab GND from one of the unconnected connectors.
- USB-to-serial device (aka "FTDI adapter") plugged into one of the USB host ports.
Whichever way you choose to go for, you'll need a(nother) USB-to-serial device to interact with the console port. Unless you hook it up to something like a ESP32's UART of course.
Configure the game's console port
For this you will need to edit a text file on the SD card. This isn't possible from a Windows PC. It might be possible from a Mac - I don't have one to try with. If you don't have a Linux PC with a memory card reader handy, create a bootable USB stick and boot from that to temporarily get a Linux computer without touching your existing hard drive. Some docs for that here or here.Once you've got this, navigate to the 352MB partition (it's the rootfs) and edit this file:
Code:
spk/packages/spike-2_0_18/etc/init.d/game_console/dev/ttymxc0 instead (this refers to CN2).If you went with option 2 above (USB-to-serial device), then make it
/dev/ttyUSB0 instead.Note the version number (2_0_18) may be different, and there may be other spk package versions present. Most likely you want the highest number. If in doubt just edit all the files!
As mentioned I went with option 1, so my file contents are now:
Code:
CONSOLE_LOG=/dev/ttymxc0
CONSOLE_INPUT=/dev/ttymxc0Usage
If you're using CN2 you will get the output from the bootloader (U-boot) and some OS startup messages.When the game boots, you will get a few warnings on the output (of course) and then nothing.
Press any letter then ENTER -- you should be greeted by the menu's help text. I'll put an example transcript in the next post.
What's it useful for?
This depends who you are. I can see 3 uses but I'm sure people will come up with more- You're a naff player like me. With this menu you can start any mode including the wizard modes which you'd otherwise never get to experience. They're usually the coolest ones too!!
- You're a mod maker. With this menu you can get some limited info out of the game (modes status), and also trigger sound effects or display animations (they're opaquely numbered though, so good luck finding the one you need).
- You're a technician. With this menu you can automate some of the diagnostics etc. Not sure it's really useful in this case tbh -- let me know if you do something cool here.
Attachments
Last edited:
")