The Shadow Playfield Repair
Introduction:
The Shadow is a great machine. It has some awesome toys, one of which is a magnetically influenced ball lock mechanism. The idea is that the ball will stop dead in its tracks as it enters the ball lock lane. It will then drop an inch towards the player, then suddenly shoot away from the player into the physical ball lock assembly. It creates a very impressive effect, looking as if there is NOTHING influencing the ball's movement.
The Problem:
Unfortunately, this mechanism is not without it's technical problems. The most major of which is playfield wear. The force of the ball stopping dead in its tracks, then moving down the playfield, and back up into the lock with nothing but gravity and a magnet influencing it causes the ball to rub against the playfield surface. Unfortunately, Williams and most operators that ran these games on route did not realize this problem before it was too late. This problem could have been avoided by adding a piece of mylar over the magnet area before any signs of playfield wear, keeping the machine clean, and frequently replacing the balls in the machine. The magnet effect is so timing dependent that any imperfections in the playfield that are caused by this rubbing action will throw off the whole routine.
If you are like most of The Shadow collector/owners, your machine has some ball lock problems. Typical symptoms of playfield wear are frequent droppage of a to-be-locked ball, or in some extreme cases, the ball will stop, and stay there until you shake the machine or manually remove it.
On to the repair. Please note, that wood putty/filler is NOT SUBSTANTIAL enough to perform this repair. It WILL wear away or compress in very fast succession. For best results, please use the recommended products when repairing your playfield. By the way, you did read the disclaimer, right?
What You Will Need:
Bondo Body Repair Kit ($5.00 at Wal*Mart)
* TiteBond II Premium Wood Glue ($4.00? at Wal*Mart)
Gray Testors Enamel Model Paint - Color Number 1138 ($1.00 at Wal*Mart)
White Testors Enamel Model Paint - Color Number 1145 ($1.00 at Wal*Mart)
A Small Paintbrush (I bought the Testors one for $1.00 at Wal*Mart)
* Another Small Paintbrush (This one can be REAL CHEAP, we're using it for glue)
A Vacuum Cleaner
Screwdriver/Nutdriver (For Magnet Removal)
A Small Metal File (optional, but helped tremendously)
A Plastic CD Jewel Case (to mix Bondo and paint on)
A Piece of Mylar (to protect the area after the repair)
220 Grit (Fine) Sandpaper
Patience (The Most Important Ingredient)
You may not need the items marked with * above. If your playfield is cracked through, or there is any under-playfield splintering (see below), you will need these items.
The Procedure:
You will first want to clean the affected playfield area of any debris or previous attempts at repair. You will want to have the divot cleaned and sanded in preparation for the repair materials. Vacuum any debris, and clean area with a slightly-damp paper towel (or tack-cloth) to remove sanding dust.
Remove the magnet assembly from the bottom side of the playfield (under the ball lock). Two Molex plugs, and three hex-screws, and it should come out. Once the magnet is removed, carefully inspect the under-side of the playfield for signs of splintering/cracking in the wood. My machine had a hairline crack, and some subsequent splintering near the crack. This will have to be repaired before continuing with any other repairs. You need a solid foundation to work off of with the Bondo that we will be using later.
My Shadow machine had endured a previous (and failed) attempt at repair from a previous owner. After cleaning out the divot on the top-side of the playfield, I began to consider patches for the splintering and crack that had developed for whatever reason. The crack was through the playfield (which is quite thin in the magnet area), and the splintering was bad enough that I wanted to repair it. I decided on TiteBond II wood glue. I've used this stuff before, with wonderful results, on all sorts of repairs. It's very good, but some people say Liquid Nails is better. I've never used Liquid Nails, so TiteBond II was my choice just due to previous experience. I needed a way to apply the glue while holding the splintering and cracked area in place. I decided to use a small piece of paper as a bonding agent. I applied the TiteBond II glue to the bottom of the playfield with my cheap paintbrush, making sure to fill in the cracked area and all of the splintered areas. You will also want to apply glue to one side of the piece of paper. Apply the glue-side of the paper to the underside of the playfield over top of the cracked/splintered area. Make sure the corners of the paper are securely glued, then glue the whole area, including the whole piece of paper, the edges of the paper, and a bit off of the paper. (See picture at right.) Leave this dry thoroughly (at least one hour) before continuing.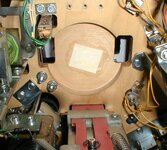
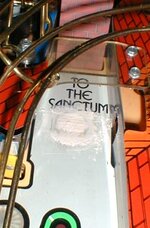 Once the glue on the underside of the playfield is dry, you can safely continue working on the top-side of the playfield. First, you will want to mix the Bondo body filler according to the instructions on the can. I used the front half of a CD jewel case to mix the Bondo, it worked perfectly, and was disposable (no clean-up). Once the Bondo is mixed, you will need to work quickly, as the Bondo will begin to set within 5 minutes. You will basically want to fill the hole in the top of the playfield, leaving a bit of excess Bondo so you can later sand down to the playfield level. If you don't overfill the hole, you won't have the liberty of sanding as much. Trust me, too much is better than not enough. You really want to have some excess Bondo, so you don't risk creating a divot from sanding. Let the Bondo cure for at least 30 minutes before sanding. After drying, it should look similar to the picture to the left.
Like I said, don't worry about the rough edges and unsmooth areas created by the excess Bondo. We will be fixing that in this step. Use your file and sandpaper to clean up the excess Bondo. It should come off of the Diamondplated playfield areas quite easily. Be very careful when sanding and filing, so you do not go too far outside the Bondo'ed area. If you scratch the playfield when sanding and filing it's not that big of a deal because we will be painting this whole area afterwards, anyway. Any slight scratching/damage to the surrounding playfield will be covered by the paint. You want to be sure and not sand any one area too much, as our object here is to create a perfectly smooth area. ANY imperfections will basically defeat the purpose of what we are doing. Use your vacuum cleaner to clean the area. You don't want debris and dust all over the insides of your machine, so be careful to get all of it with the vacuum. Once you get the Bondo area sanded down, and level with the surrounding playfield area, clean the sanded area with a wet paper towel, or some tack cloth. Once complete, it will look like the picture to the right.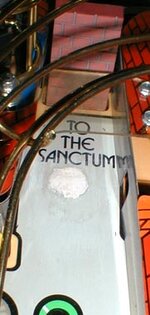
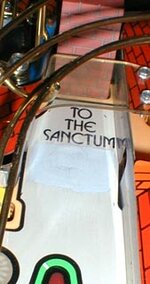 At this point, you will want to get a good match for the gray paint on the playfield. I used a slight amount of the white and a slight amount of the grey on the other half of my CD jewel case. Put the paint in separate areas on your "pallete". Use the (good) brush to grab a bit of the gray and mix it with the white (on an edge of the white "puddle"). Eye up the colors (the CD case is clear, so it makes this easy). Be very careful to NOT drip ANY paint on the playfield. If you accidentally do, immediately clean it up (a wet paper towel, and a dry cotton cloth should do the trick). Once you get a solid match for the color, begin painting the patched area. You will probably want to paint out to the metal guides on either side, and from the bottom of the word Sanctum to about half-way to the top of the arrow light insert. Let the paint dry until it is no longer tacky. The bottle claimed a one hour dry time, but it was really far longer than this until it was dry to the touch. A picture after painting is shown to the left. Unfortunately, my digital camera is a bit more sensitive to color than the human eye, so the differences in my color matching stand out very obviously. It is very close in color when viewing it in "real life".
While the paint is drying, you might want to slightly modify the magnet assembly. On mine, the magnet was not coming in complete contact with the bottom side of the playfield. I figured that the more solid the contact, the more support the playfield would have, and the less vibration would occur throughout the assembly. This was cured by loosening the lock nut on the bottom of the magnet's center shaft, and turning the center shaft until more of it was peeking above the height of the magnet coil. Retighten the lock nut, and you should be good-to-go. A picture of my magnet after the adjustment appears below.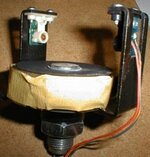
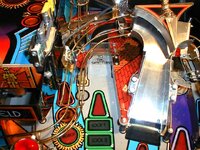
The next step is to cut a piece of Mylar to cover the entire area. The mylar should cover the entire area, from the bottom of the drop target, out to each side of the lane (to the metal guides), and down to the tip of the arrow light insert. Cut the Mylar too large to begin with, and with the backing still on it, continue trimming it until you get the perfect dry-fit. Remove the backing, exposing the adhesive, and carefully place the Mylar. Be sure to move slowly, you do NOT want any air bubbles in the Mylar. Once done, the area repair is complete. See the picture below for the final result.
Congratulations! Your Shadow machine's magnet lock should be ready for some really solid playing action!
Introduction:
The Shadow is a great machine. It has some awesome toys, one of which is a magnetically influenced ball lock mechanism. The idea is that the ball will stop dead in its tracks as it enters the ball lock lane. It will then drop an inch towards the player, then suddenly shoot away from the player into the physical ball lock assembly. It creates a very impressive effect, looking as if there is NOTHING influencing the ball's movement.
The Problem:
Unfortunately, this mechanism is not without it's technical problems. The most major of which is playfield wear. The force of the ball stopping dead in its tracks, then moving down the playfield, and back up into the lock with nothing but gravity and a magnet influencing it causes the ball to rub against the playfield surface. Unfortunately, Williams and most operators that ran these games on route did not realize this problem before it was too late. This problem could have been avoided by adding a piece of mylar over the magnet area before any signs of playfield wear, keeping the machine clean, and frequently replacing the balls in the machine. The magnet effect is so timing dependent that any imperfections in the playfield that are caused by this rubbing action will throw off the whole routine.
If you are like most of The Shadow collector/owners, your machine has some ball lock problems. Typical symptoms of playfield wear are frequent droppage of a to-be-locked ball, or in some extreme cases, the ball will stop, and stay there until you shake the machine or manually remove it.
On to the repair. Please note, that wood putty/filler is NOT SUBSTANTIAL enough to perform this repair. It WILL wear away or compress in very fast succession. For best results, please use the recommended products when repairing your playfield. By the way, you did read the disclaimer, right?
What You Will Need:
Bondo Body Repair Kit ($5.00 at Wal*Mart)
* TiteBond II Premium Wood Glue ($4.00? at Wal*Mart)
Gray Testors Enamel Model Paint - Color Number 1138 ($1.00 at Wal*Mart)
White Testors Enamel Model Paint - Color Number 1145 ($1.00 at Wal*Mart)
A Small Paintbrush (I bought the Testors one for $1.00 at Wal*Mart)
* Another Small Paintbrush (This one can be REAL CHEAP, we're using it for glue)
A Vacuum Cleaner
Screwdriver/Nutdriver (For Magnet Removal)
A Small Metal File (optional, but helped tremendously)
A Plastic CD Jewel Case (to mix Bondo and paint on)
A Piece of Mylar (to protect the area after the repair)
220 Grit (Fine) Sandpaper
Patience (The Most Important Ingredient)
You may not need the items marked with * above. If your playfield is cracked through, or there is any under-playfield splintering (see below), you will need these items.
The Procedure:
You will first want to clean the affected playfield area of any debris or previous attempts at repair. You will want to have the divot cleaned and sanded in preparation for the repair materials. Vacuum any debris, and clean area with a slightly-damp paper towel (or tack-cloth) to remove sanding dust.
Remove the magnet assembly from the bottom side of the playfield (under the ball lock). Two Molex plugs, and three hex-screws, and it should come out. Once the magnet is removed, carefully inspect the under-side of the playfield for signs of splintering/cracking in the wood. My machine had a hairline crack, and some subsequent splintering near the crack. This will have to be repaired before continuing with any other repairs. You need a solid foundation to work off of with the Bondo that we will be using later.
My Shadow machine had endured a previous (and failed) attempt at repair from a previous owner. After cleaning out the divot on the top-side of the playfield, I began to consider patches for the splintering and crack that had developed for whatever reason. The crack was through the playfield (which is quite thin in the magnet area), and the splintering was bad enough that I wanted to repair it. I decided on TiteBond II wood glue. I've used this stuff before, with wonderful results, on all sorts of repairs. It's very good, but some people say Liquid Nails is better. I've never used Liquid Nails, so TiteBond II was my choice just due to previous experience. I needed a way to apply the glue while holding the splintering and cracked area in place. I decided to use a small piece of paper as a bonding agent. I applied the TiteBond II glue to the bottom of the playfield with my cheap paintbrush, making sure to fill in the cracked area and all of the splintered areas. You will also want to apply glue to one side of the piece of paper. Apply the glue-side of the paper to the underside of the playfield over top of the cracked/splintered area. Make sure the corners of the paper are securely glued, then glue the whole area, including the whole piece of paper, the edges of the paper, and a bit off of the paper. (See picture at right.) Leave this dry thoroughly (at least one hour) before continuing.

 Once the glue on the underside of the playfield is dry, you can safely continue working on the top-side of the playfield. First, you will want to mix the Bondo body filler according to the instructions on the can. I used the front half of a CD jewel case to mix the Bondo, it worked perfectly, and was disposable (no clean-up). Once the Bondo is mixed, you will need to work quickly, as the Bondo will begin to set within 5 minutes. You will basically want to fill the hole in the top of the playfield, leaving a bit of excess Bondo so you can later sand down to the playfield level. If you don't overfill the hole, you won't have the liberty of sanding as much. Trust me, too much is better than not enough. You really want to have some excess Bondo, so you don't risk creating a divot from sanding. Let the Bondo cure for at least 30 minutes before sanding. After drying, it should look similar to the picture to the left.
 Like I said, don't worry about the rough edges and unsmooth areas created by the excess Bondo. We will be fixing that in this step. Use your file and sandpaper to clean up the excess Bondo. It should come off of the Diamondplated playfield areas quite easily. Be very careful when sanding and filing, so you do not go too far outside the Bondo'ed area. If you scratch the playfield when sanding and filing it's not that big of a deal because we will be painting this whole area afterwards, anyway. Any slight scratching/damage to the surrounding playfield will be covered by the paint. You want to be sure and not sand any one area too much, as our object here is to create a perfectly smooth area. ANY imperfections will basically defeat the purpose of what we are doing. Use your vacuum cleaner to clean the area. You don't want debris and dust all over the insides of your machine, so be careful to get all of it with the vacuum. Once you get the Bondo area sanded down, and level with the surrounding playfield area, clean the sanded area with a wet paper towel, or some tack cloth. Once complete, it will look like the picture to the right.

 At this point, you will want to get a good match for the gray paint on the playfield. I used a slight amount of the white and a slight amount of the grey on the other half of my CD jewel case. Put the paint in separate areas on your "pallete". Use the (good) brush to grab a bit of the gray and mix it with the white (on an edge of the white "puddle"). Eye up the colors (the CD case is clear, so it makes this easy). Be very careful to NOT drip ANY paint on the playfield. If you accidentally do, immediately clean it up (a wet paper towel, and a dry cotton cloth should do the trick). Once you get a solid match for the color, begin painting the patched area. You will probably want to paint out to the metal guides on either side, and from the bottom of the word Sanctum to about half-way to the top of the arrow light insert. Let the paint dry until it is no longer tacky. The bottle claimed a one hour dry time, but it was really far longer than this until it was dry to the touch. A picture after painting is shown to the left. Unfortunately, my digital camera is a bit more sensitive to color than the human eye, so the differences in my color matching stand out very obviously. It is very close in color when viewing it in "real life".
 While the paint is drying, you might want to slightly modify the magnet assembly. On mine, the magnet was not coming in complete contact with the bottom side of the playfield. I figured that the more solid the contact, the more support the playfield would have, and the less vibration would occur throughout the assembly. This was cured by loosening the lock nut on the bottom of the magnet's center shaft, and turning the center shaft until more of it was peeking above the height of the magnet coil. Retighten the lock nut, and you should be good-to-go. A picture of my magnet after the adjustment appears below.

The next step is to cut a piece of Mylar to cover the entire area. The mylar should cover the entire area, from the bottom of the drop target, out to each side of the lane (to the metal guides), and down to the tip of the arrow light insert. Cut the Mylar too large to begin with, and with the backing still on it, continue trimming it until you get the perfect dry-fit. Remove the backing, exposing the adhesive, and carefully place the Mylar. Be sure to move slowly, you do NOT want any air bubbles in the Mylar. Once done, the area repair is complete. See the picture below for the final result.

Congratulations! Your Shadow machine's magnet lock should be ready for some really solid playing action!
