What's new
Pinball info

Register a free account today to become a member! Once signed in, you'll be able to participate on this site by adding your own topics and posts, as well as connect with other members through your own private inbox!

In Progress Scared Stiff

DRD

Registered
Joined
Oct 26, 2014
Messages
5,434
Location
Newark
Bought this from @chris b as a garage player at a fair price. Good dmd. Everything worked. He also threw in some replacement parts - correct red globe to replace incorrect purple one. Better siderails to replace dented ones. Black pop wafers to replaced damaged ones

image.jpg

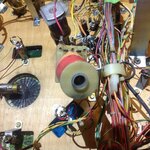
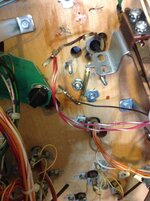
I pulled the mylar as in places it was three layers thick !

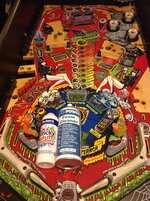
Been happily playing it for a few months, without significant work being done.

Usual story, faded to hell and drilled ...


image.jpg

image.jpg Traditional wear to the "terrifying" in front of the crate, iffy coloured crate decal ...

image.jpg

Damaged speaker panel - cracked on the outside, broken spigots and glued in bits on the inside. This now replaced with anew panel and upgraded @new forest pinball speakers and spacers. He has created fantastic spacers that allow use of the same sized speaker in each side ...

image.jpg

Now this, with much better midrange out of the backbox. I will install the woofer after i have rebuilt my cab....
image.jpg

The wpc95 plastic speaker panel is cheaper, flimsier and inferior to the earlier mdf ones. It must have been introduced as a cost saving measure

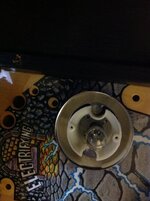
The coffin smacks the glass when fired open by the solenoid. The glass is scratched in 4 places because of this, indicating a fault for a very long time. Phil at heaven had seen this problem before and advised me that i needed to lower the mech slightly by putting shims between the bracket and the underside of the playfield, like with the addams family vault

image.jpg
Cab and head had seen some pretty rudimentary repairs and touch ups in the past ..

image.jpg

image.jpg image.jpg image.jpg image.jpg

Variety of spare parts bought over recent months.

Correct crate decals. Boogie men slingshot upgrade from usa to install the feature that was removed due to cost cutting. Skull pile leds and torches, again removed from final production due to cost cutting. Replacement claw globe holder. Plastic posts, rubber kit etc etc
image.jpg

First job is to decal the cab and head while 'er indoors away and the weather is good. I bought a decal set and used cab+head from manny so that I could just swap parts game to game rather than do the full tear down

image.jpg image.jpg

My makita orbital sander and 40 grit paper made light work of the decals. No heat gun used ...

image.jpg
 
Last edited:
Doh! I'm being such a pleb. I mistook this image as the main cabinet and not the backbox:

image-jpg.34265


And I'm like "Weird. What game is that?"
 
Looking good! Be great to see it looking super fresh with the new cabinet! As you know, I'll take ur old one lol

Dunc
 
I knew this game would be a pig, so I just kept putting it off. It worked, I liked playing it. Some scabs are better left unpicked.....

The auto ball shooter was loose, missing bolts. Stripped it. The riveted cylinder bearings were loose, so tightened them by squeezing in a vice.

This didn't fire the ball consistently so I straightened the kicker arm. Sorted, it passed my 20 out of 20 test. Try it 20 times, if no errors, it is done

image.jpeg

Ball trough filthy, but working. Stripped it, bit of a polish, took the opto boards out, cleaned with ipa.

image.jpeg

Rebuilt both flippers with full kits, including nos playfield bushes, though left the eos in as they were ok. Incorrect red coils on both. Correct blue coils fitted. New boney bats fitted plus superbands.
image.jpg

Stil a bit disappointed with the flippers. I used the same kits on my fish tales a few months back, the flippers on that game are superb. I wonder whether the boney bats are heavier, hence less responsive?

Stripped the slingshot mechs, inserted my us sourced boogiemen kit. Per the picture above, they move towards the centre of the pf. The manual indicated two different types of slingshot coils ! The weaker ones were installed reflecting that production games had this feature stripped out. Uprated more powerful coils were inserted with new sleeves. The new arrangement is vastly superior to the production game in terms of appearance, but again, like the boney flippers, I wonder whether the extra weight slows them down. New repro sling covers installed too, these needed the dremel to widen the gap in the middle a little.

The end result looks vastly superior, the original factory static boogieman left looking rather sad ...

image.jpg

I wanted to section by section refurb it like I did with Fish Tales. But the game was too filthy so I did a traditional topside teardown.
 

Attachments

  • image.jpeg
    image.jpeg
    165.8 KB · Views: 19
Last edited:
Looking forward to seeing this progress! Will be a very nice example when finished! Seemed to play nicely the other week as it was!

Dunc
 
Getting the coffin mech out is a pig of a job. The two ramps are intertwined, both have to be removed, it then has this strange metal bar on the LHS that you must remove before sliding the coffin out.

image.jpeg

The PF was the usual filth fest ...

image.jpeg


One of the worst jobs in pinball is the pop bumper strip. The poppers in this game "worked" but not at all properly. The top popper was getting stuck in the down position. The middle popper had a chunk missing out of the wafer as the vuk fires the ball directly at it.

image.jpeg

On stripping them, the coil sleeves were all paper thin. Two of the metal yokes were broken ...

image.jpeg

To get the wafer out you must desolder the underside of the PF, then remove the staples holding the lampholder's metal straps ...

image.jpeg

Then pull the lampholder through the top of the pf. Then remove the two screws holding the white plastic frame to the pf to get the whole lot out ...

image.jpeg

All cleaned, parts replaced as necessary, rings polished with Autosol and the Dremel.

image.jpeg

The upper one was still binding in the down position. On inspection the coil bracket was bent. It was a non-factory replacement part. So something had gone wrong here before. It may be catching on the playfield hinge mechanism. Anyway, with an adjustable spanner I straightened it ....

image.jpeg

There was still glue residue from the mylar I removed at the edges of the pf. Cleaning the pf required foam cleaner and also this sticky residue remover ...

image.jpeg

This pic above also shows how well these diamond plate games clean up. They are vastly superior playfields to those used on earlier games like System 11 and Bally SS.

I installed the excellent skull eyes and flaming torch mods from www.pinballtoys.co.uk. These were stripped out of production games as a cost cutting measure, so there are just holes where the eyes and torches should be. But the associated wiring looms and connectors were still incorporated in the machines ...
image.jpeg

These mods really brighten up the skull pile and are a no-brainer purchase. The led eyes are synced with the game's modes - The Six Tales of Terror ...
image.jpeg

The top was fully stripped and the metal put into my tumbler. Been in for about 4 days now, and still getting shinier by the day. This is filled with the trademark @ronsplooter walnut with a squirt of solvol autosol mix. I put paper towels on top to keep the dust in
image.jpeg

Normally I smooth the wood then fill. This time I have applied the filler to the rough sanded head, immediately after the decals have been sanded off. If this turns out a better way, I will do the same with the cab.
image.jpeg

Some minor delamination, so I inserted PVA glue and clamped it overnight
 

Attachments

  • image.jpeg
    image.jpeg
    89.6 KB · Views: 10
  • image.jpeg
    image.jpeg
    102.8 KB · Views: 11
  • image.jpg
    image.jpg
    116.1 KB · Views: 13
Last edited:
Some good news, the subway was undamaged and not too filthy ..
image.jpeg
Other below pf mechs needed rather more work ...
image.jpeg

The dremel, solvol autosol, ipa and a fibreglass pencil did the job ...
image.jpeg

Similarly, the upkicker ...
image.jpeg

Then this scumfest ..
image.jpeg

image.jpeg

The crate was working very reliably but had clearly taken a real battering, the door revealed its secrets when I removed the decal. Looks like a previous welding job to repair it. Though this was actually well done and I had no idea this was present
image.jpeg

image.jpeg
 
In summary ..... do not renovate Scared Stiff. It is a hateful game to work on. Three steps forward, two steps back. Buy one that is fixed up. If you need to replace ramps, or remove them to get to stuff, just burn the damned thing

Every other game I have worked on has immediately been faster, sharper, more responsive. The games reward you for renovating them. Scared Stiff just sucks the enthusiasm out of you.

Mine is all back together, all nice and shiny. New plastic set. New rubbers. New spotlight assembly for the coffin. Correct red flasher globes.

image.jpeg

But now I have play tested it, I need to remove the ramps to undo or modify a number of the "improvements" I had undertaken.

The repro metal crate is at least a huge improvement on the broken black plastic one that mine had. Here it is adorned with new pinball heaven decals which look miles better than the damaged, discoloured components originally on my game ....

image.jpeg

I replaced the Bat Ramp with a new one. As ever, I needed to countersink the two holes that accept the small philips screws at the entrance. But ...

1. The new ramp caused air balls. So I replaced the "correct" flipper coils I had installed (which did seem over powered) and put the weaker flipper coils that came with the game back in. I needed to adjust the EOS switches too, but all ok now.

2. The ramp has not been properly manufactured, so the leapers get caught on it. I now need to remove the ramp to cut the horizontal lip off the lower edge so it better matches the original ...

image.jpeg

the expensive boogiemen slingshots (with uprated coils and new slingshot covers) ...
image.jpeg

These look the part and return a prototype feature removed from production but have slowed the game down. They are lethargic, heavy. They just feel wrong, sound wrong and are clunky. Like installing early 80s Bally linear slingshots ....

I will get a second opinion from another pinhead, see what someone else thinks about it, but I may well remove the damned things as I like my games to be very responsive.

The correct (fully rebuilt and with NOS bushes) boney flippers also feel lethargic due to their extra weight?. My shadow sits next to my scared stiff and has much more responsive slings and flippers

My crate very occasionally did not close fast enough, exposing its locking pin. So I tightened the tired looking spring. Now it occasionally traps balls in the half open crate !!! Yet another mech to dismantle

I inserted Addams Family Vault spacers under the pf, between he pf and cofin mech to slghtly lower it. At least this actually worked! The coffin lid no longer strikes the playfield glass

There is something wrong with the extra ball shot now too, occasionally a ball gets snagged in here and does not make the shot. I think I need to adjust the stinless ball guides hidden beneath the two ramps and/ or the microswitch and/ or the ball gate.

image.jpeg
 

Attachments

  • image.jpeg
    image.jpeg
    175.3 KB · Views: 4
Back
Top Bottom